commit b10e930476d8bbe82f679f3ae8ed44cea733898f
Merge: a2c34aa 8531476
Author: Sammii <sammii.h@icloud.com>
Date:   Wed Apr 24 20:05:09 2024 +0100

    Merge pull request #1 from Sammii-HK/feat/restyle-store

    Feat/restyle store

commit 85314765721447f5612cb59b7e668653606e7b7b
Author: Samantha Kellow <sammii.h@icloud.com>
Date:   Wed Apr 24 20:03:12 2024 +0100

    responsive design app page carousel

commit d5563a7355c2581c29ebf3f11799e1047c0c29dd
Author: Samantha Kellow <sammii.h@icloud.com>
Date:   Wed Apr 24 19:57:47 2024 +0100

    updating mobile carousel tile size

commit 9976d0d427ea92dab510bface5da9a4e89feabee
Author: Samantha Kellow <sammii.h@icloud.com>
Date:   Wed Apr 24 19:30:07 2024 +0100

    updating combox import

commit f6a365df8239d26d5feb37cf53d43632ab7c90c4
Author: Samantha Kellow <sammii.h@icloud.com>
Date:   Wed Apr 24 19:16:08 2024 +0100

    styling label price

commit cf89e3b0648bb07ed038f872183bd7ecea064df0
Author: Samantha Kellow <sammii.h@icloud.com>
Date:   Wed Apr 24 19:08:16 2024 +0100

    styling accordians and drop downs

commit 49f3776ba8894d5fd2aa6b2fea0632f73d6ae093
Author: Samantha Kellow <sammii.h@icloud.com>
Date:   Wed Apr 24 18:53:14 2024 +0100

    updating search and carousel styling

commit 7666a25f918a1b53a088dd9240077af5b9013712
Author: Samantha Kellow <sammii.h@icloud.com>
Date:   Wed Apr 24 18:37:29 2024 +0100

    styling product description

commit b8280101ad367abfe48aed4fee8ef32ed1fd5d67
Author: Samantha Kellow <sammii.h@icloud.com>
Date:   Wed Apr 24 18:18:11 2024 +0100

    removing `-full` from all rounded elements

commit 77480edd79327898aa2c417d34d231db1d593736
Author: Samantha Kellow <sammii.h@icloud.com>
Date:   Wed Apr 24 18:15:27 2024 +0100

    styling cart component

commit 3ec0c4d5679b20c66442e5002225cbefe927a13e
Author: Samantha Kellow <sammii.h@icloud.com>
Date:   Wed Apr 24 18:06:53 2024 +0100

    updating styling

commit efcab218934934edea629406b823fd2b2ac3d193
Author: Samantha Kellow <sammii.h@icloud.com>
Date:   Wed Apr 24 18:06:43 2024 +0100

    updating carousel for correct types

commit b14934af8489a6294f1c47a3a41d40d0a7565550
Author: Samantha Kellow <sammii.h@icloud.com>
Date:   Wed Apr 24 17:57:31 2024 +0100

    styling tile

commit 0c72e76bad994317d5e39faedfc4aade9a368fe7
Author: Samantha Kellow <sammii.h@icloud.com>
Date:   Wed Apr 24 17:56:50 2024 +0100

    styling label

commit ca24a30543ddfbdd345ac405b14e0541a9af1020
Author: Samantha Kellow <sammii.h@icloud.com>
Date:   Wed Apr 24 17:54:54 2024 +0100

    update main app layout for dark view

commit 57c1c4cac9a15c2091f652f53f7bb85a6a5b613a
Author: Samantha Kellow <sammii.h@icloud.com>
Date:   Wed Apr 24 17:52:53 2024 +0100

    commenting out weight li on description content

commit d2f0ac2041b04117e24db0316b470646489aca07
Author: Samantha Kellow <sammii.h@icloud.com>
Date:   Wed Apr 24 17:52:02 2024 +0100

    updating carousel to new style

commit 545717006d7f25f36e71b67873d01316aeeafcf9
Author: Samantha Kellow <sammii.h@icloud.com>
Date:   Wed Apr 24 17:50:55 2024 +0100

    updating getAllLiveProducts to handle no param

commit 0bf97ecdf69b4f7a4aa00c090e09e613fa1aba8a
Author: Samantha Kellow <sammii.h@icloud.com>
Date:   Wed Apr 24 17:50:39 2024 +0100

    styling and adjusting footer & navbar

commit 18200b4e848affe01ca9014bdf8ac841ce176114
Author: Samantha Kellow <sammii.h@icloud.com>
Date:   Wed Apr 24 17:50:00 2024 +0100

    updating cart to bag

commit 82c30cdda8d38b3111b539a34127155bb82612d5
Author: Samantha Kellow <sammii.h@icloud.com>
Date:   Wed Apr 24 17:48:32 2024 +0100

    SKUs page file check

commit e88a45b9d51096b3250062708d5ef1a49138258c
Author: Samantha Kellow <sammii.h@icloud.com>
Date:   Wed Apr 24 17:47:30 2024 +0100

    updatibng Prose import path

commit 5e81519f983e58758d865b2905f279f34afb67a4
Author: Samantha Kellow <sammii.h@icloud.com>
Date:   Wed Apr 24 17:45:58 2024 +0100

    updating app page metadata

commit 9c9a5c035b245d8811a601ba2dd134c5c5f124d7
Author: Samantha Kellow <sammii.h@icloud.com>
Date:   Tue Apr 23 21:25:05 2024 +0100

    making borders muted

commit 8a40e08e41a7fdad172e5ffaebb7f791ec66f4e5
Author: Samantha Kellow <sammii.h@icloud.com>
Date:   Tue Apr 23 20:37:35 2024 +0100

    moving ui components to own folder 🧹

Next.js Commerce
A Next.js 13 and App Router-ready ecommerce template featuring:
- Next.js App Router
- Optimized for SEO using Next.js's Metadata
- React Server Components (RSCs) and Suspense
- Server Actions for mutations
- Edge Runtime
- New fetching and caching paradigms
- Dynamic OG images
- Styling with Tailwind CSS
- Checkout and payments with Shopify
- Automatic light/dark mode based on system settings
Note: Looking for Next.js Commerce v1? View the code, demo, and release notes
Providers
Vercel will only be actively maintaining a Shopify version as outlined in our vision and strategy for Next.js Commerce.
Vercel is more than happy to partner and work with any commerce provider to help them get a similar template up and running and listed below. Alternative providers should be able to fork this repository and swap out the lib/shopify file with their own implementation while leaving the rest of the template mostly unchanged.
Running locally
You will need to use the environment variables defined in .env.example to run Next.js Commerce. It's recommended you use Vercel Environment Variables for this, but a .env file is all that is necessary.
Note: You should not commit your
.envfile or it will expose secrets that will allow others to control your Shopify store.
- Install Vercel CLI:
npm i -g vercel - Link local instance with Vercel and GitHub accounts (creates
.verceldirectory):vercel link - Download your environment variables:
vercel env pull
pnpm install
pnpm dev
Your app should now be running on localhost:3000.
Expand if you work at Vercel and want to run locally and / or contribute
- Run
vc link. - Select the
Vercel Solutionsscope. - Connect to the existing
commerce-shopifyproject. - Run
vc env pullto get environment variables. - Run
pmpm devto ensure everything is working correctly.
How to configure your Shopify store for Next.js Commerce
Next.js Commerce requires a paid Shopify plan.
Note: Next.js Commerce will not work with a Shopify Starter plan as it does not allow installation of custom themes, which is required to run as a headless storefront.
Add Shopify domain to an environment variable
Create a SHOPIFY_STORE_DOMAIN environment variable and use your Shopify domain as the the value (ie. [your-shopify-store-subdomain].myshopify.com).
Note: Do not include the
https://.
Accessing the Shopify Storefront API
Next.js Commerce utilizes Shopify's Storefront API to create unique customer experiences. The API offers a full range of commerce options making it possible for customers to control products, collections, menus, pages, cart, checkout, and more.
In order to use the Shopify's Storefront API, you need to install the Headless app in your Shopify store.
Once installed, you'll need to create a SHOPIFY_STOREFRONT_ACCESS_TOKEN environment variable and use the public access token as the value.
Note: Shopify does offer a Node.js Storefront API SDK. We use the Storefront API via GraphQL directly instead of the Node.js SDK so we have more control over fetching and caching.
Expand to view detailed walkthrough
- Navigate to
https://[your-shopify-store-subdomain].myshopify.com/admin/settings/apps. - Click the green
Shopify App Storebutton.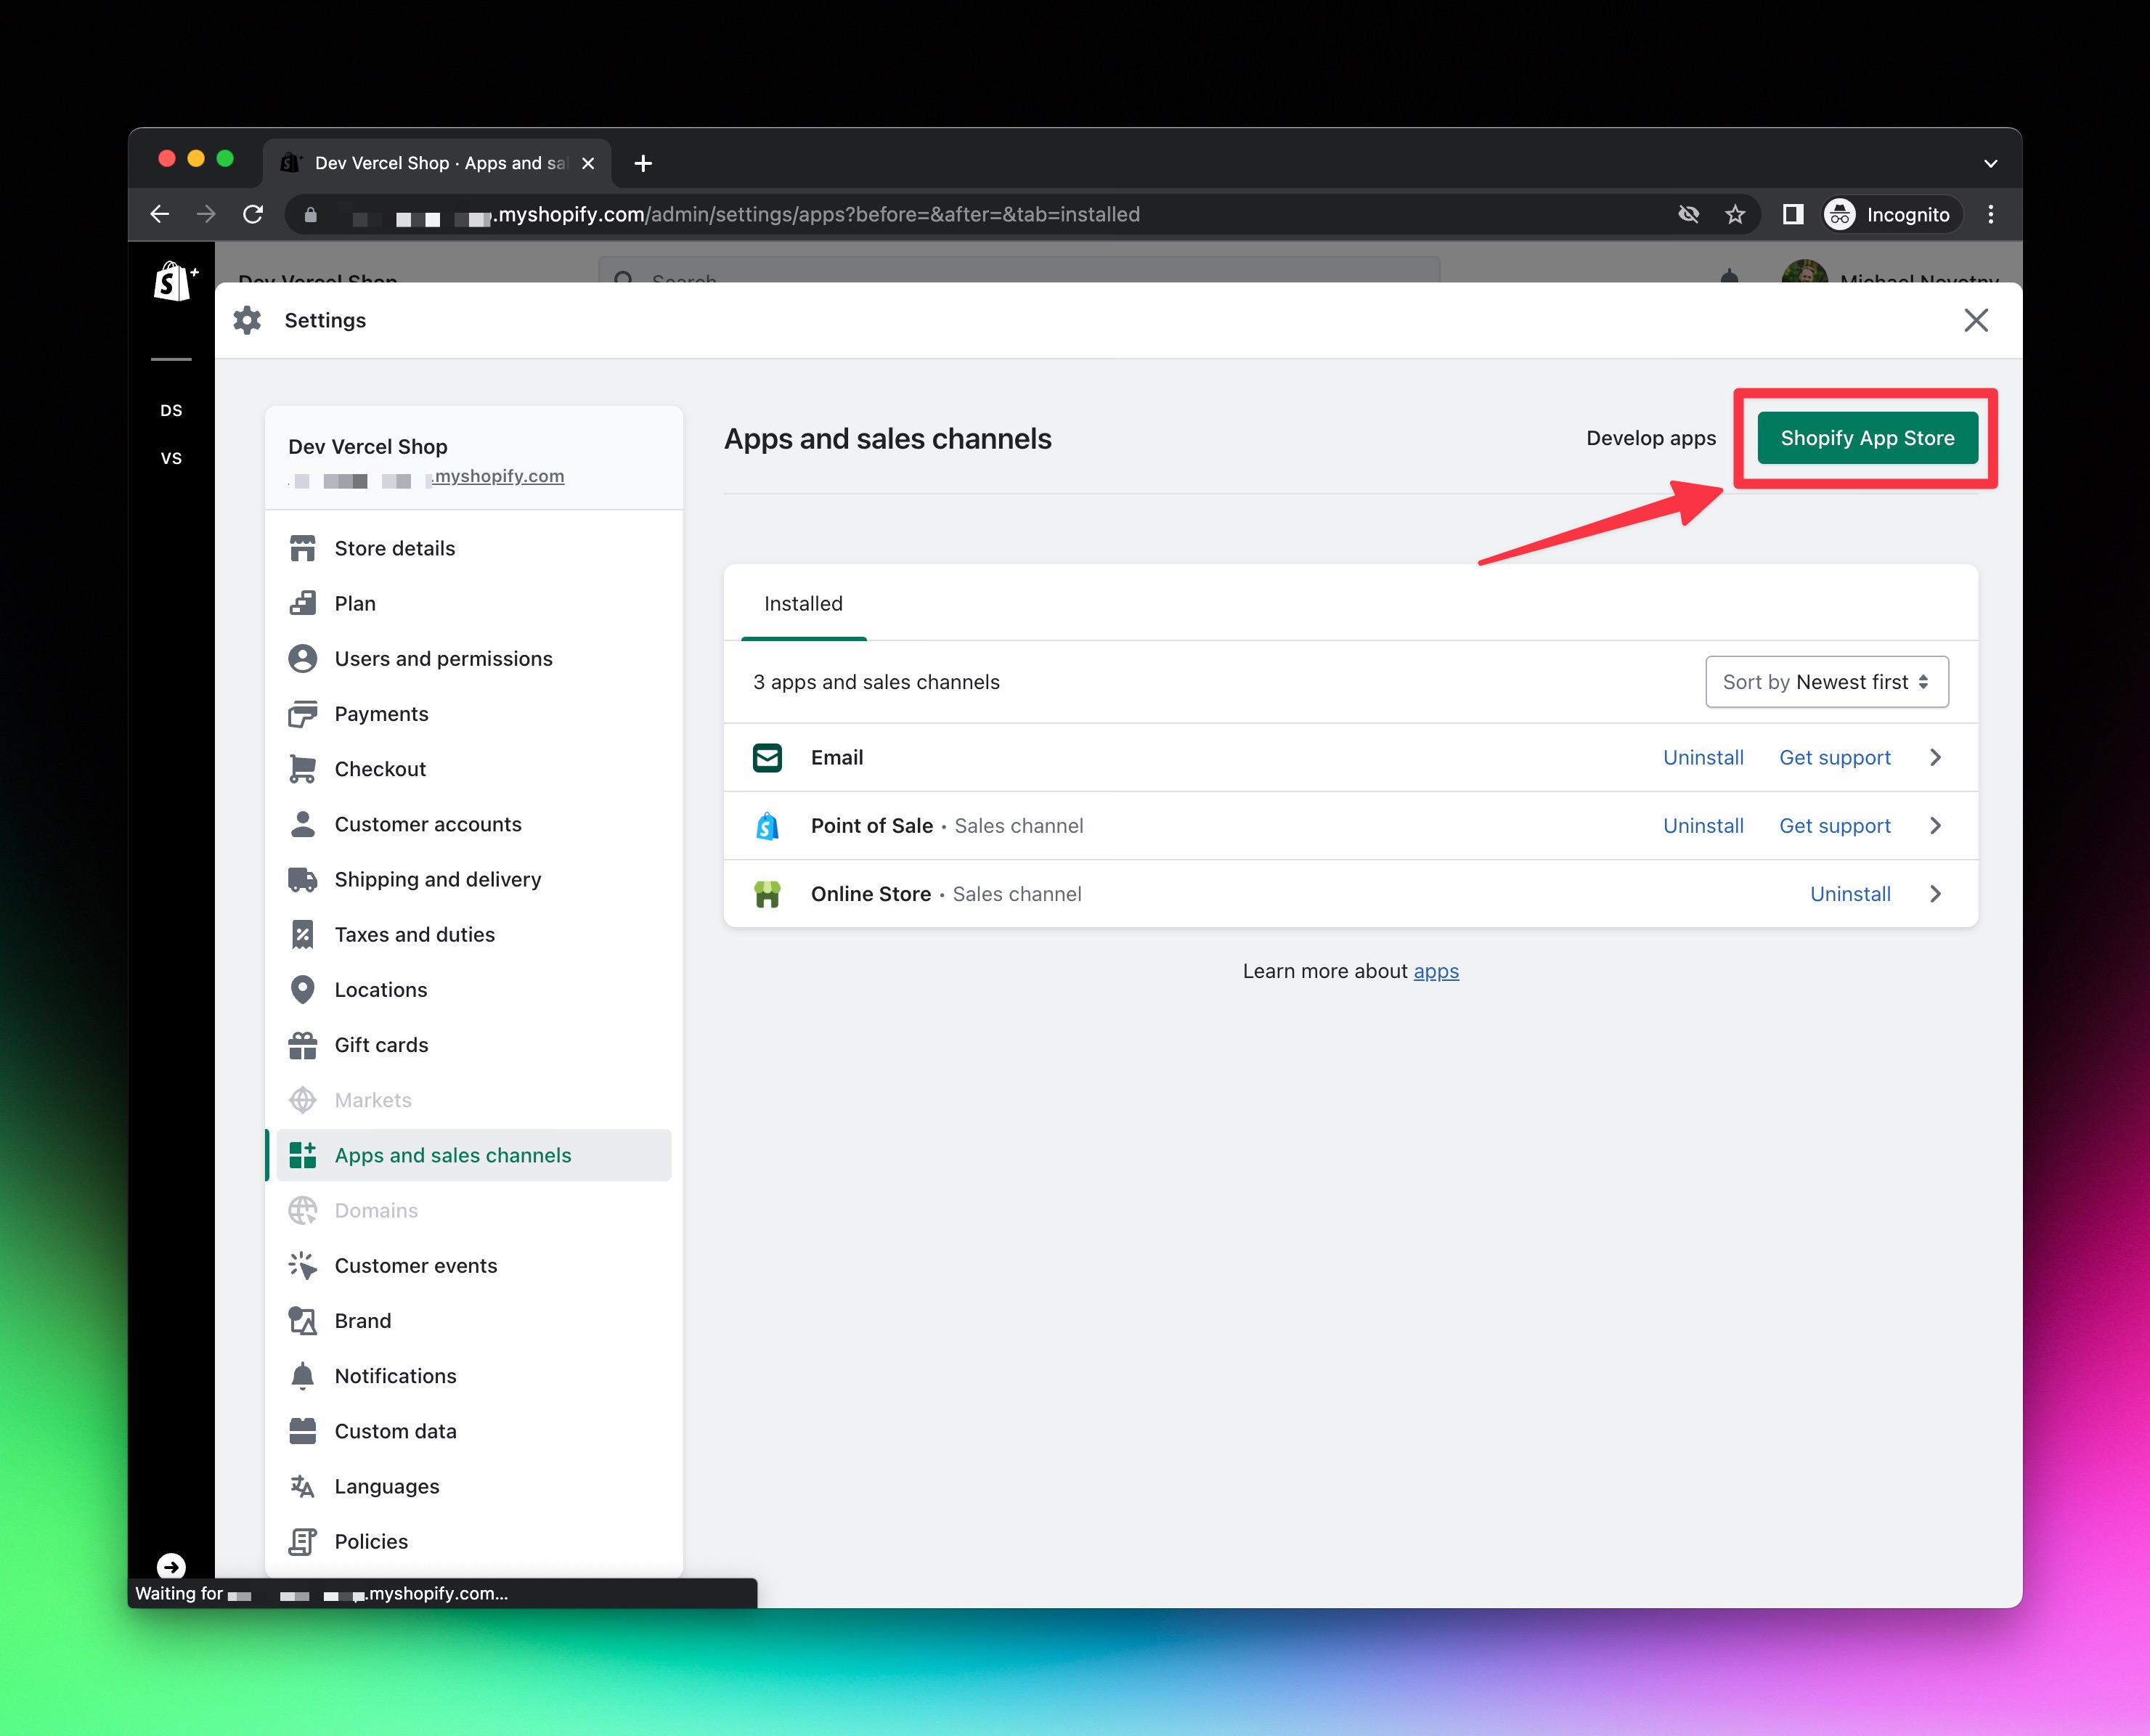
- Search for
Headlessand click on theHeadlessapp.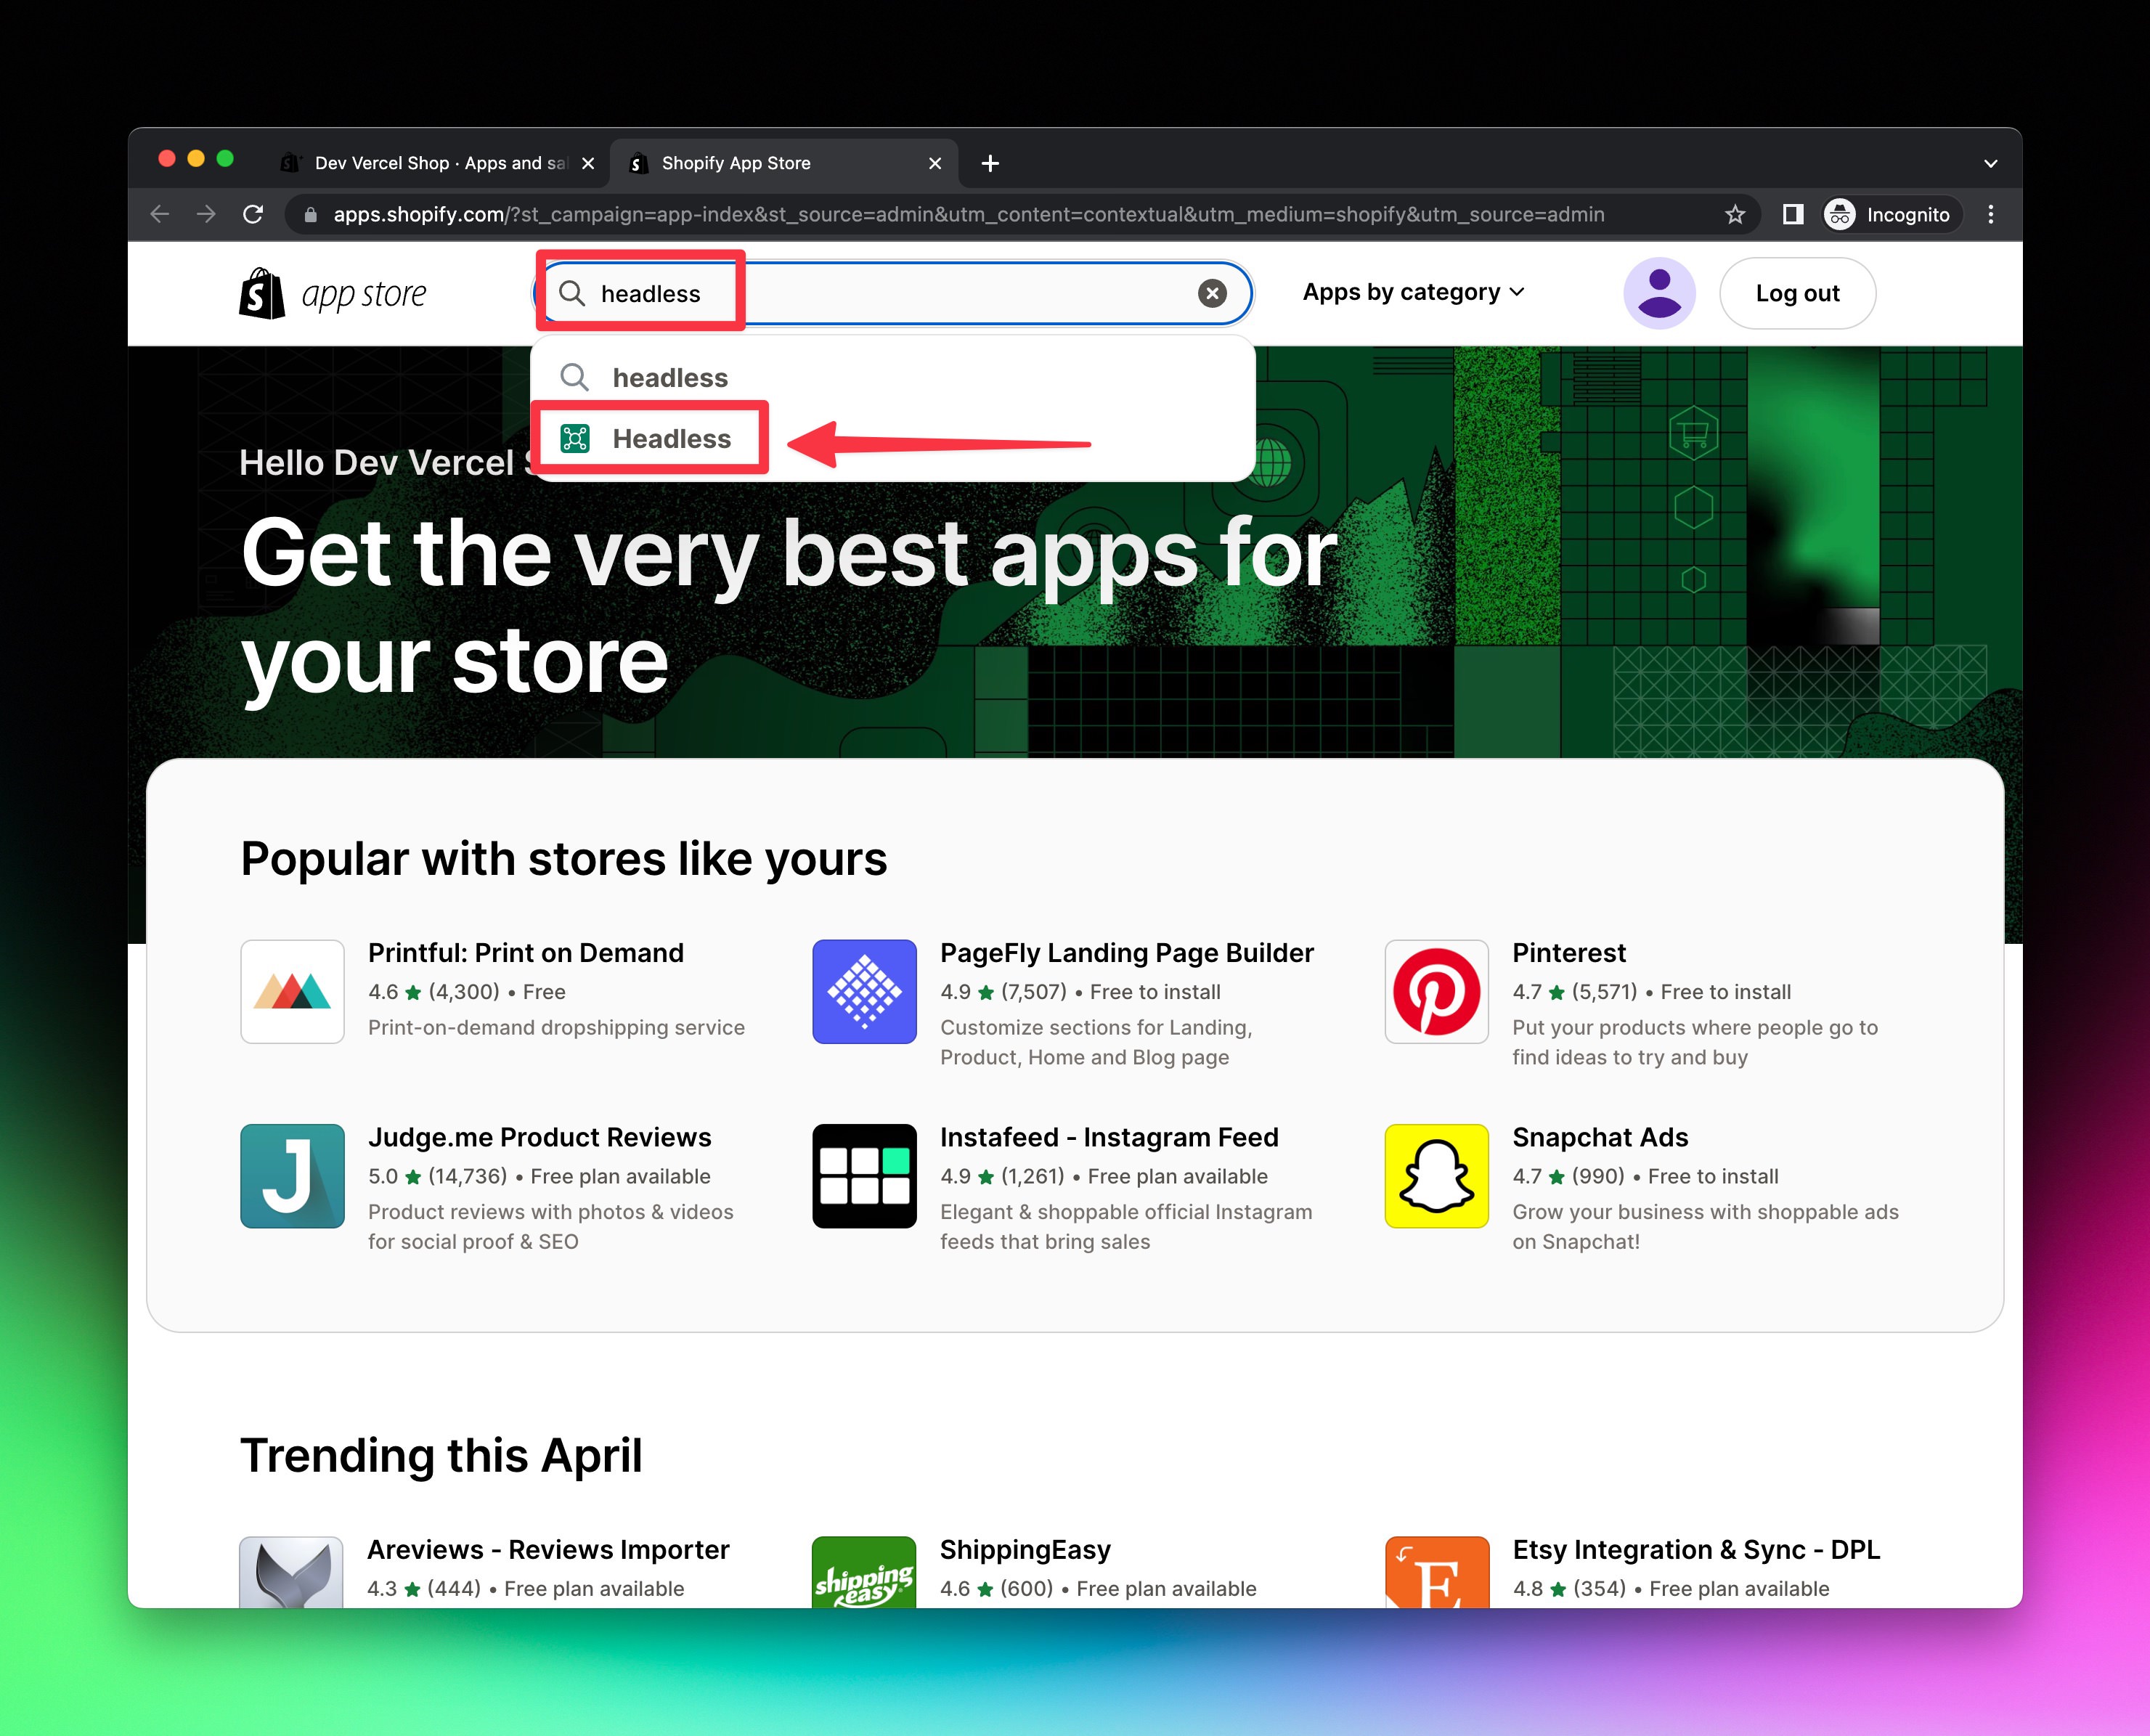
- Click the black
Add appbutton.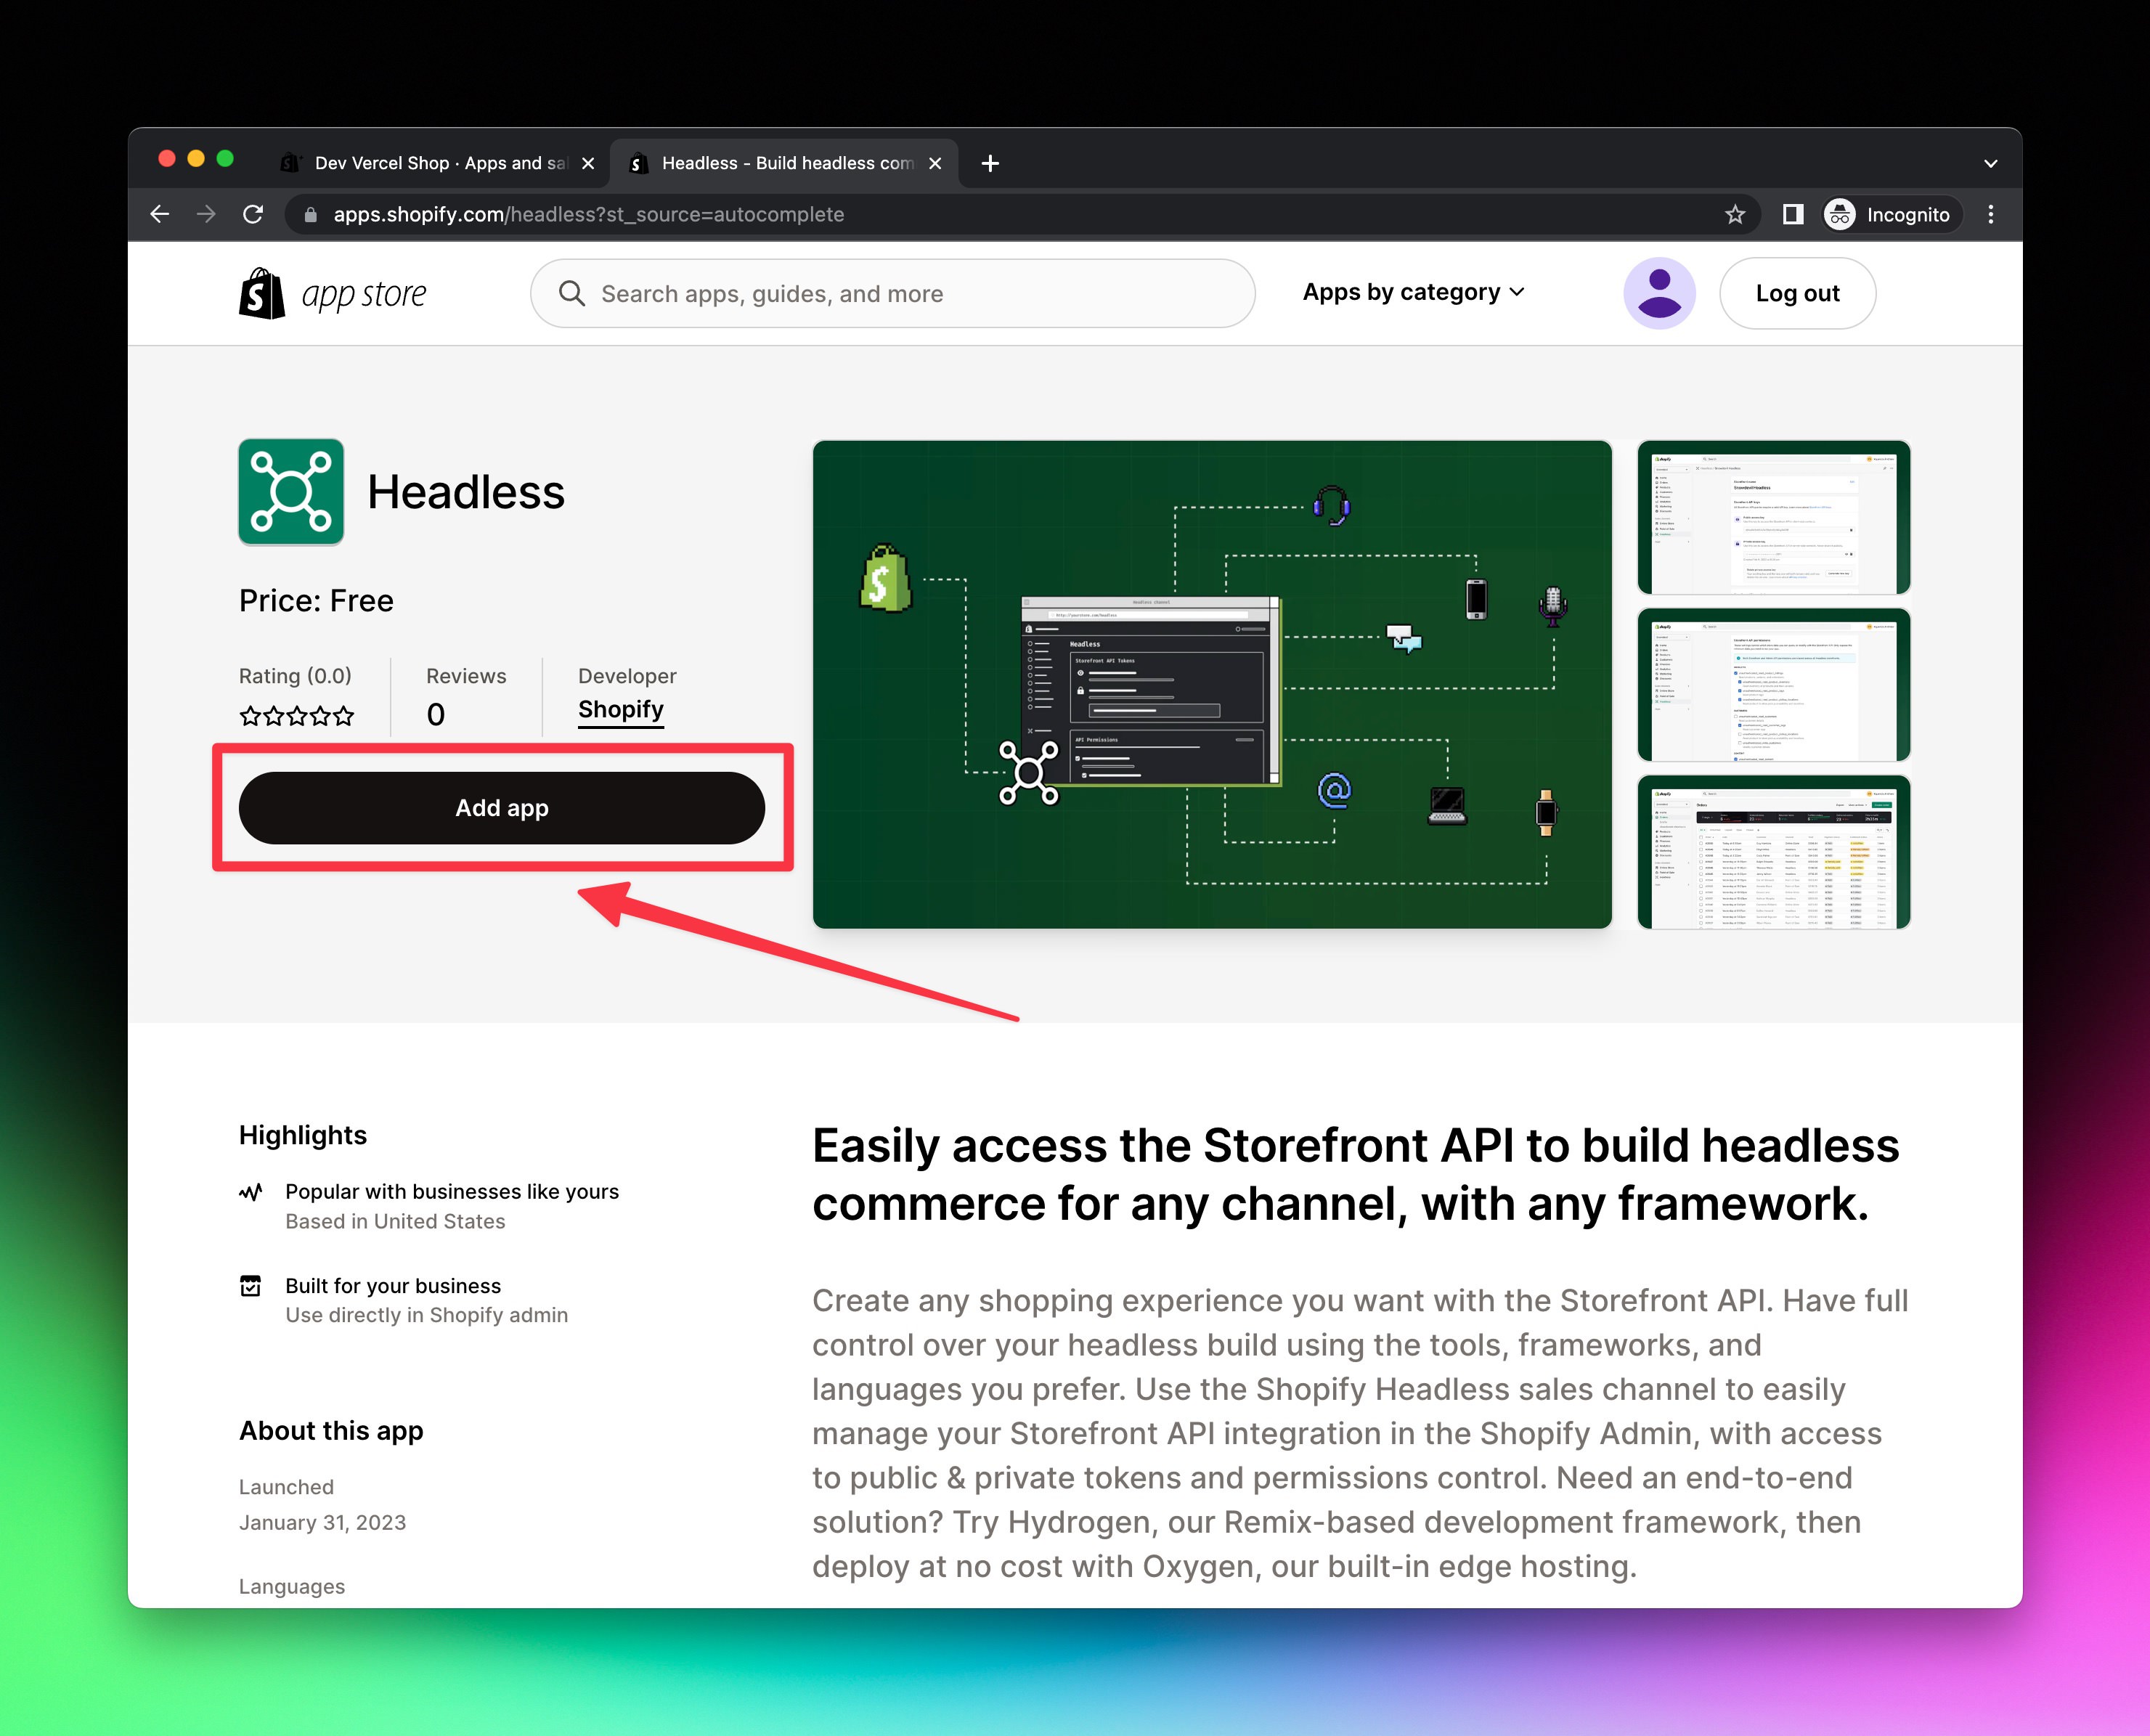
- Click the green
Add sales channelbutton.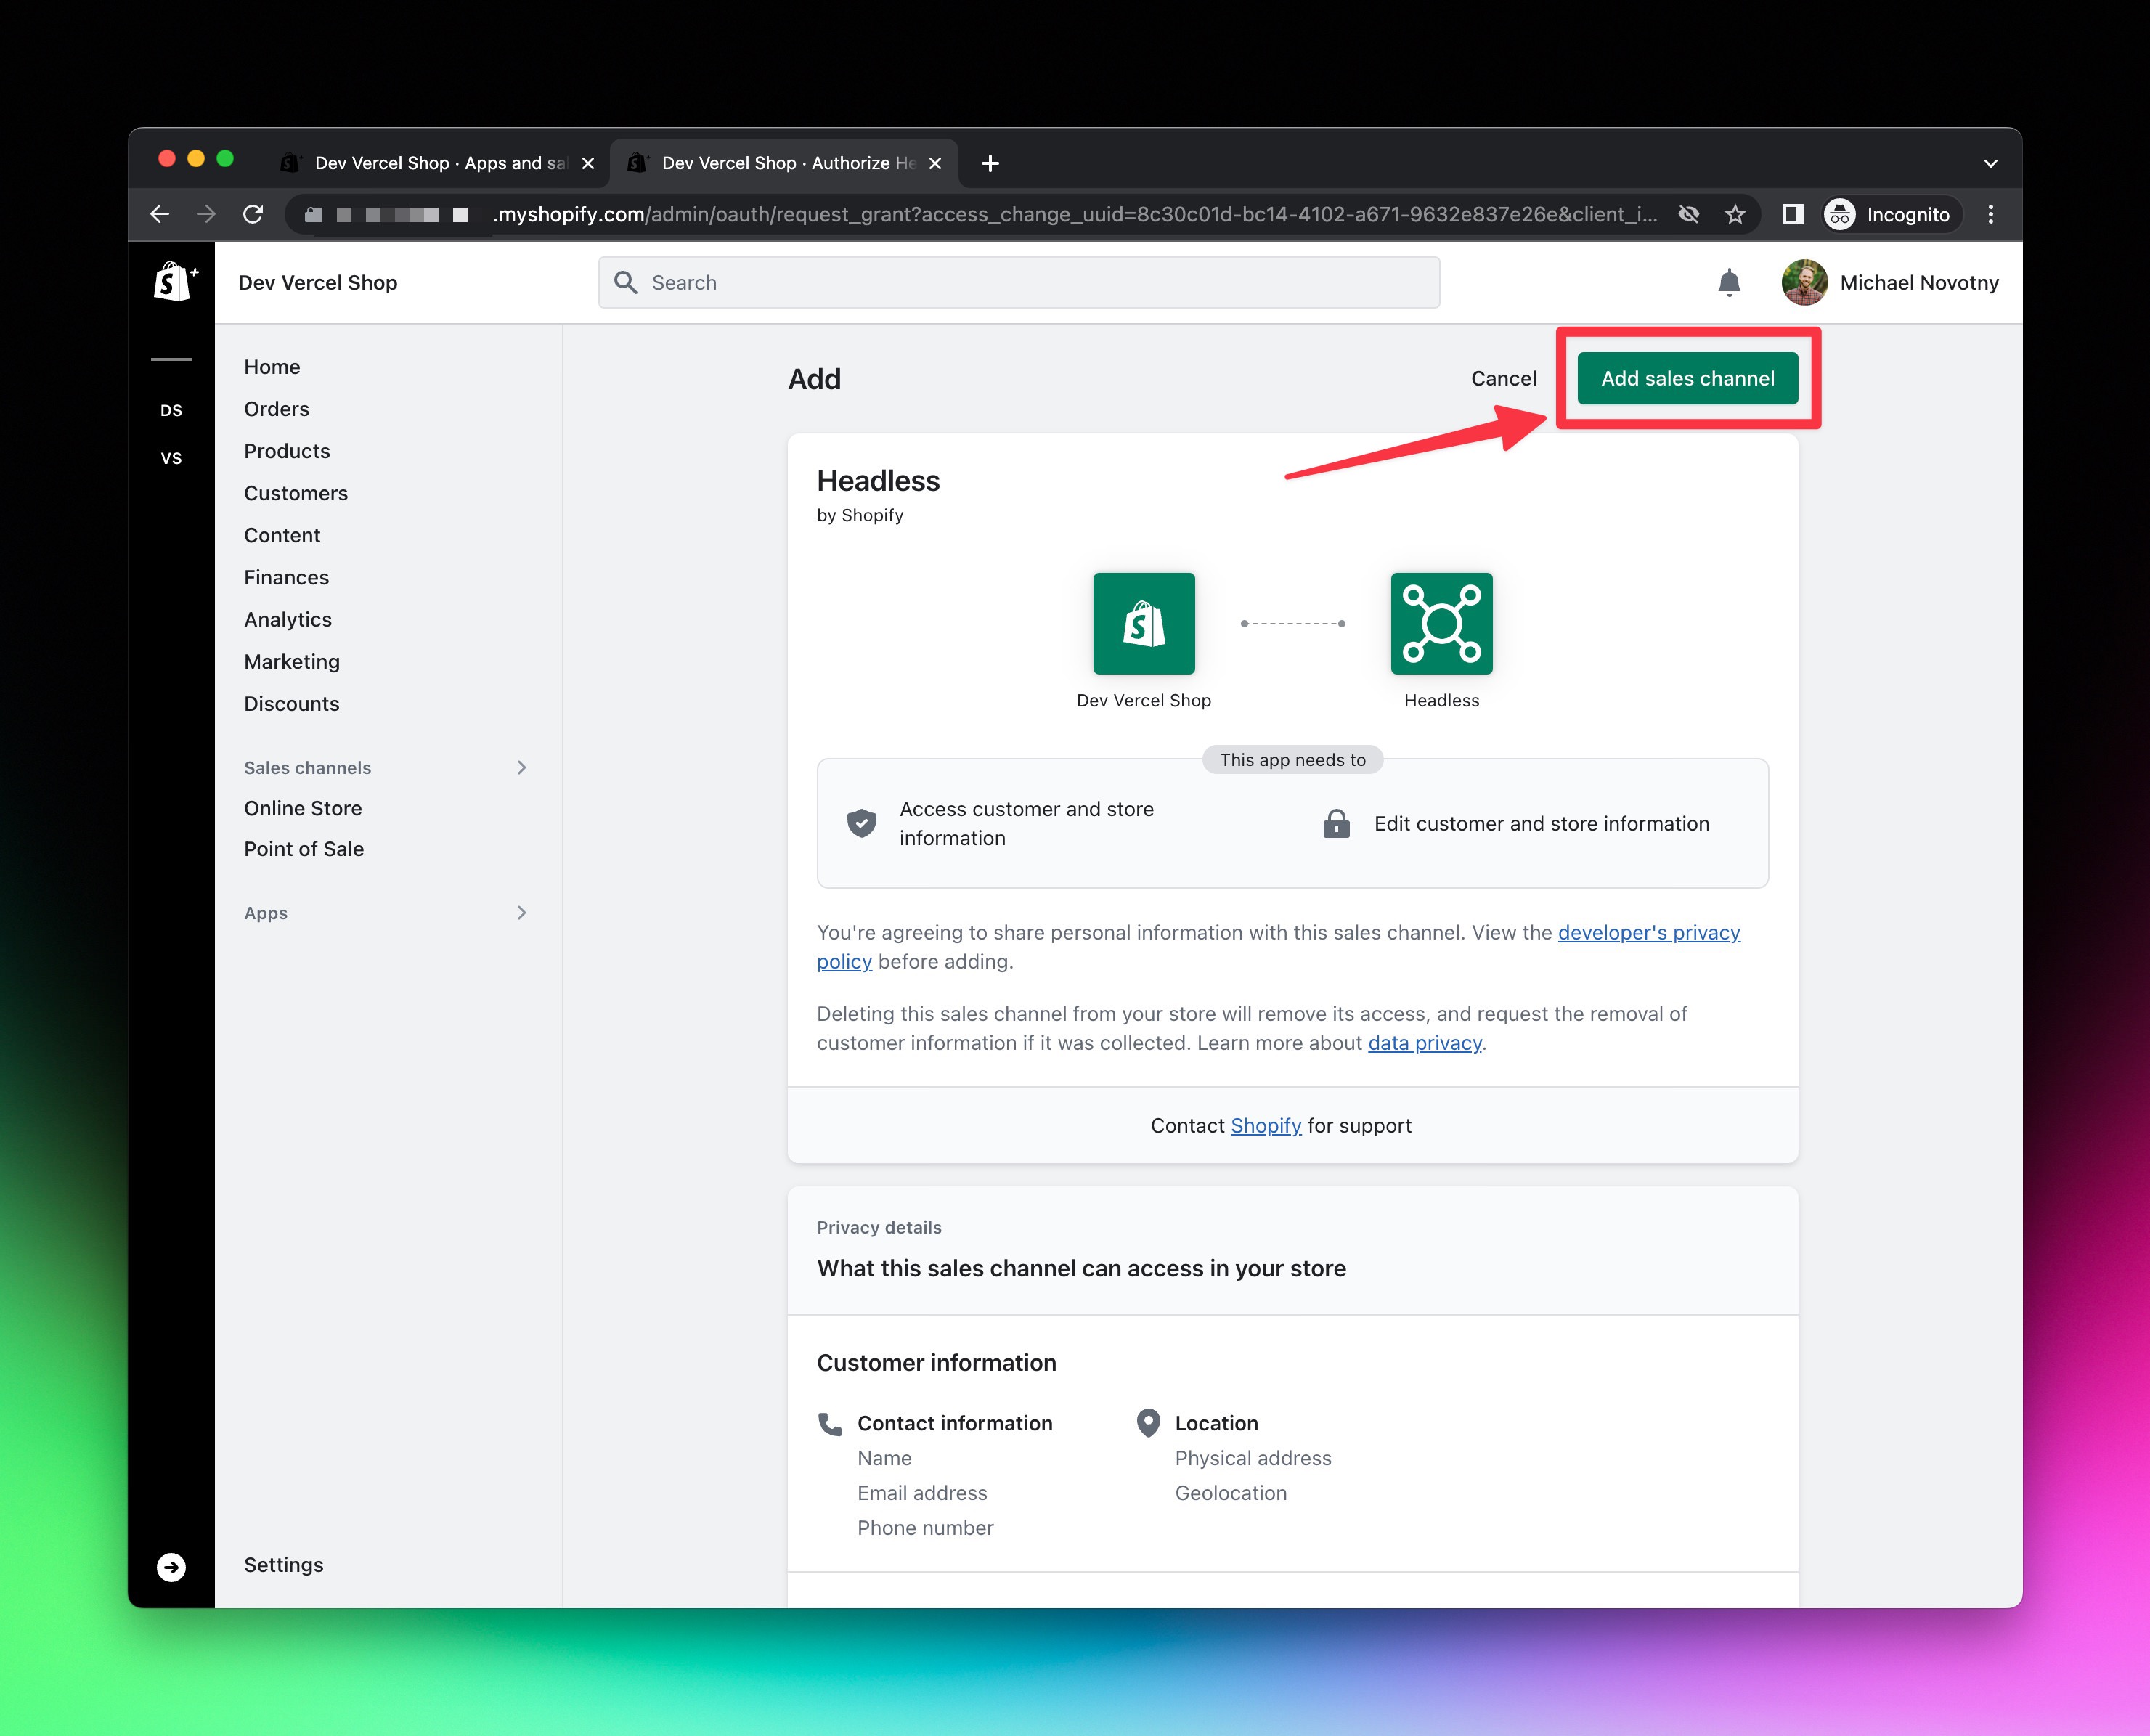
- Click the green
Create storefrontbutton.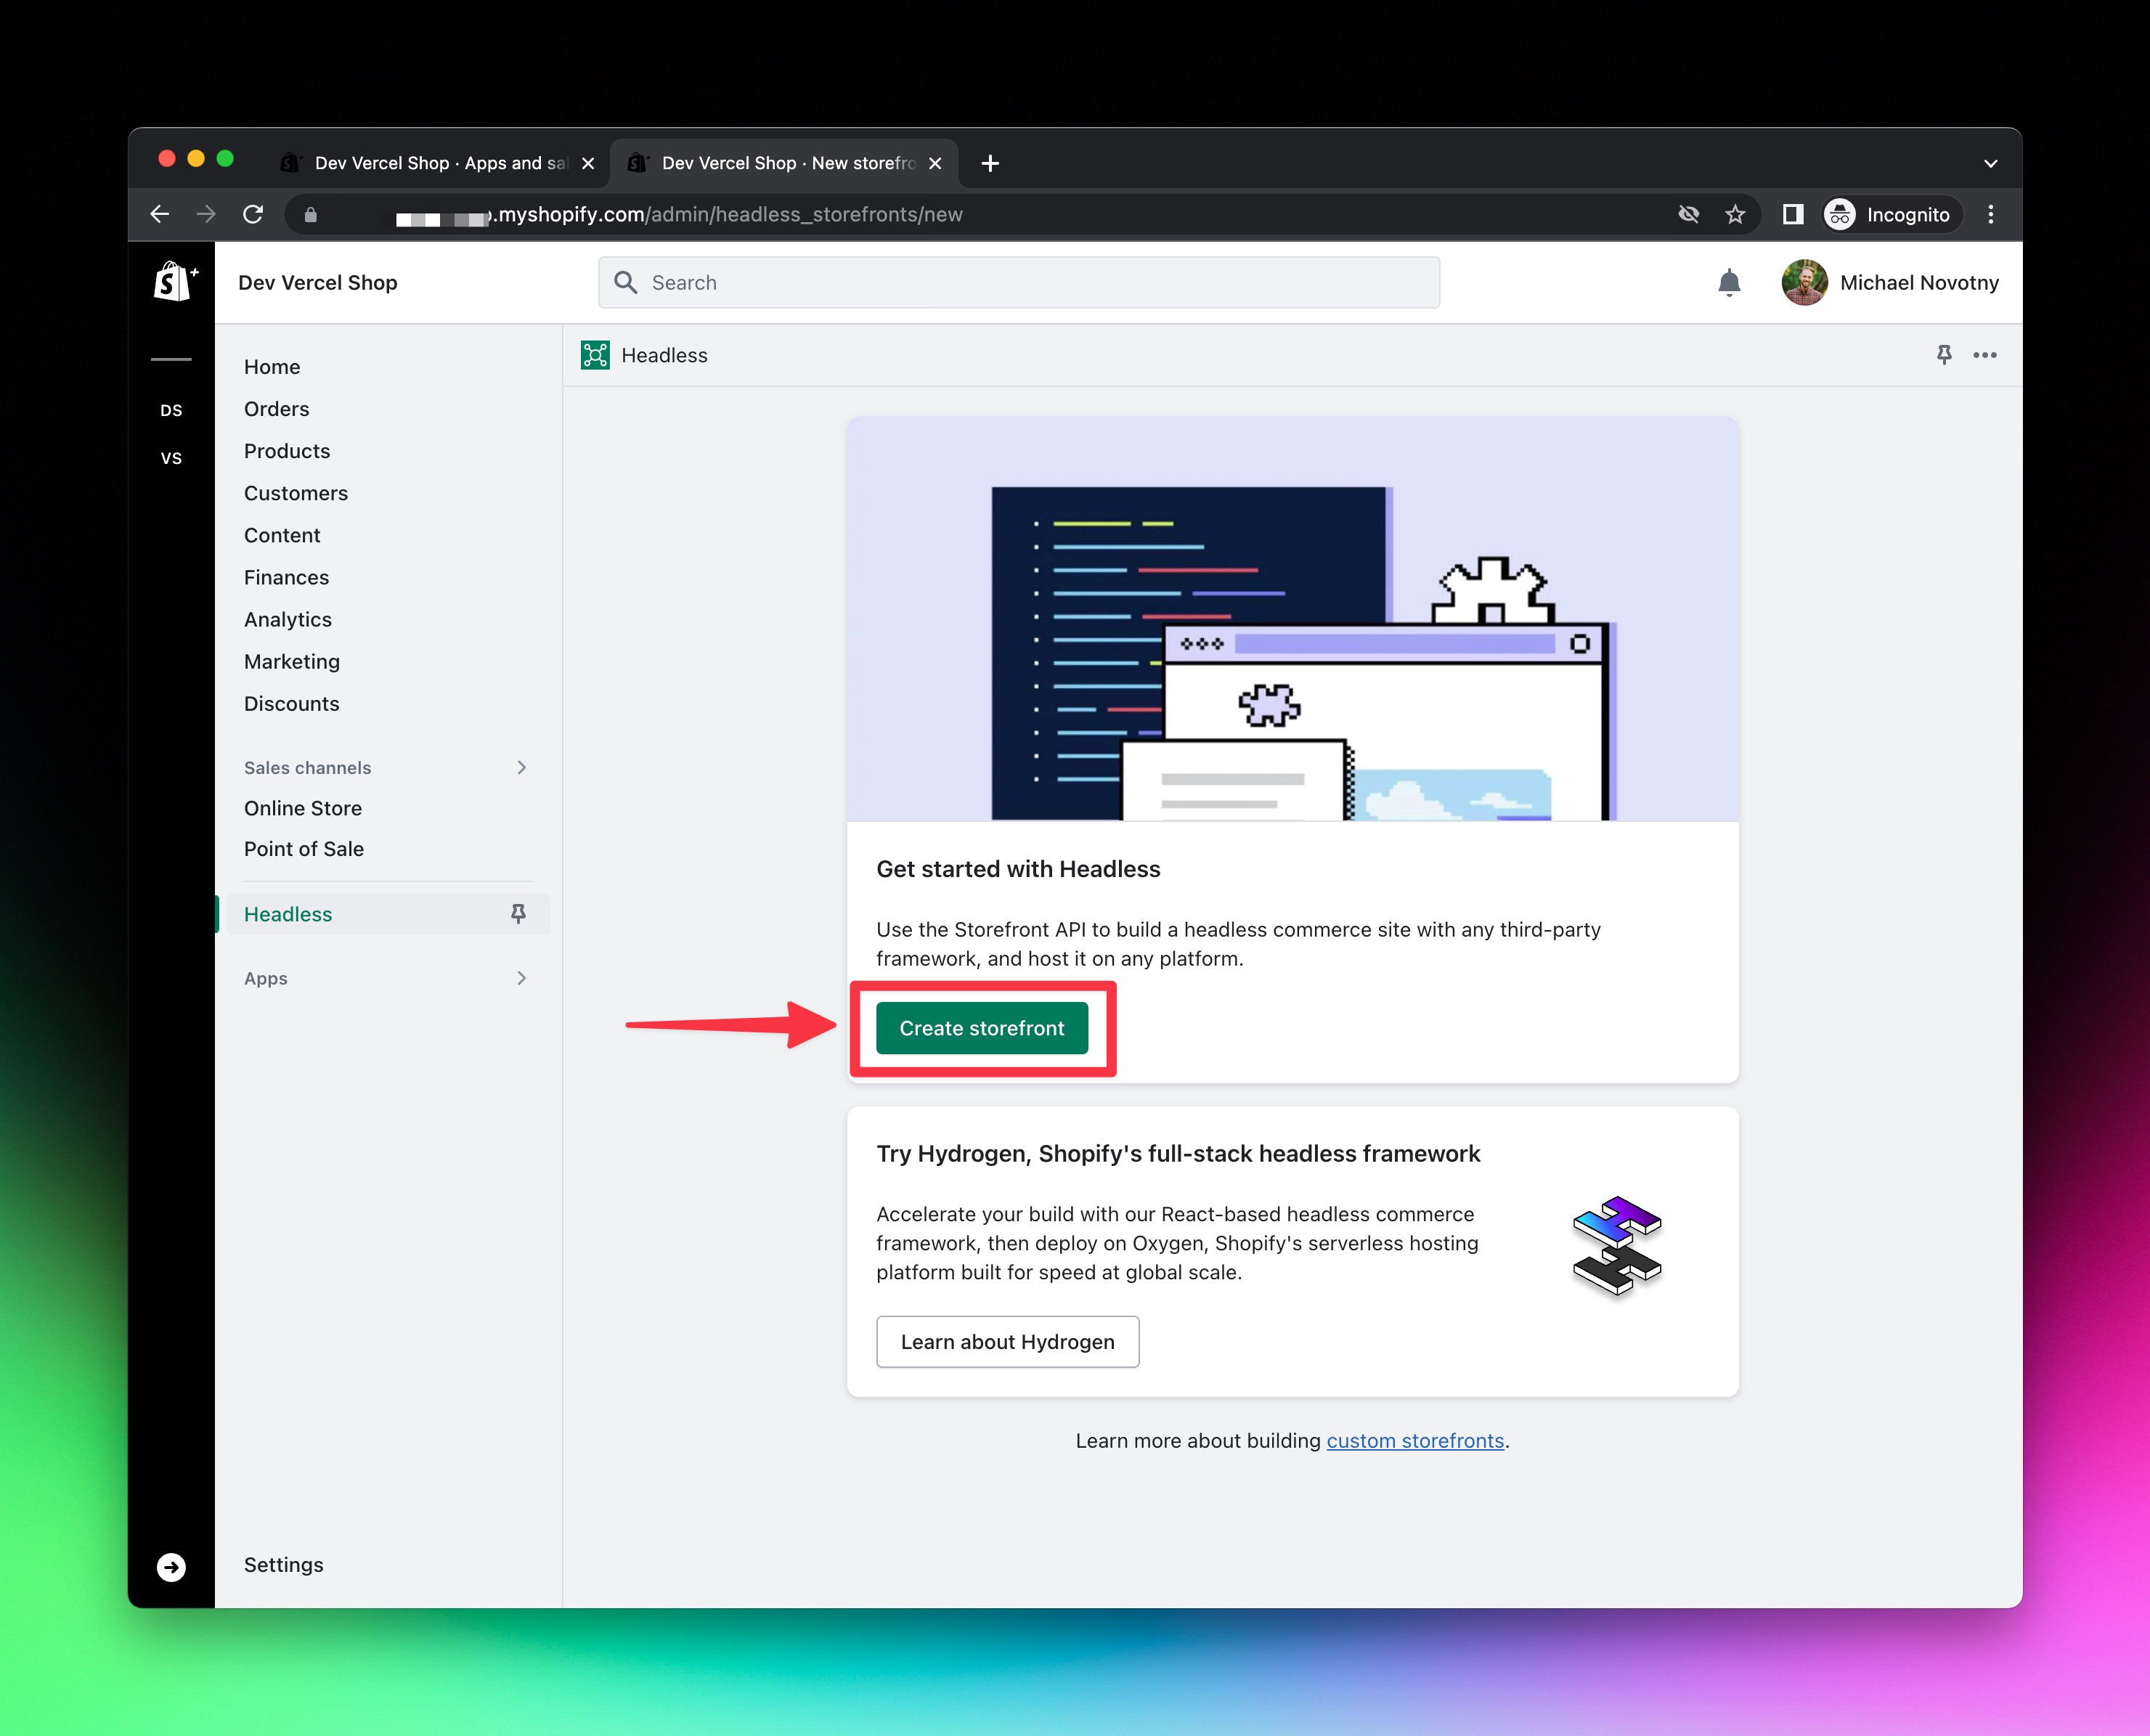
- Copy and paste the public access token and assign it to a
SHOPIFY_STOREFRONT_ACCESS_TOKENenvironment variable.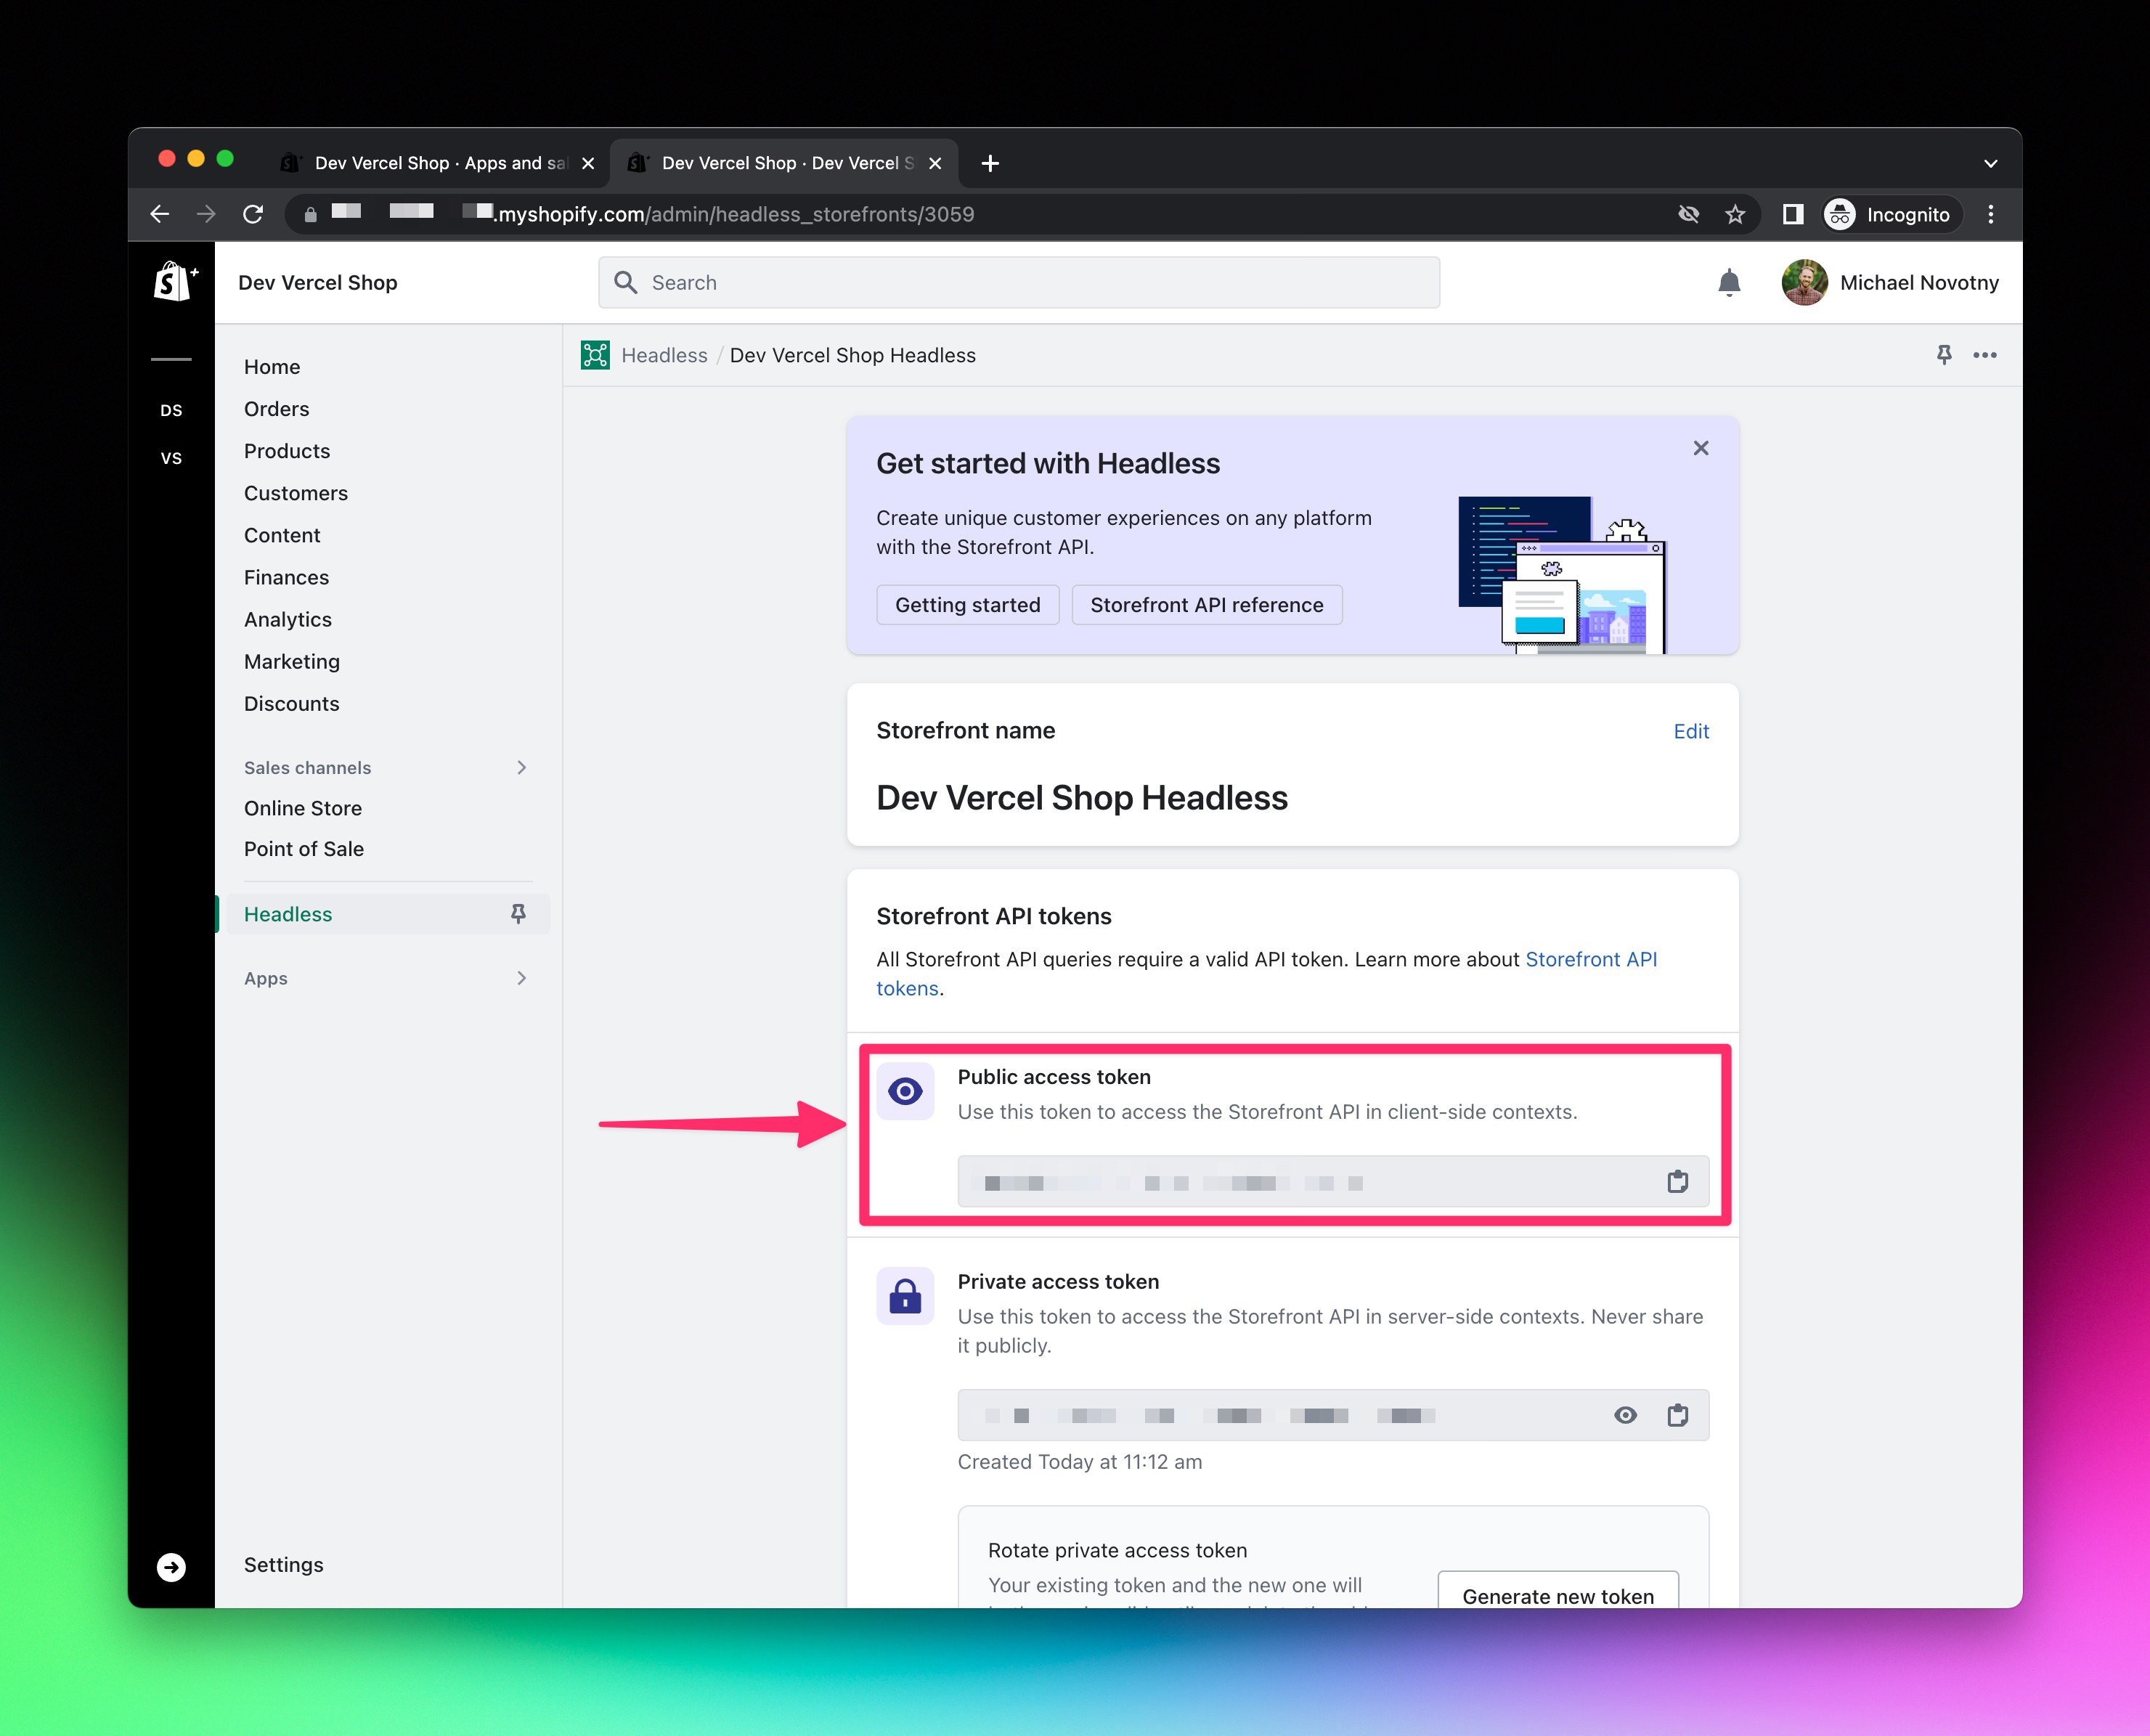
- If you ever need to reference the public access token again, you can navigate to
https://[your-shopify-store-subdomain].myshopify.com/admin/headless_storefronts.
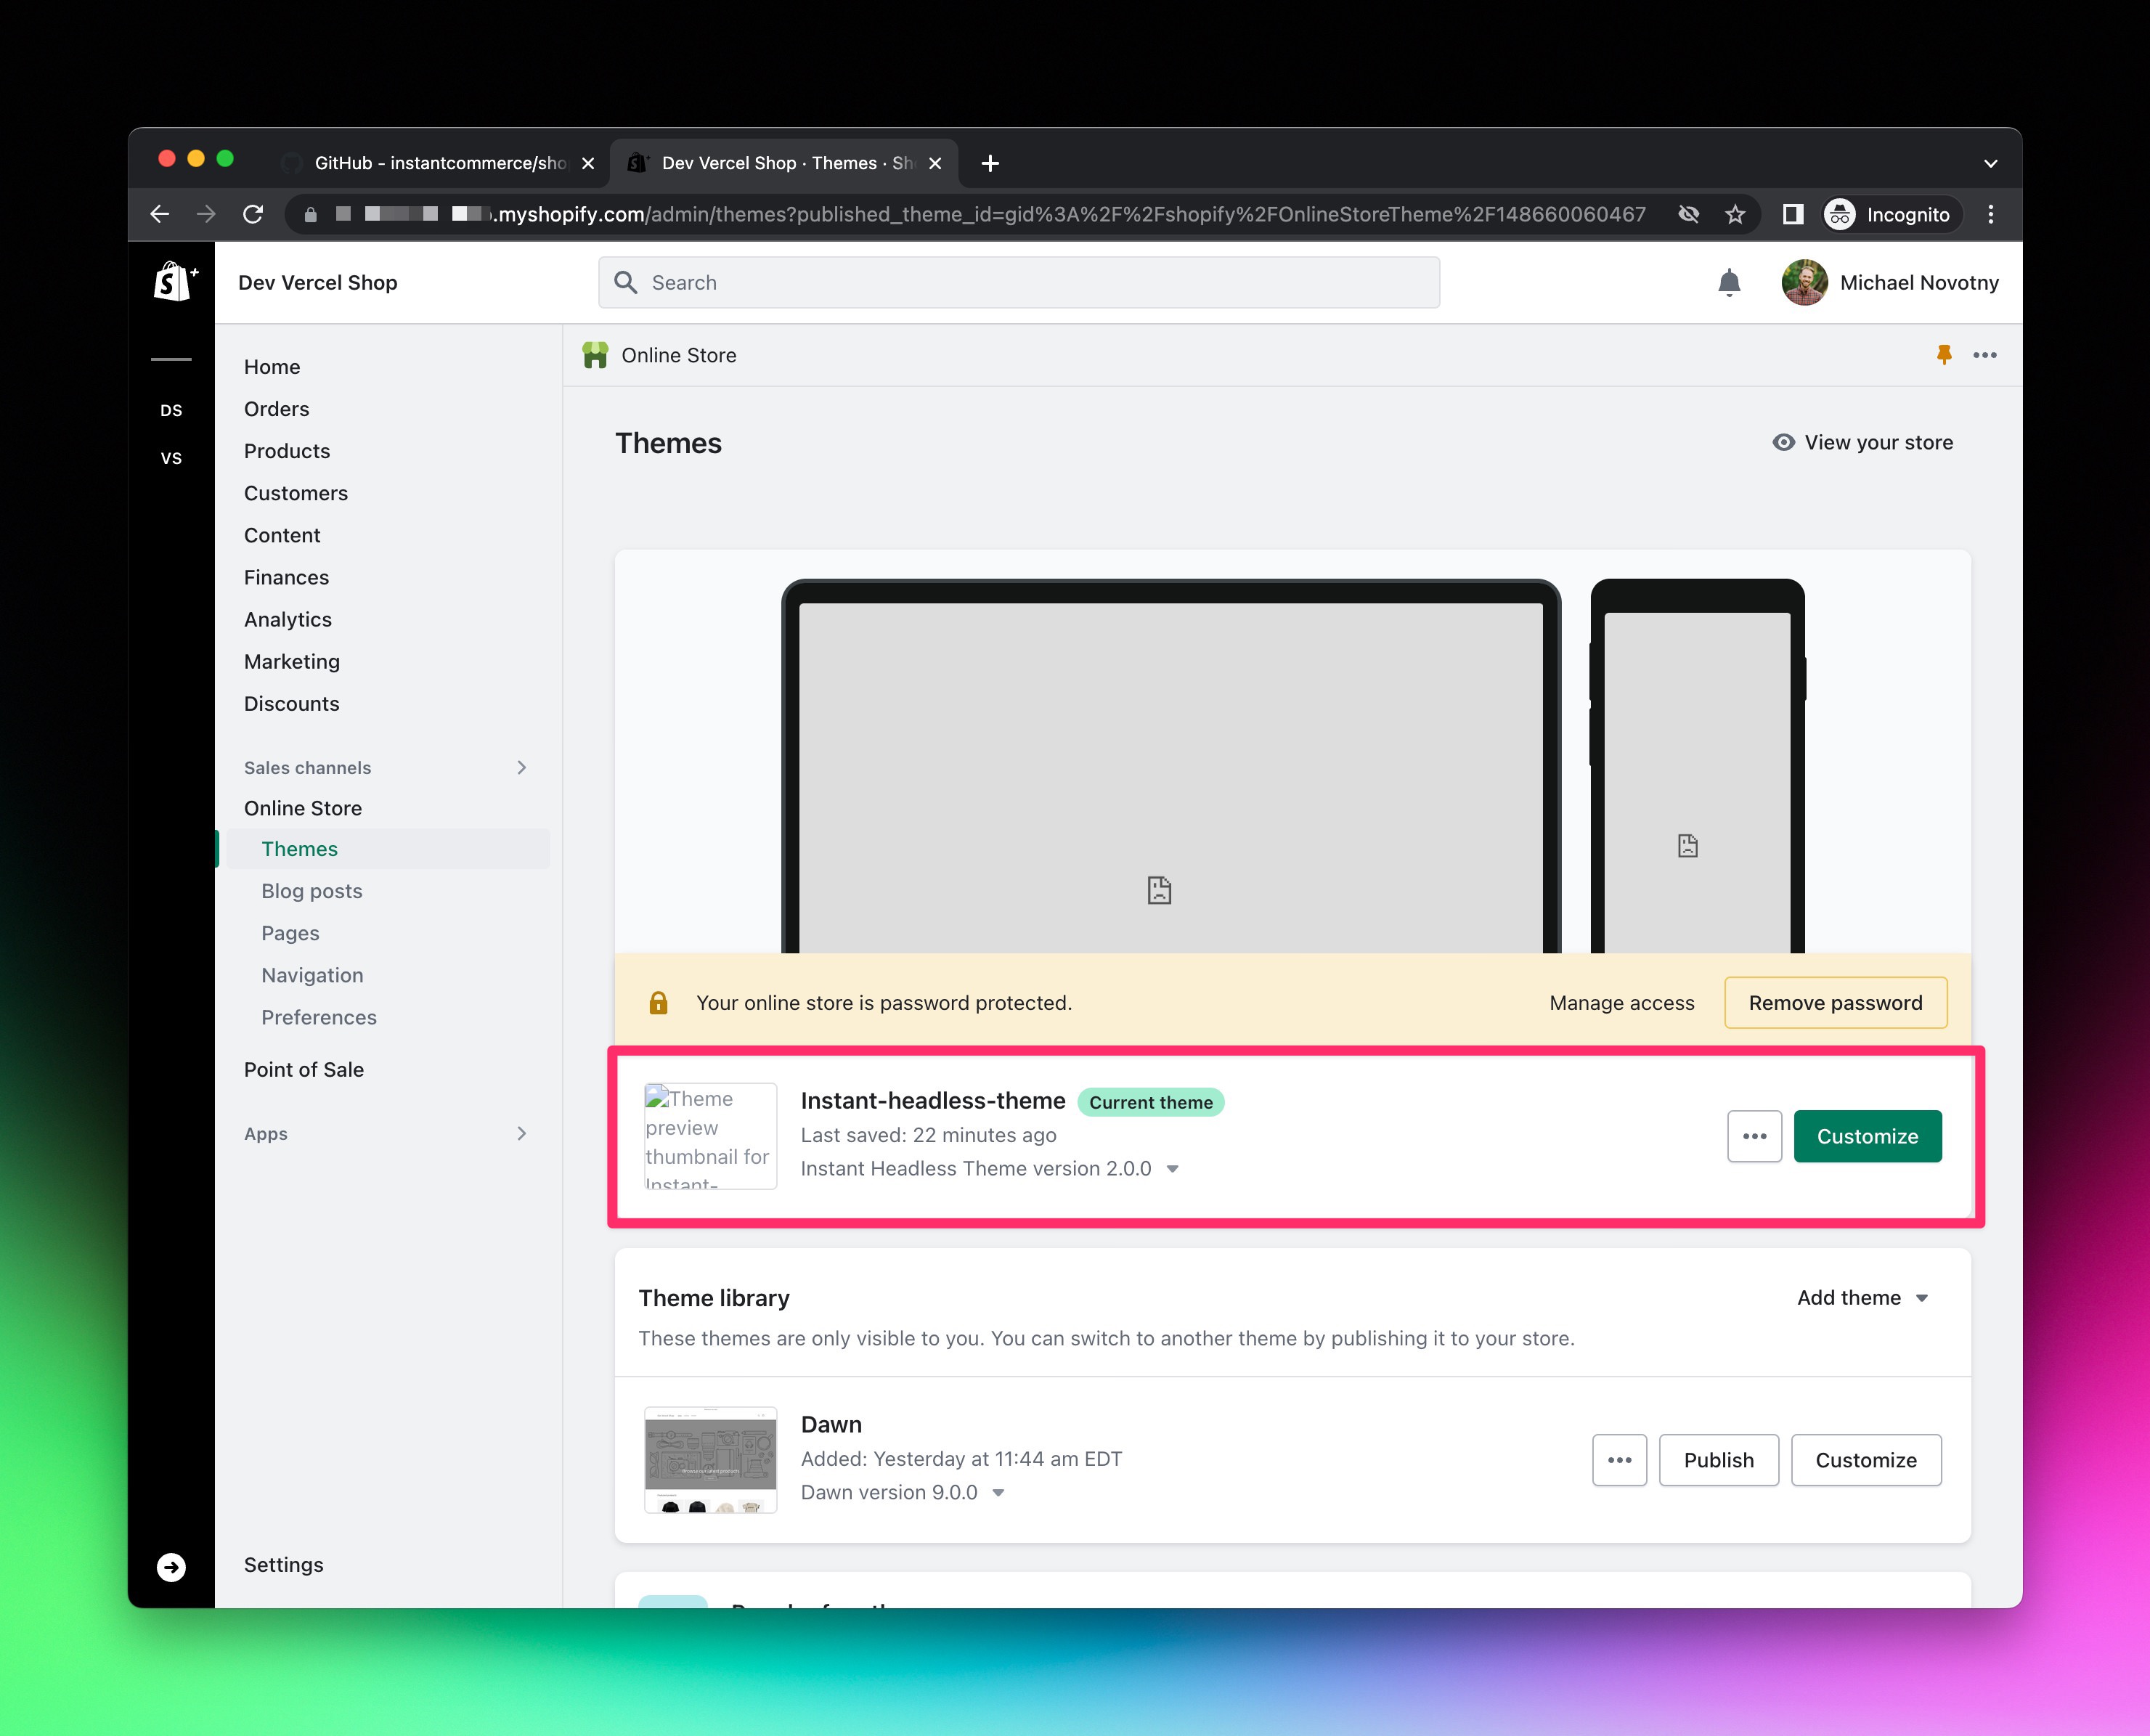
Install a headless theme
When using a headless Shopify setup, you normally don't want customers to access any of the theme pages except for checkout. However, you can't totally disable the theme and a lot of links will still point to the theme (e.g. links in emails, order details, plugins, checkout, etc.).
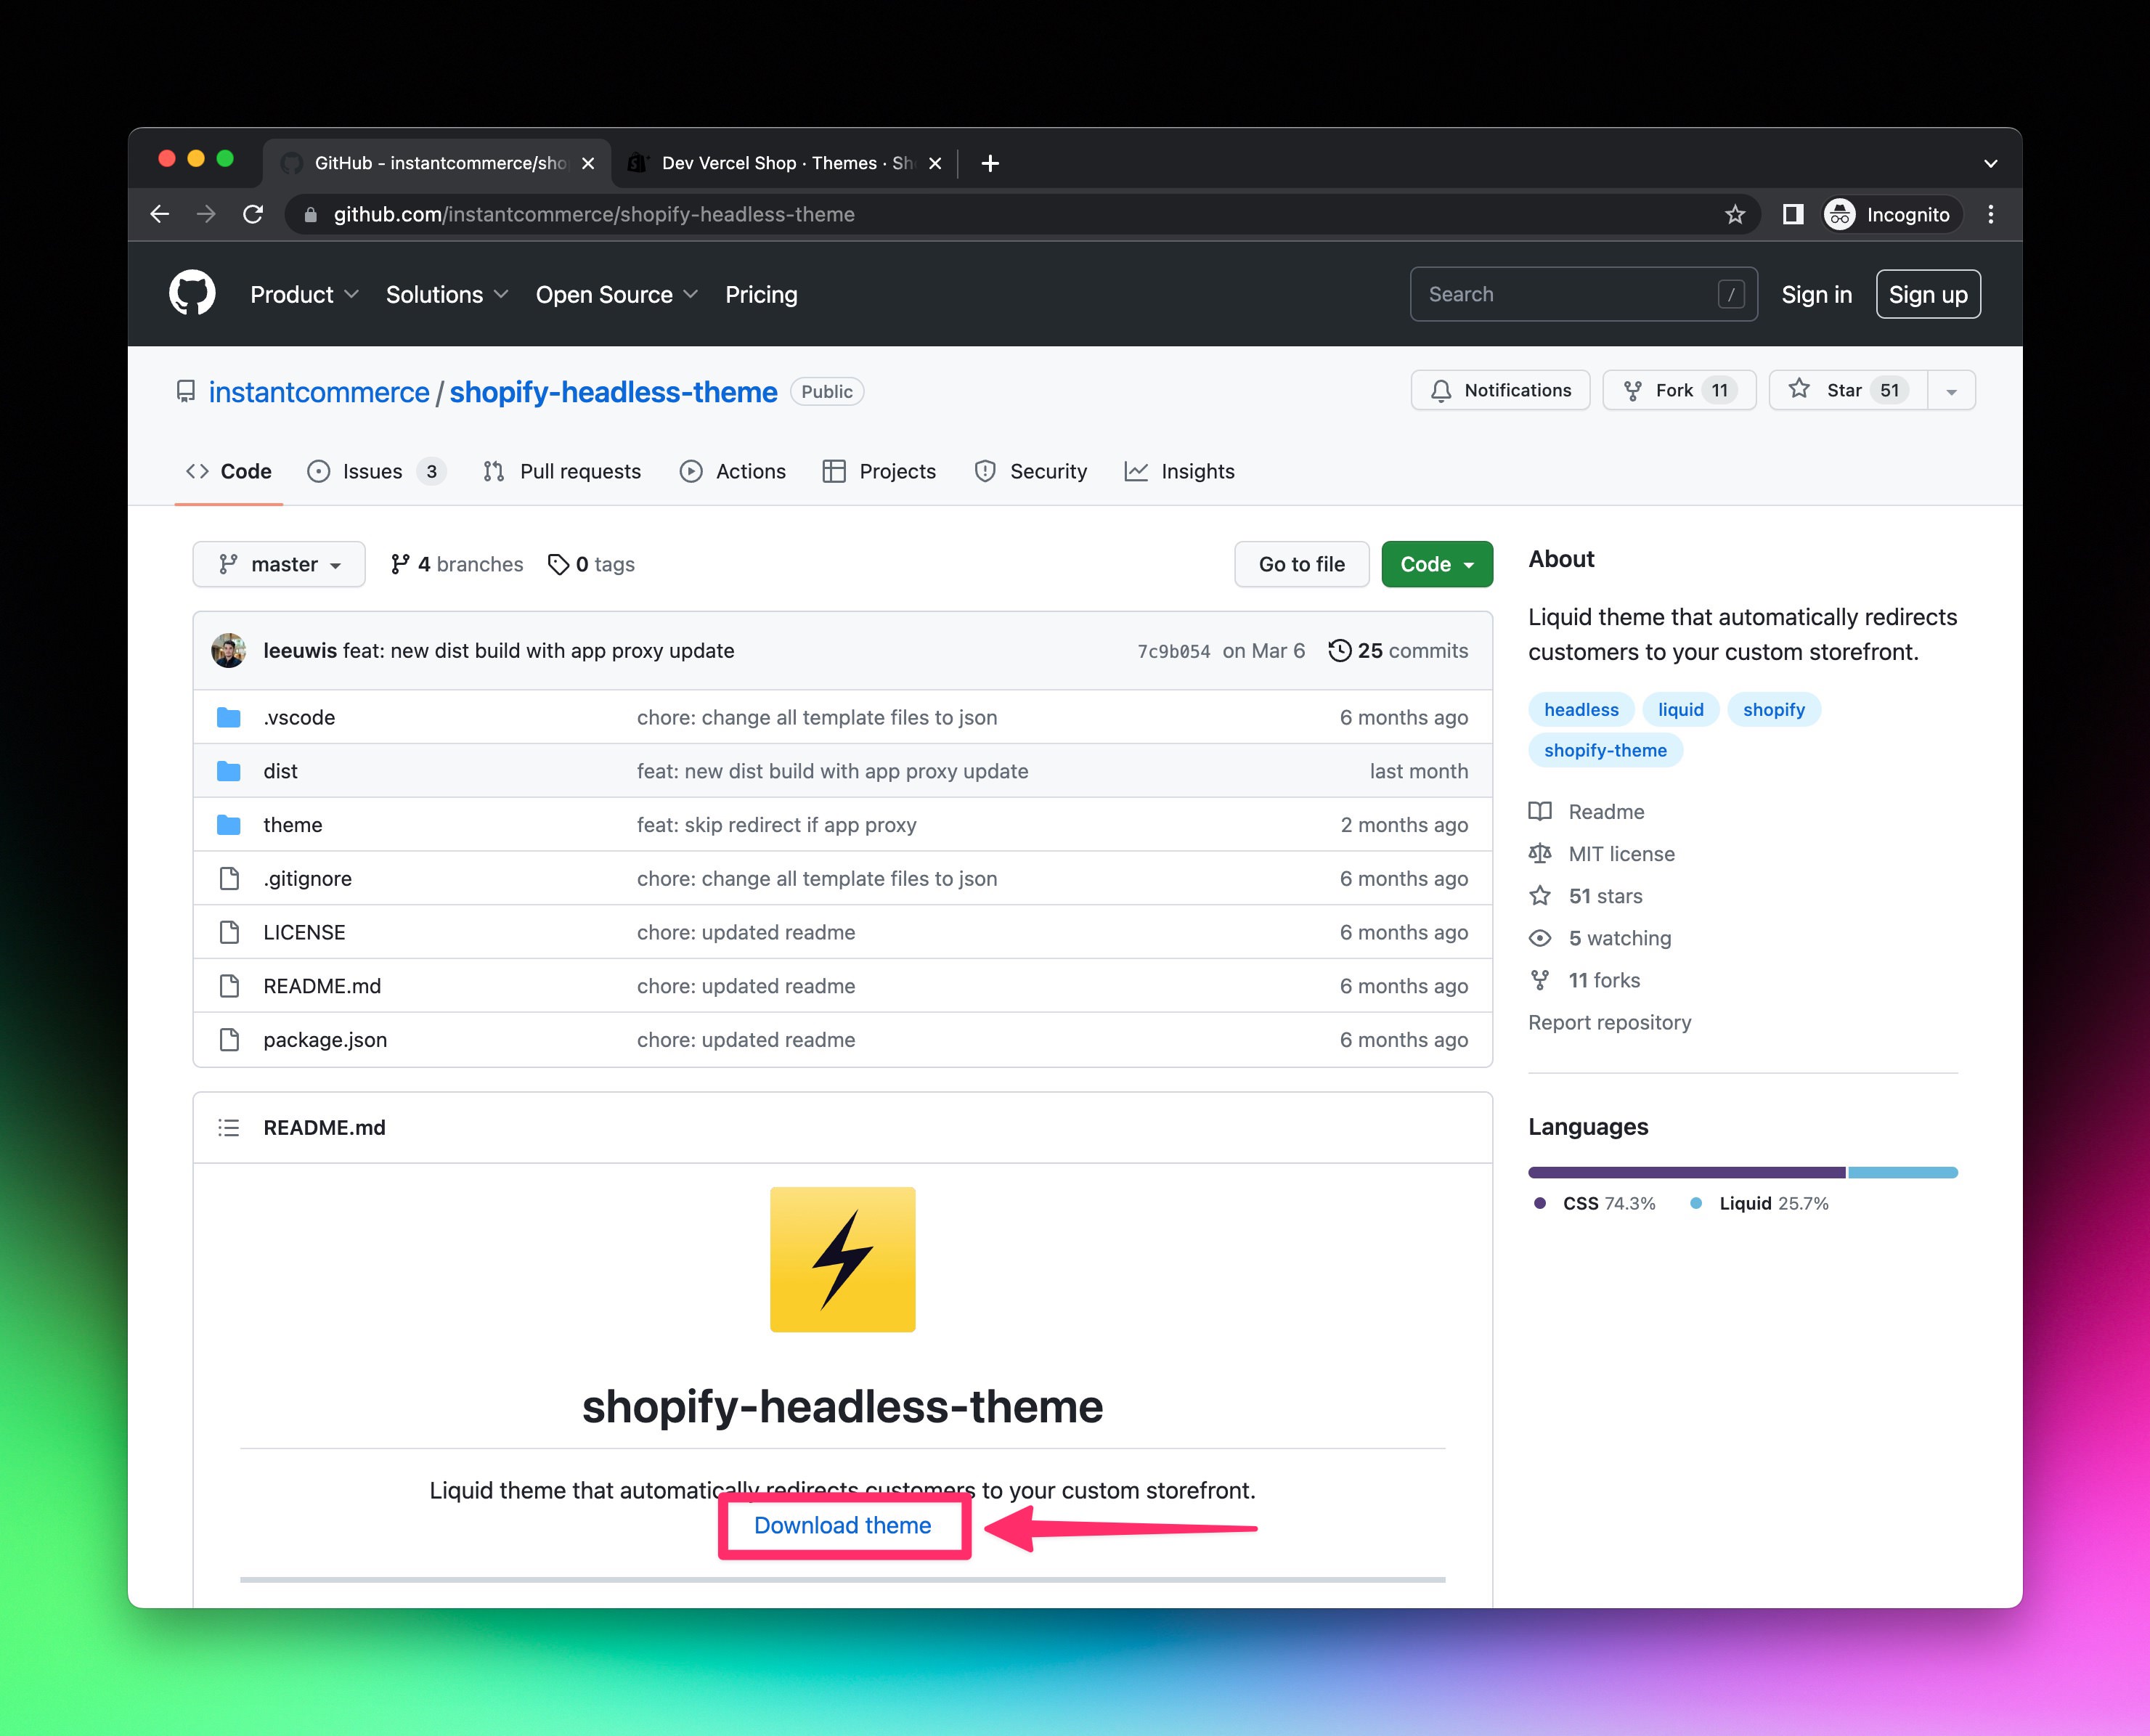
To enable a seamless flow between your headless site and Shopify, you can install the Shopify Headless Theme.
Follow the installation instructions and configure the theme with your headless site's values.
Expand to view detailed walkthrough
- Download Shopify Headless Theme.
- Navigate to
https://[your-shopify-store-subdomain].myshopify.com/admin/themes. - Click
Add theme, thenUpload zip file.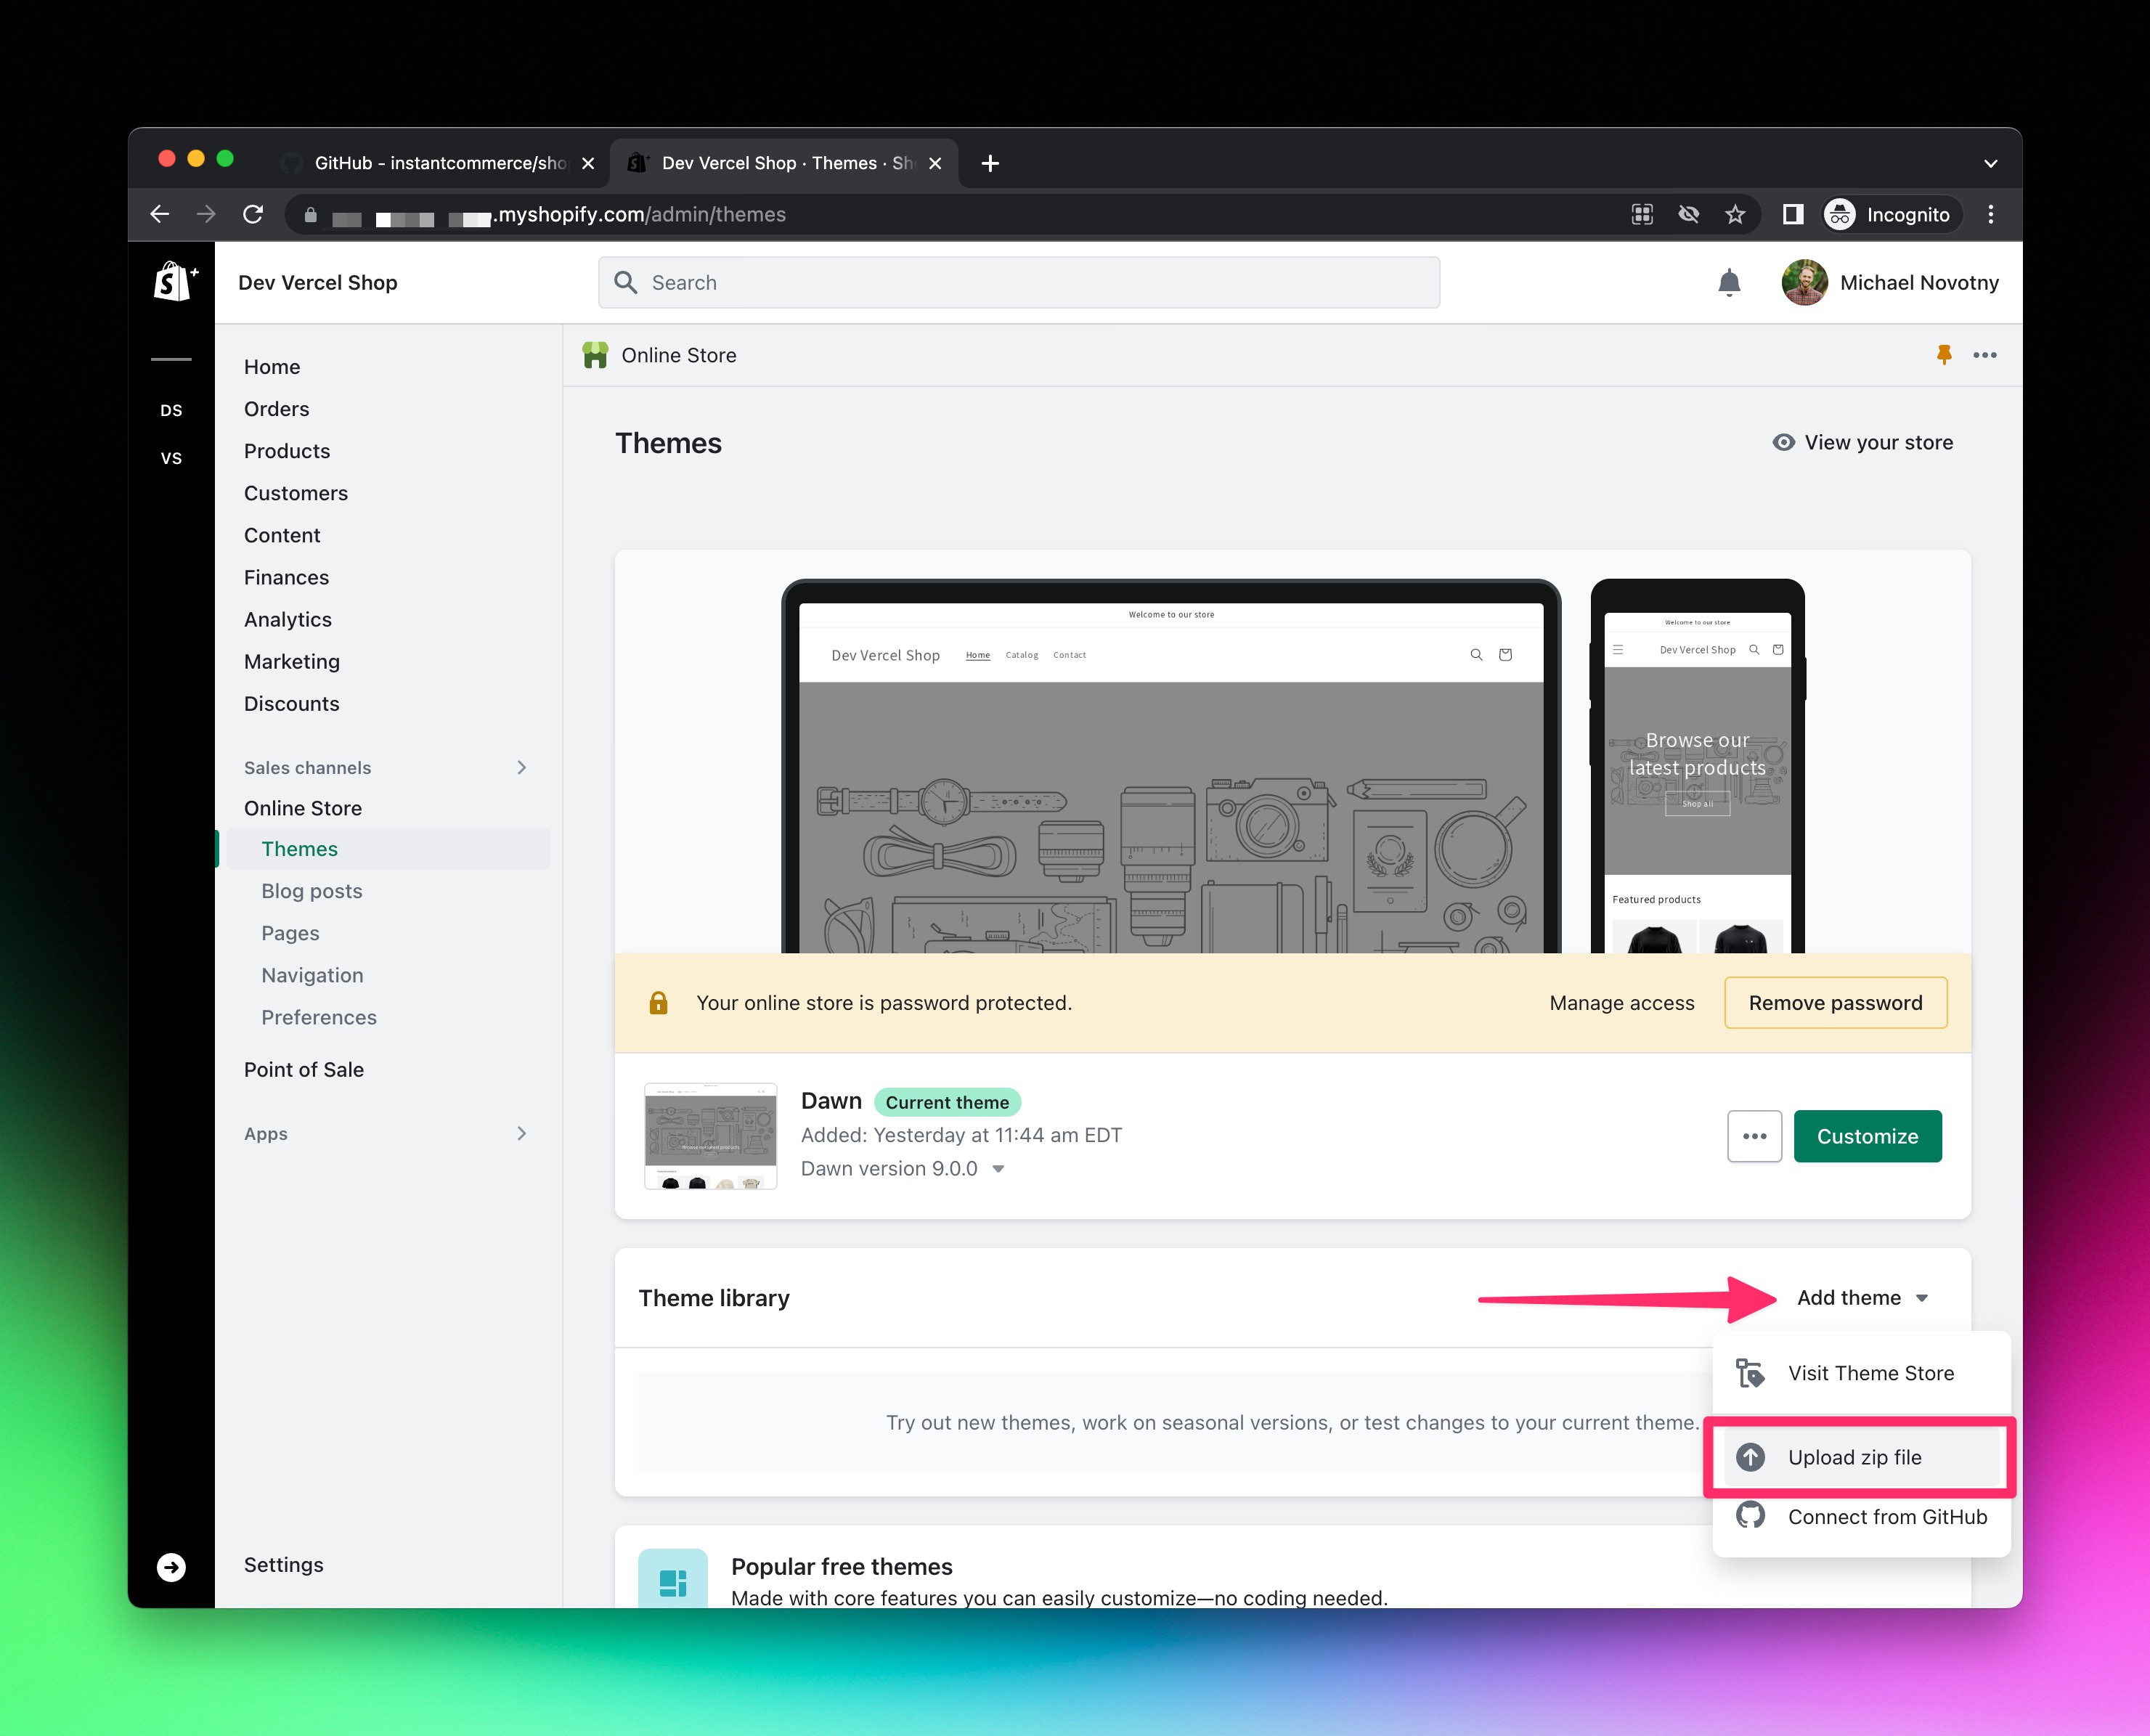
- Select the downloaded zip file from above, and click the green
Upload filebutton.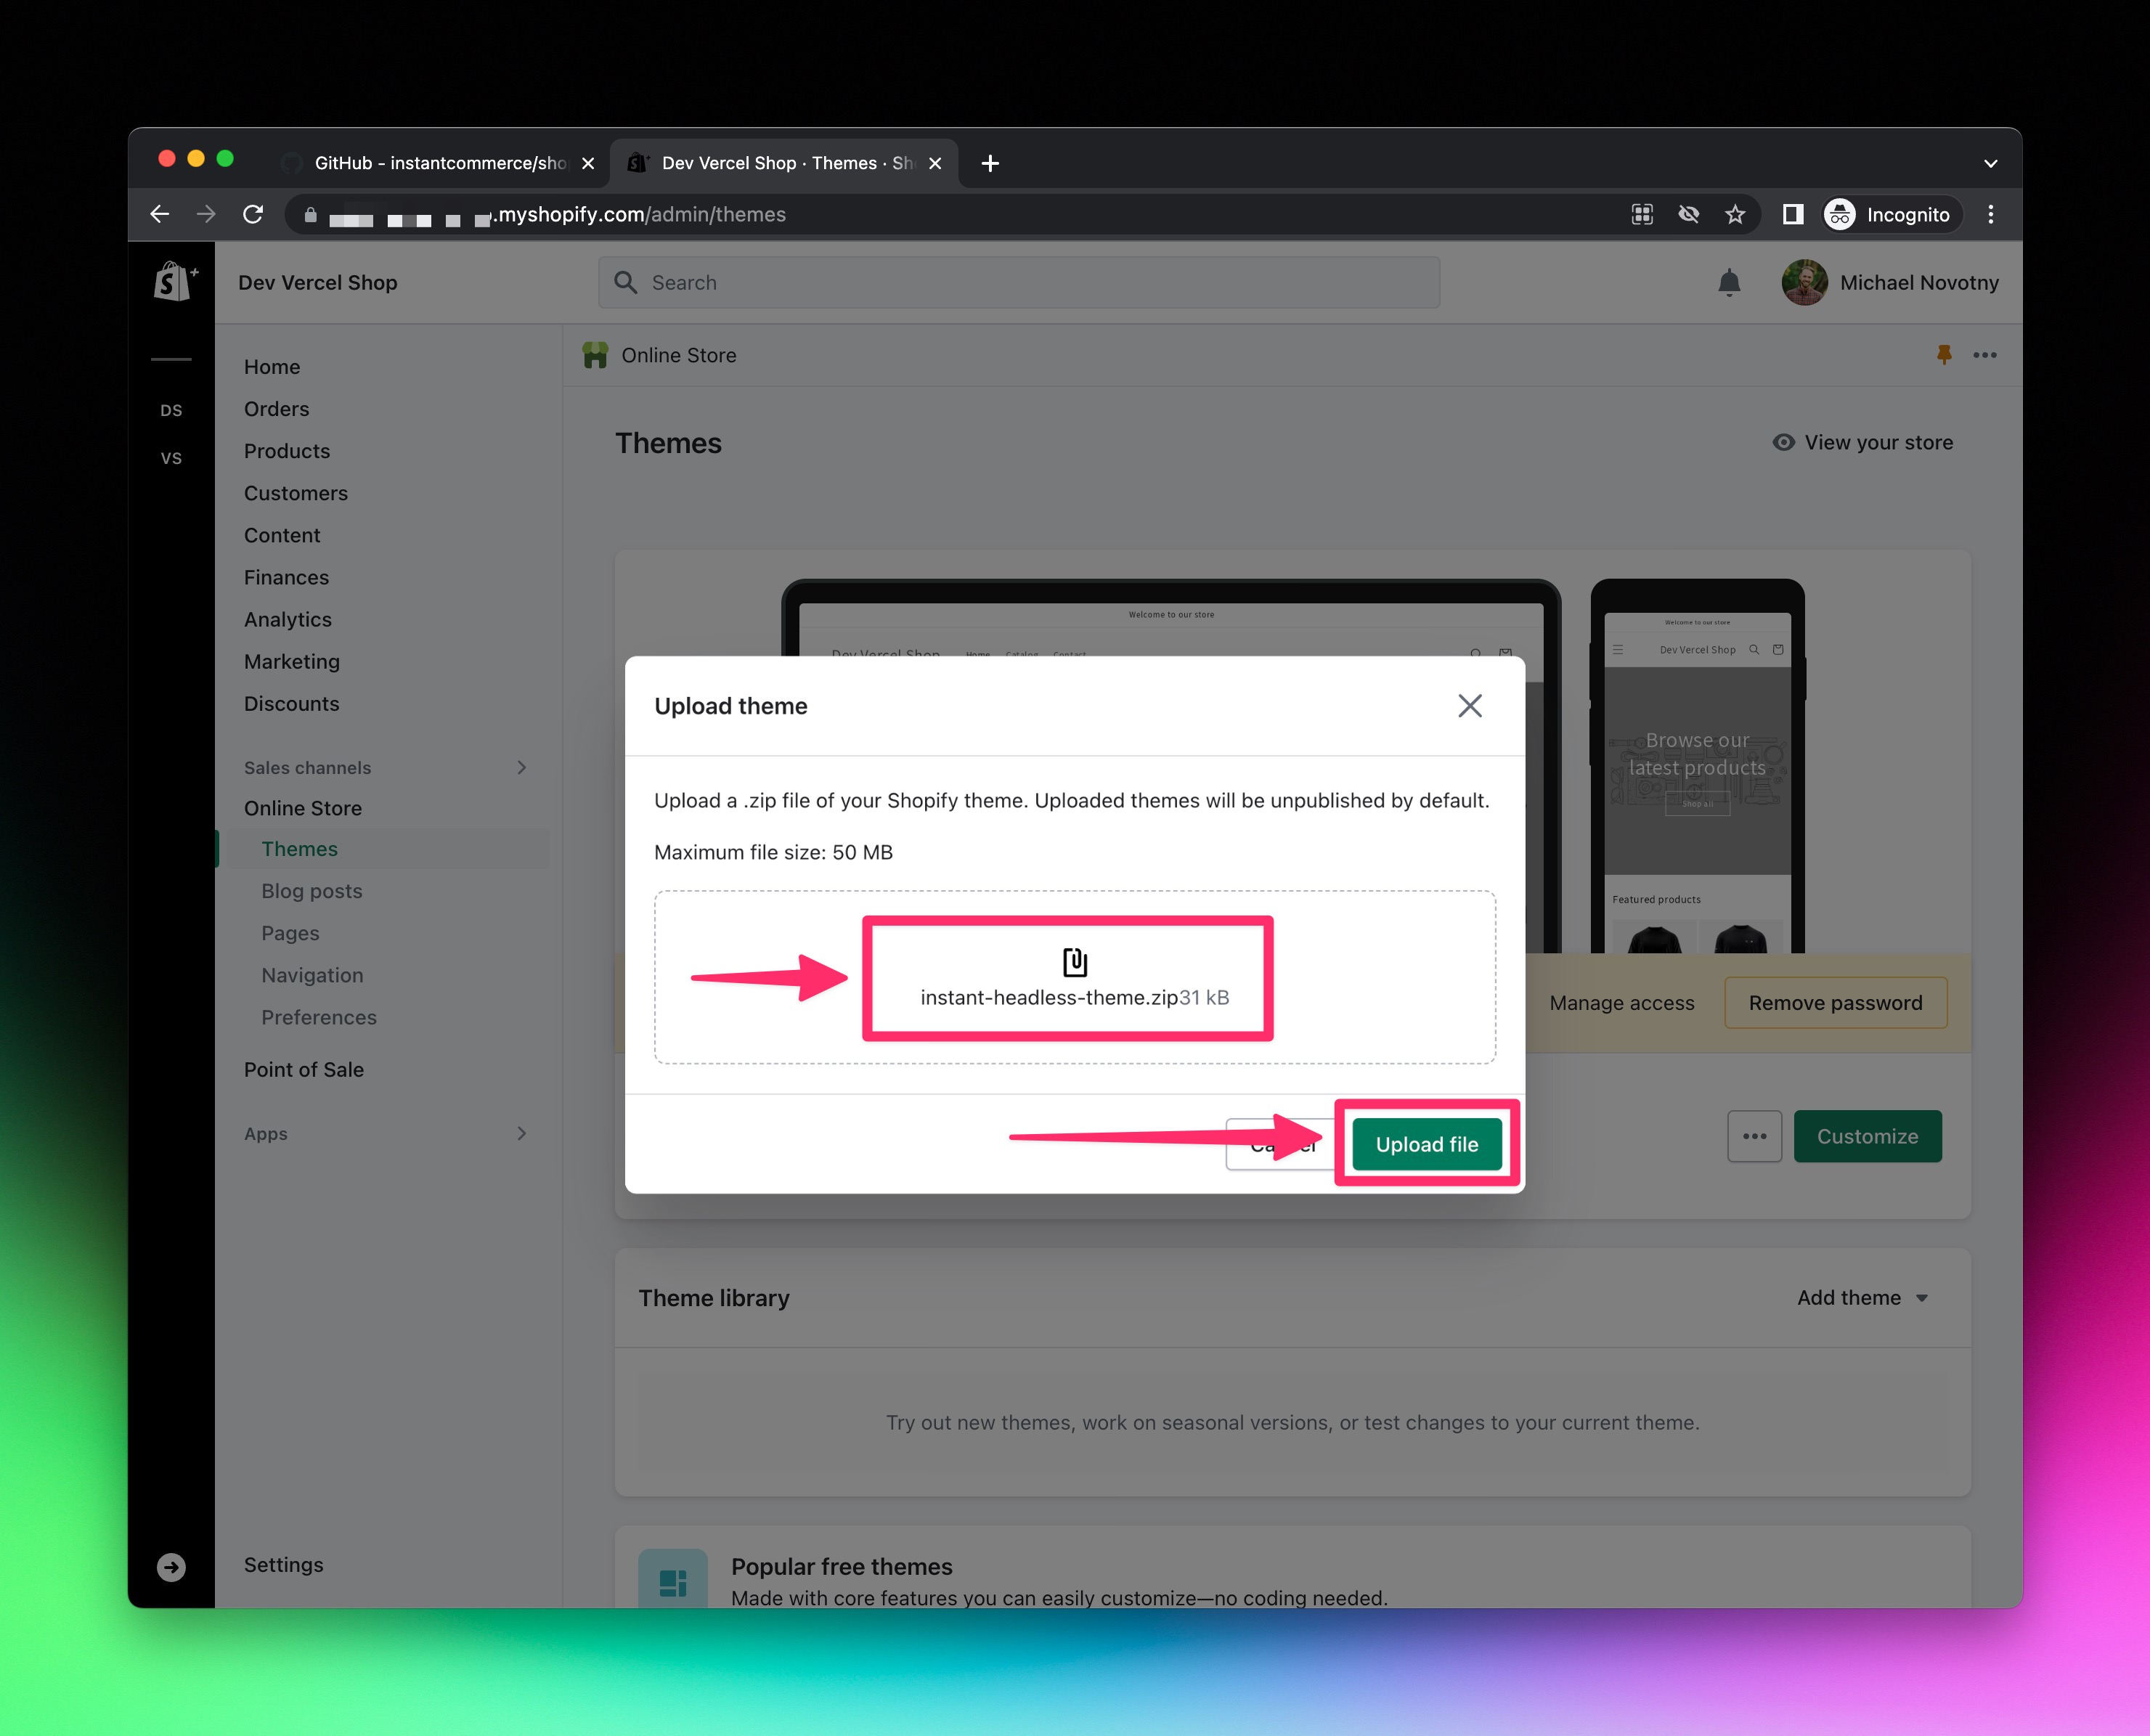
- Click
Customize.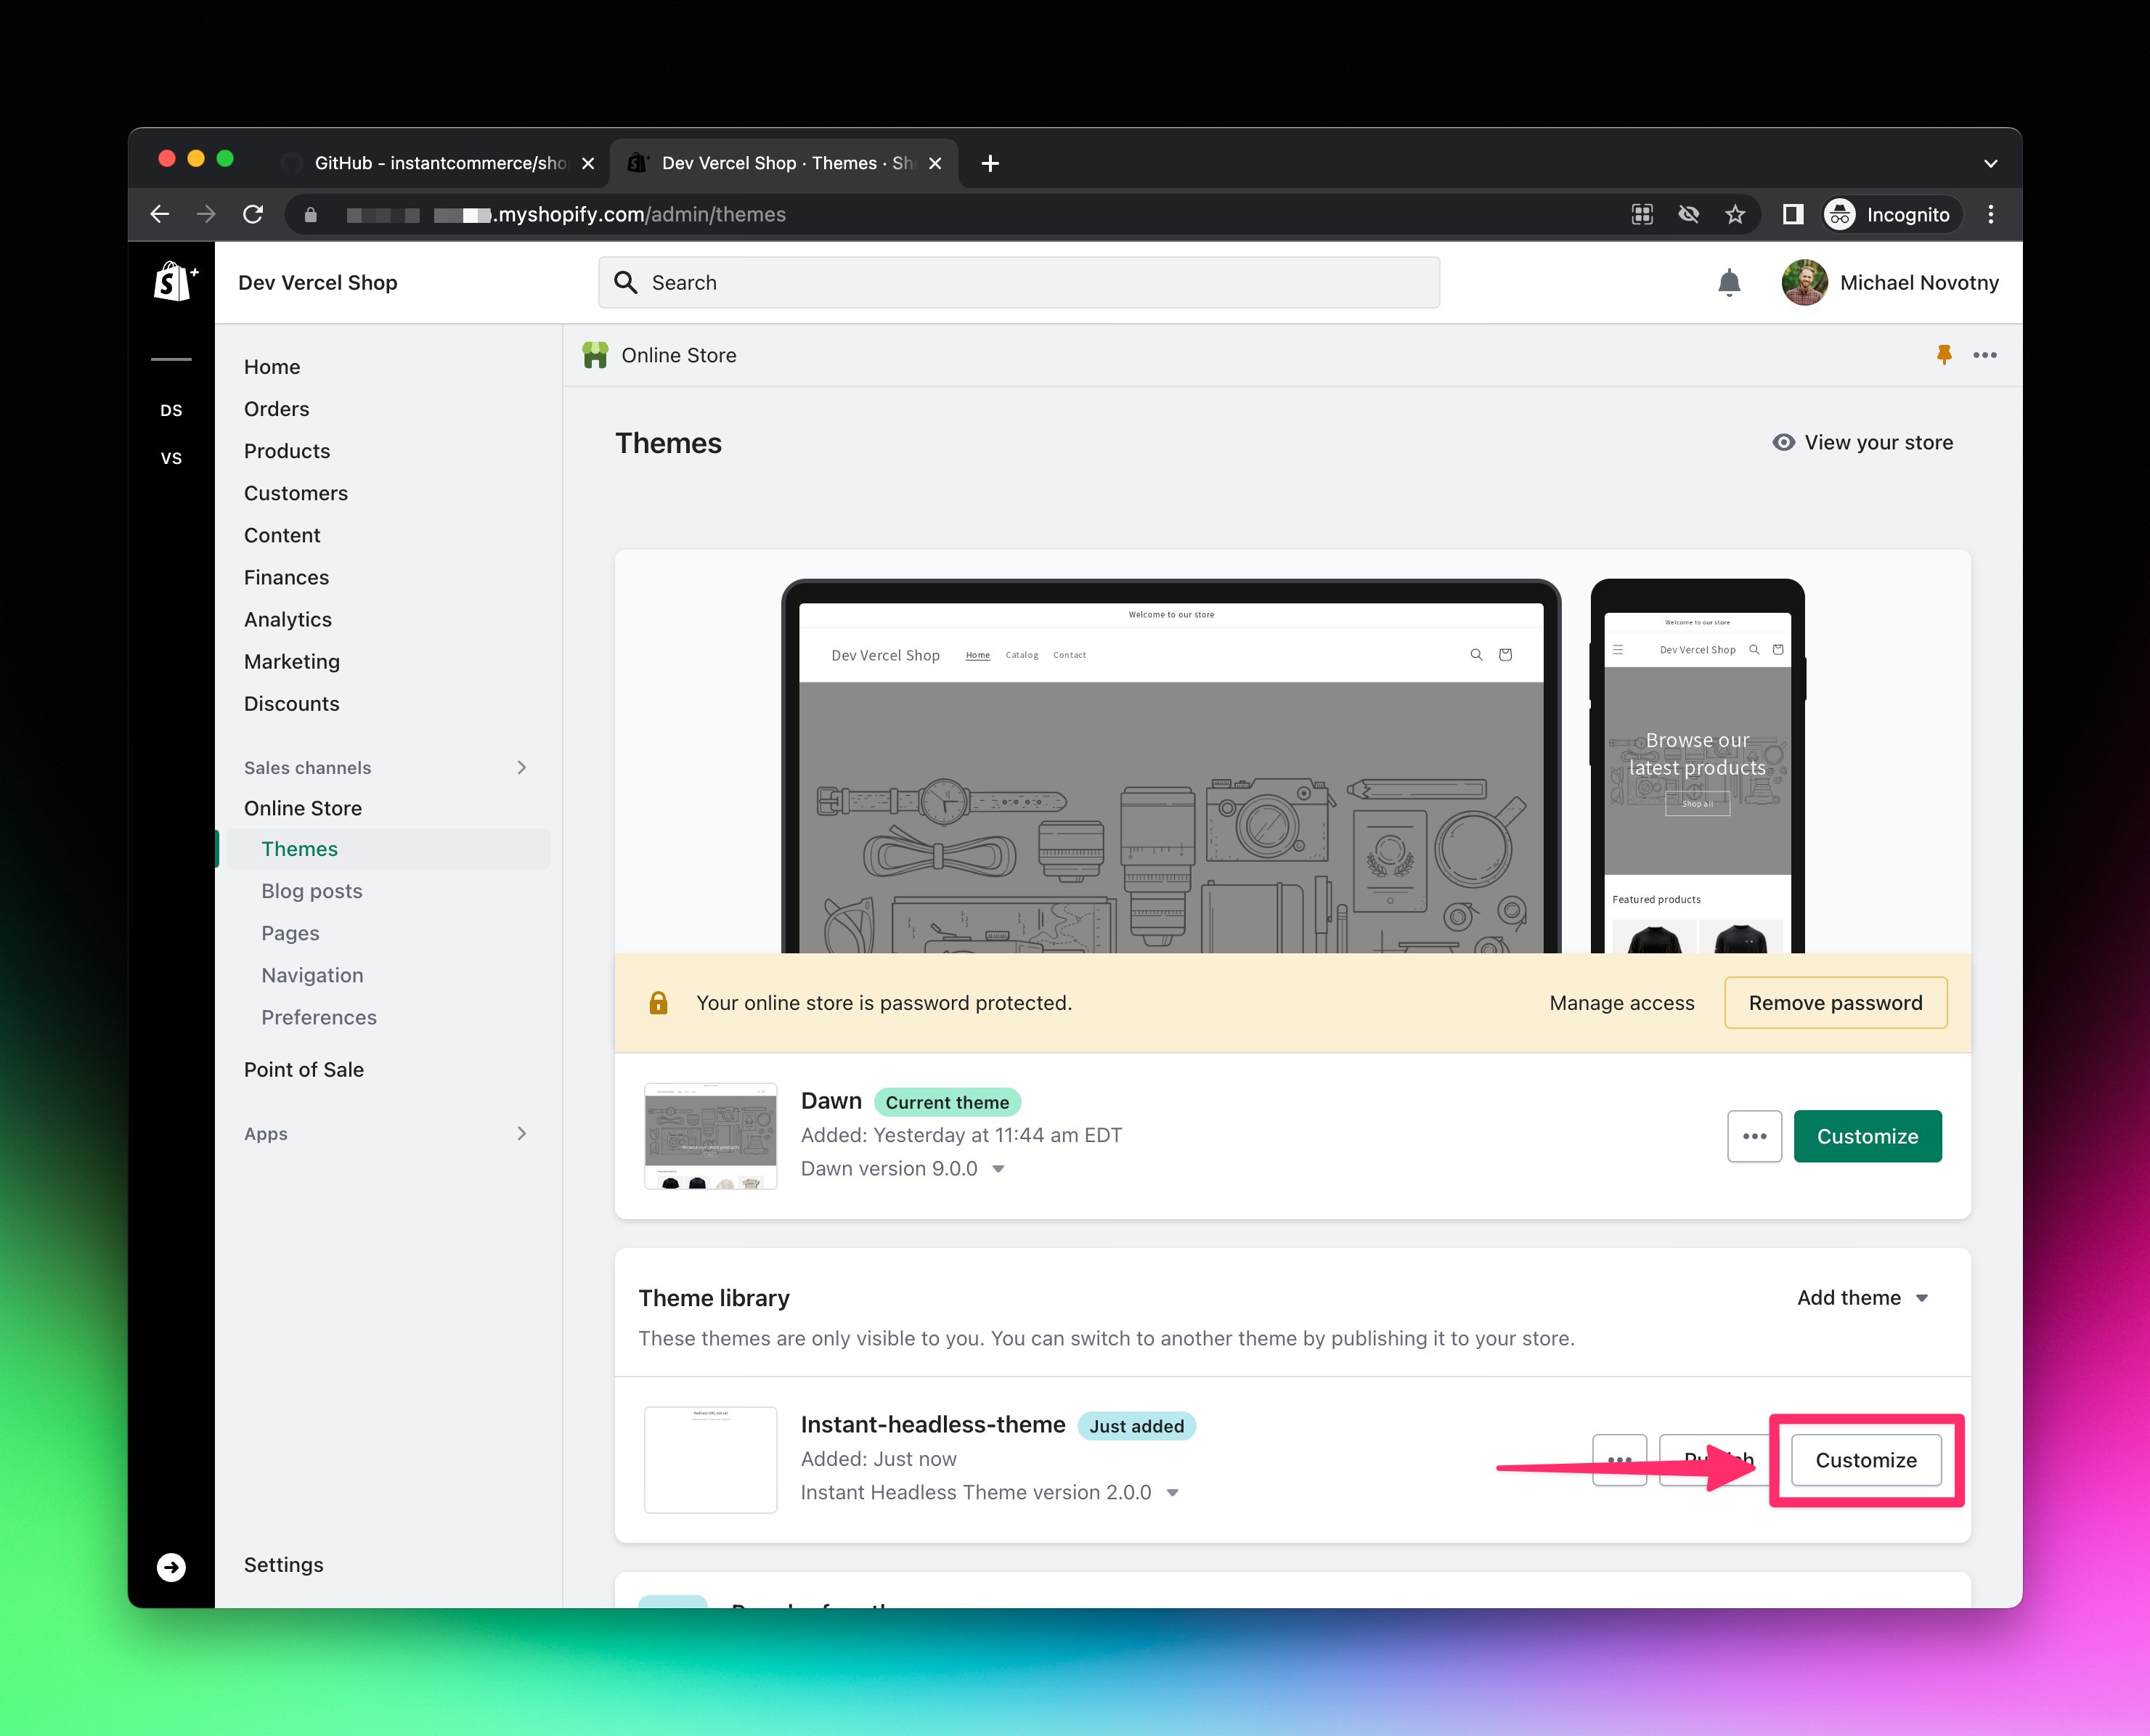
- Click
Theme settings(ie. the paintbrush icon), expand theSTOREFRONTsection, enter your headless store domain, click the grayPublishbutton.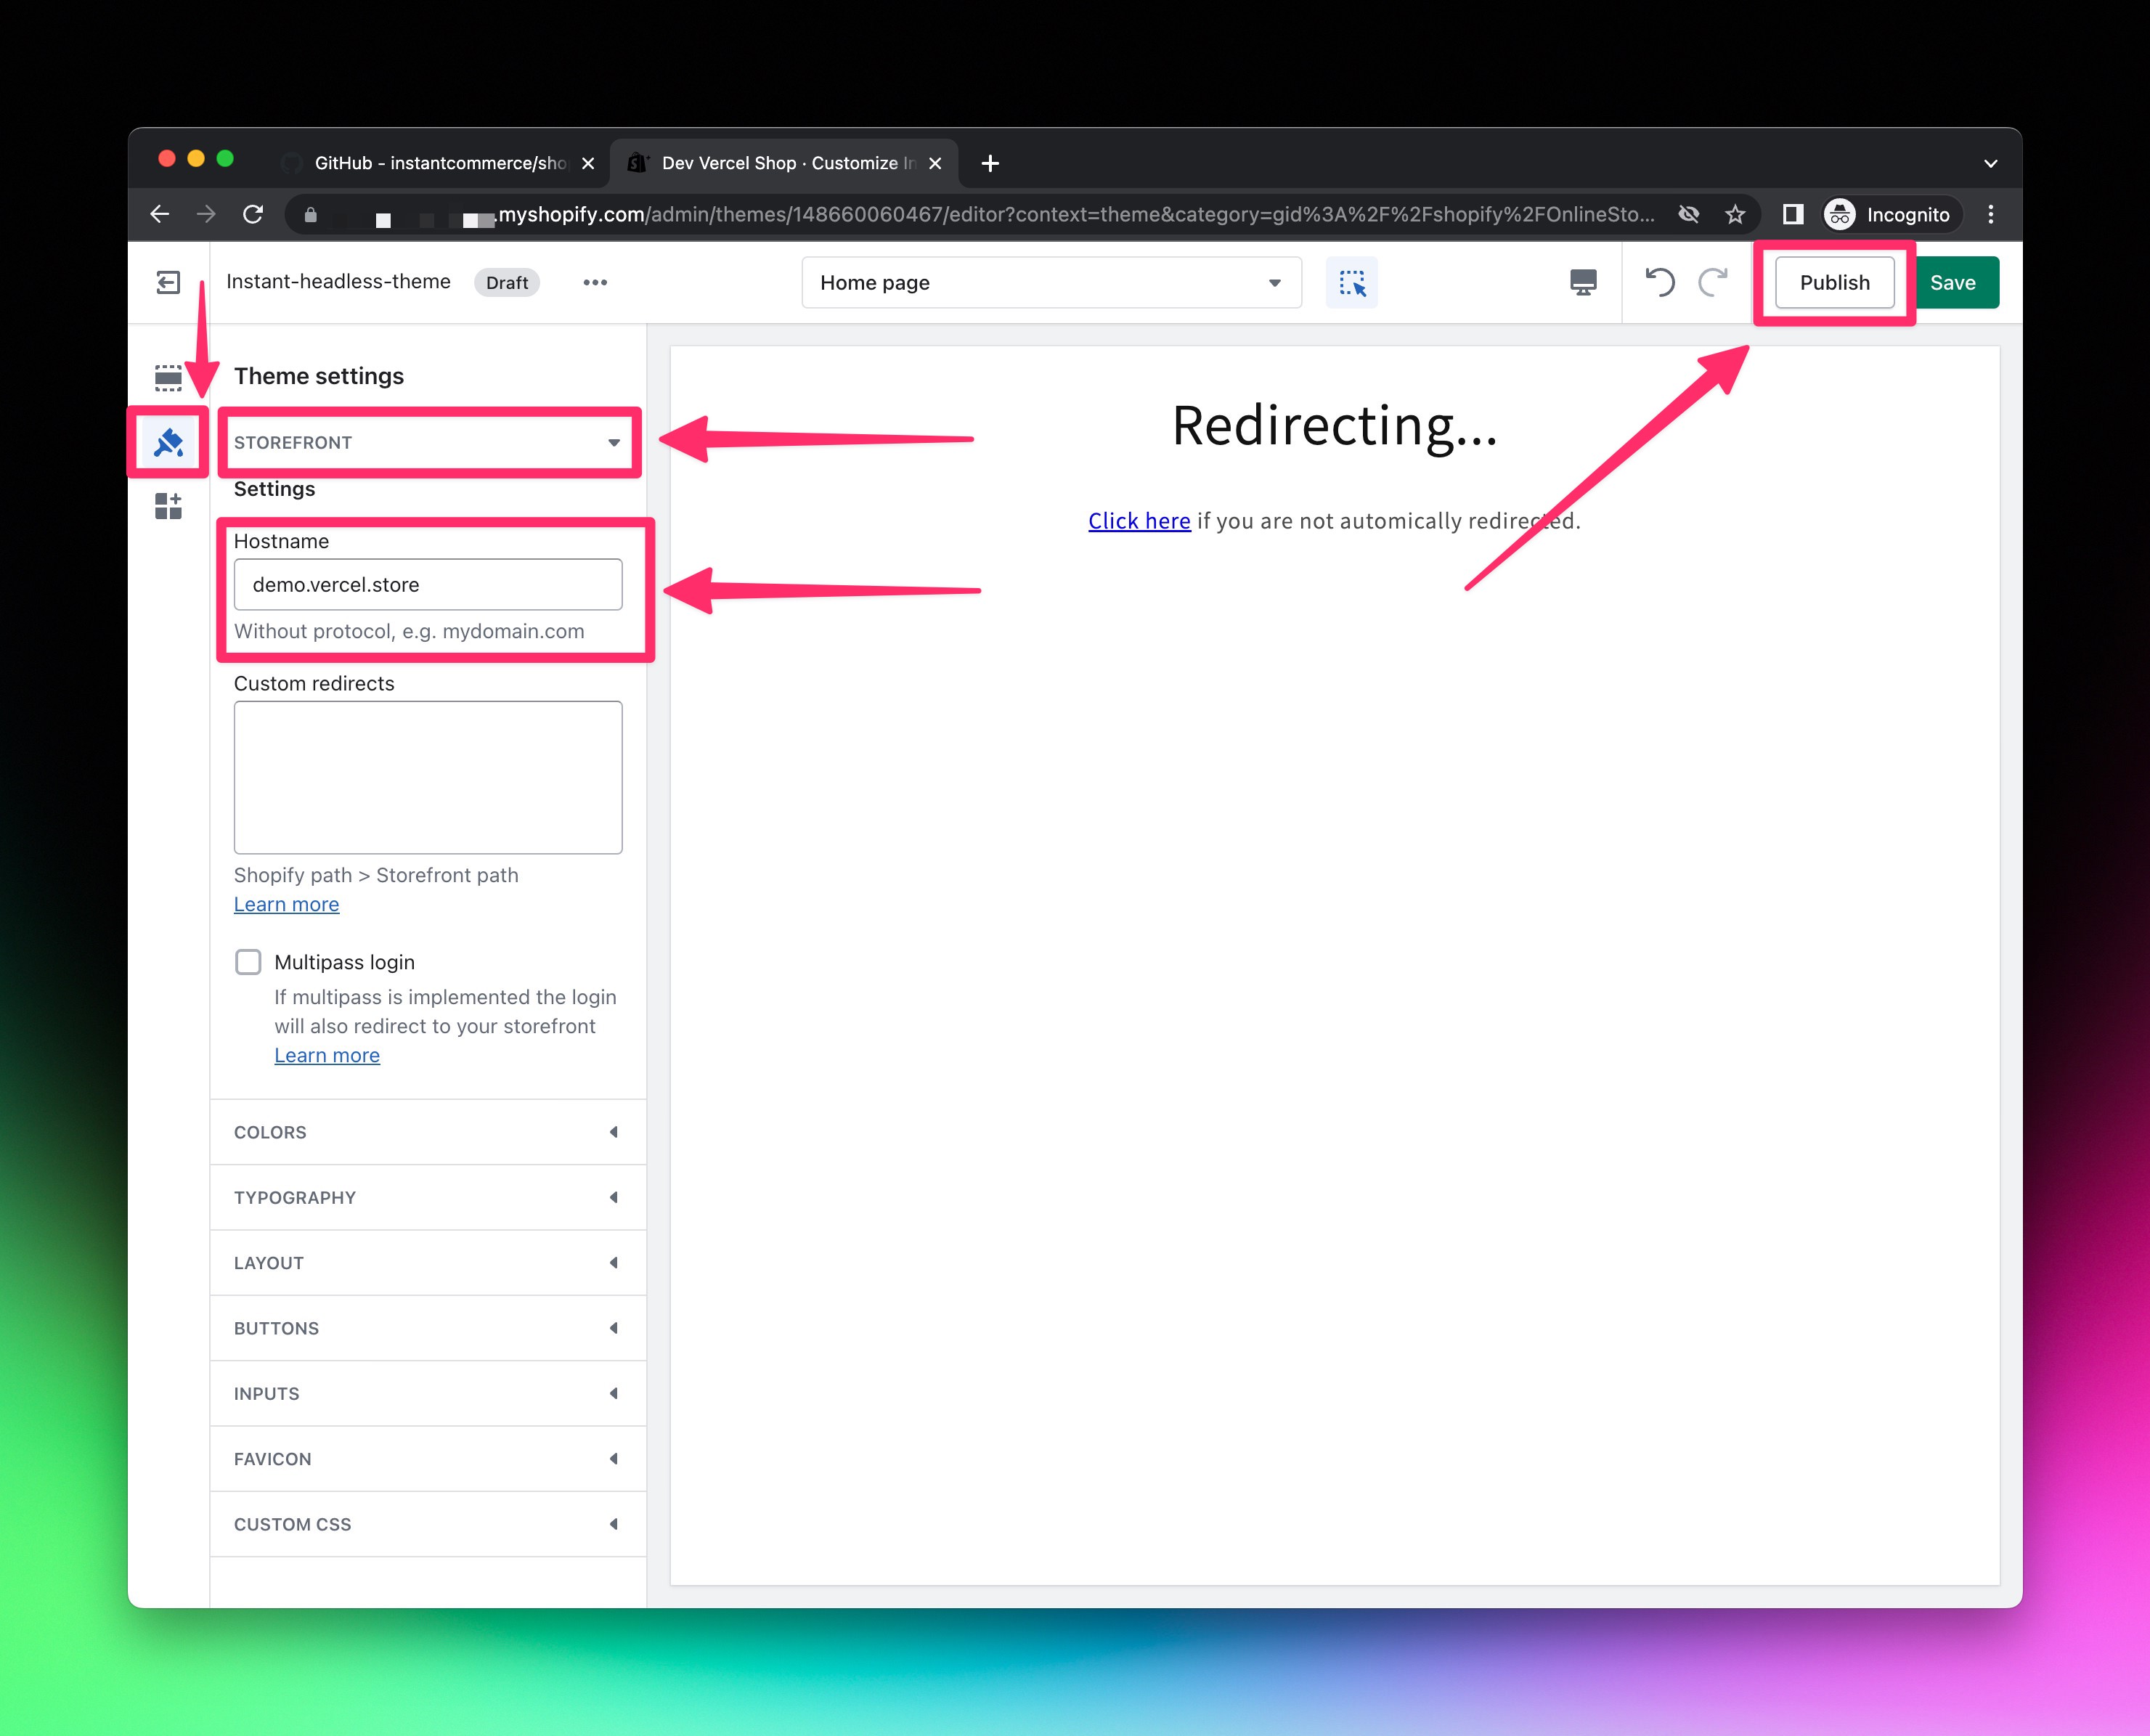
- Confirm the theme change by clicking the green
Save and publishbutton.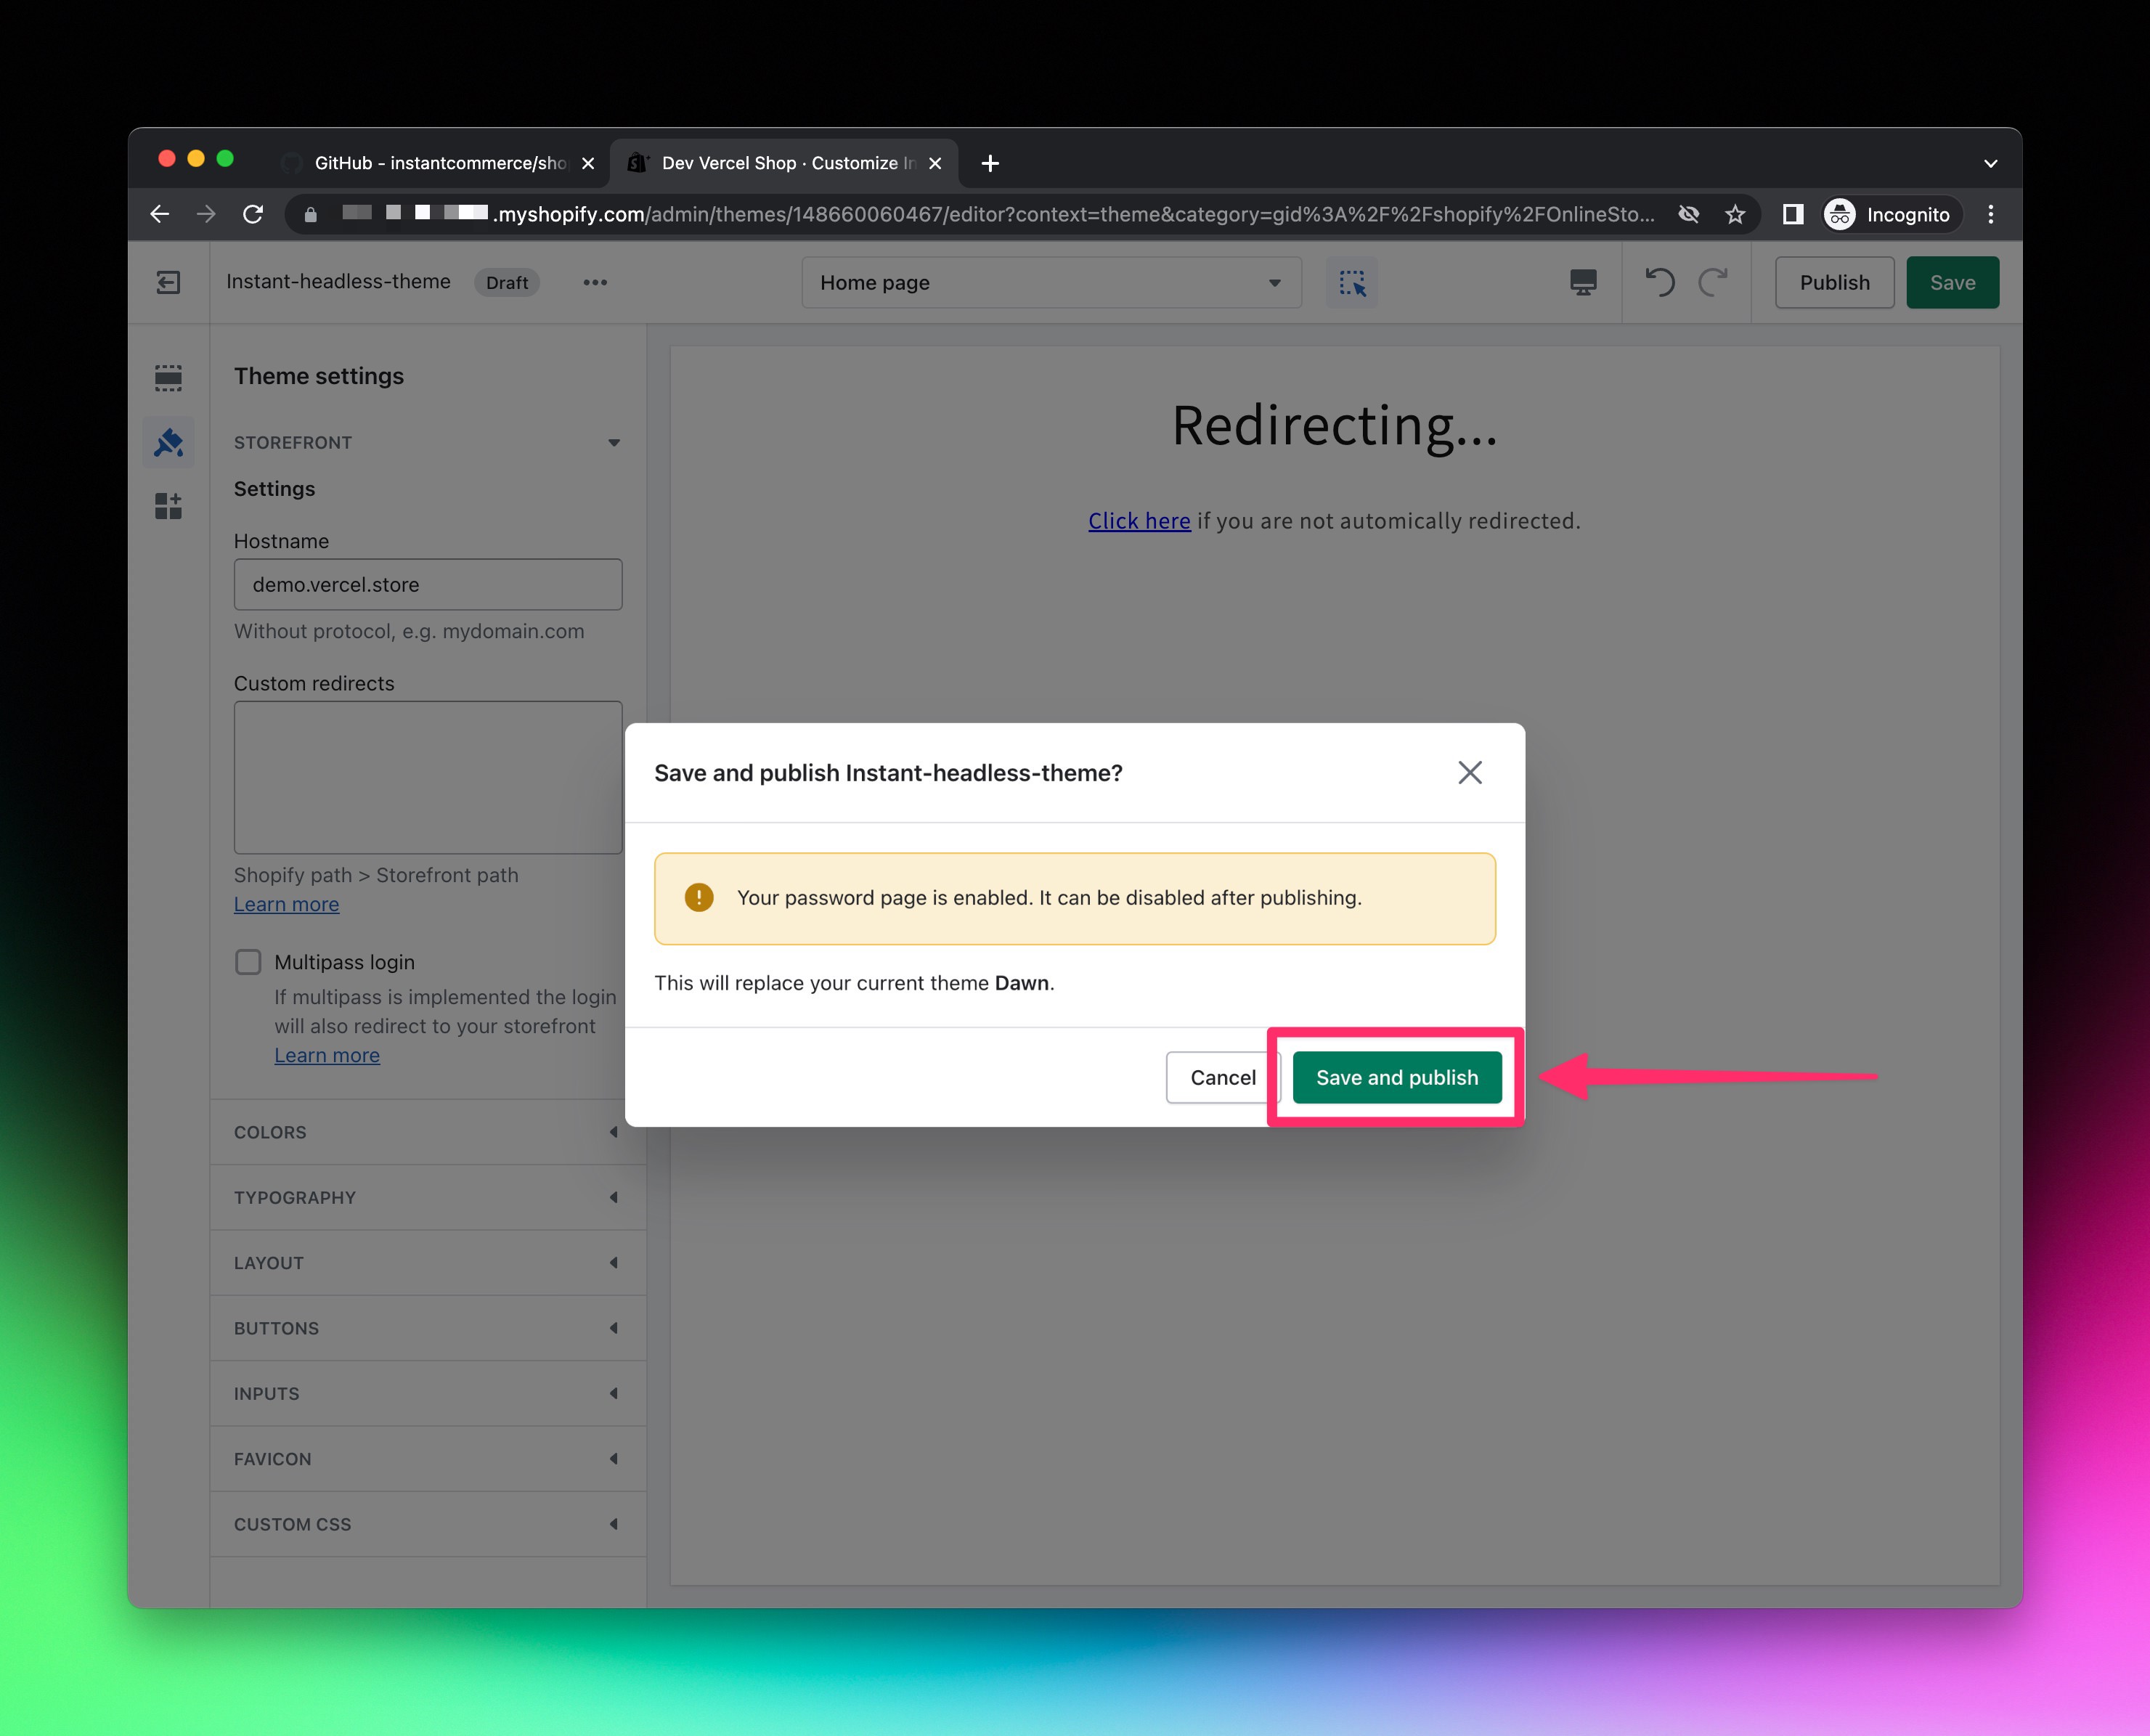
- The headless theme should now be your current active theme.
Branding & Design
Since you're creating a headless Shopify store, you'll be in full control of your brand and design. However, there are still a few aspects we're leaving within Shopify's control.
- Checkout
- Emails
- Order status
- Order history
- Favicon (for any Shopify controlled pages)
You can use Shopify's admin to customize these pages to match your brand and design.
Expand to view detailed walkthrough
Checkout, order status, and order history
- Navigate to
https://[your-shopify-store-subdomain].myshopify.com/admin/settings/checkout. - Click the green
Customizebutton.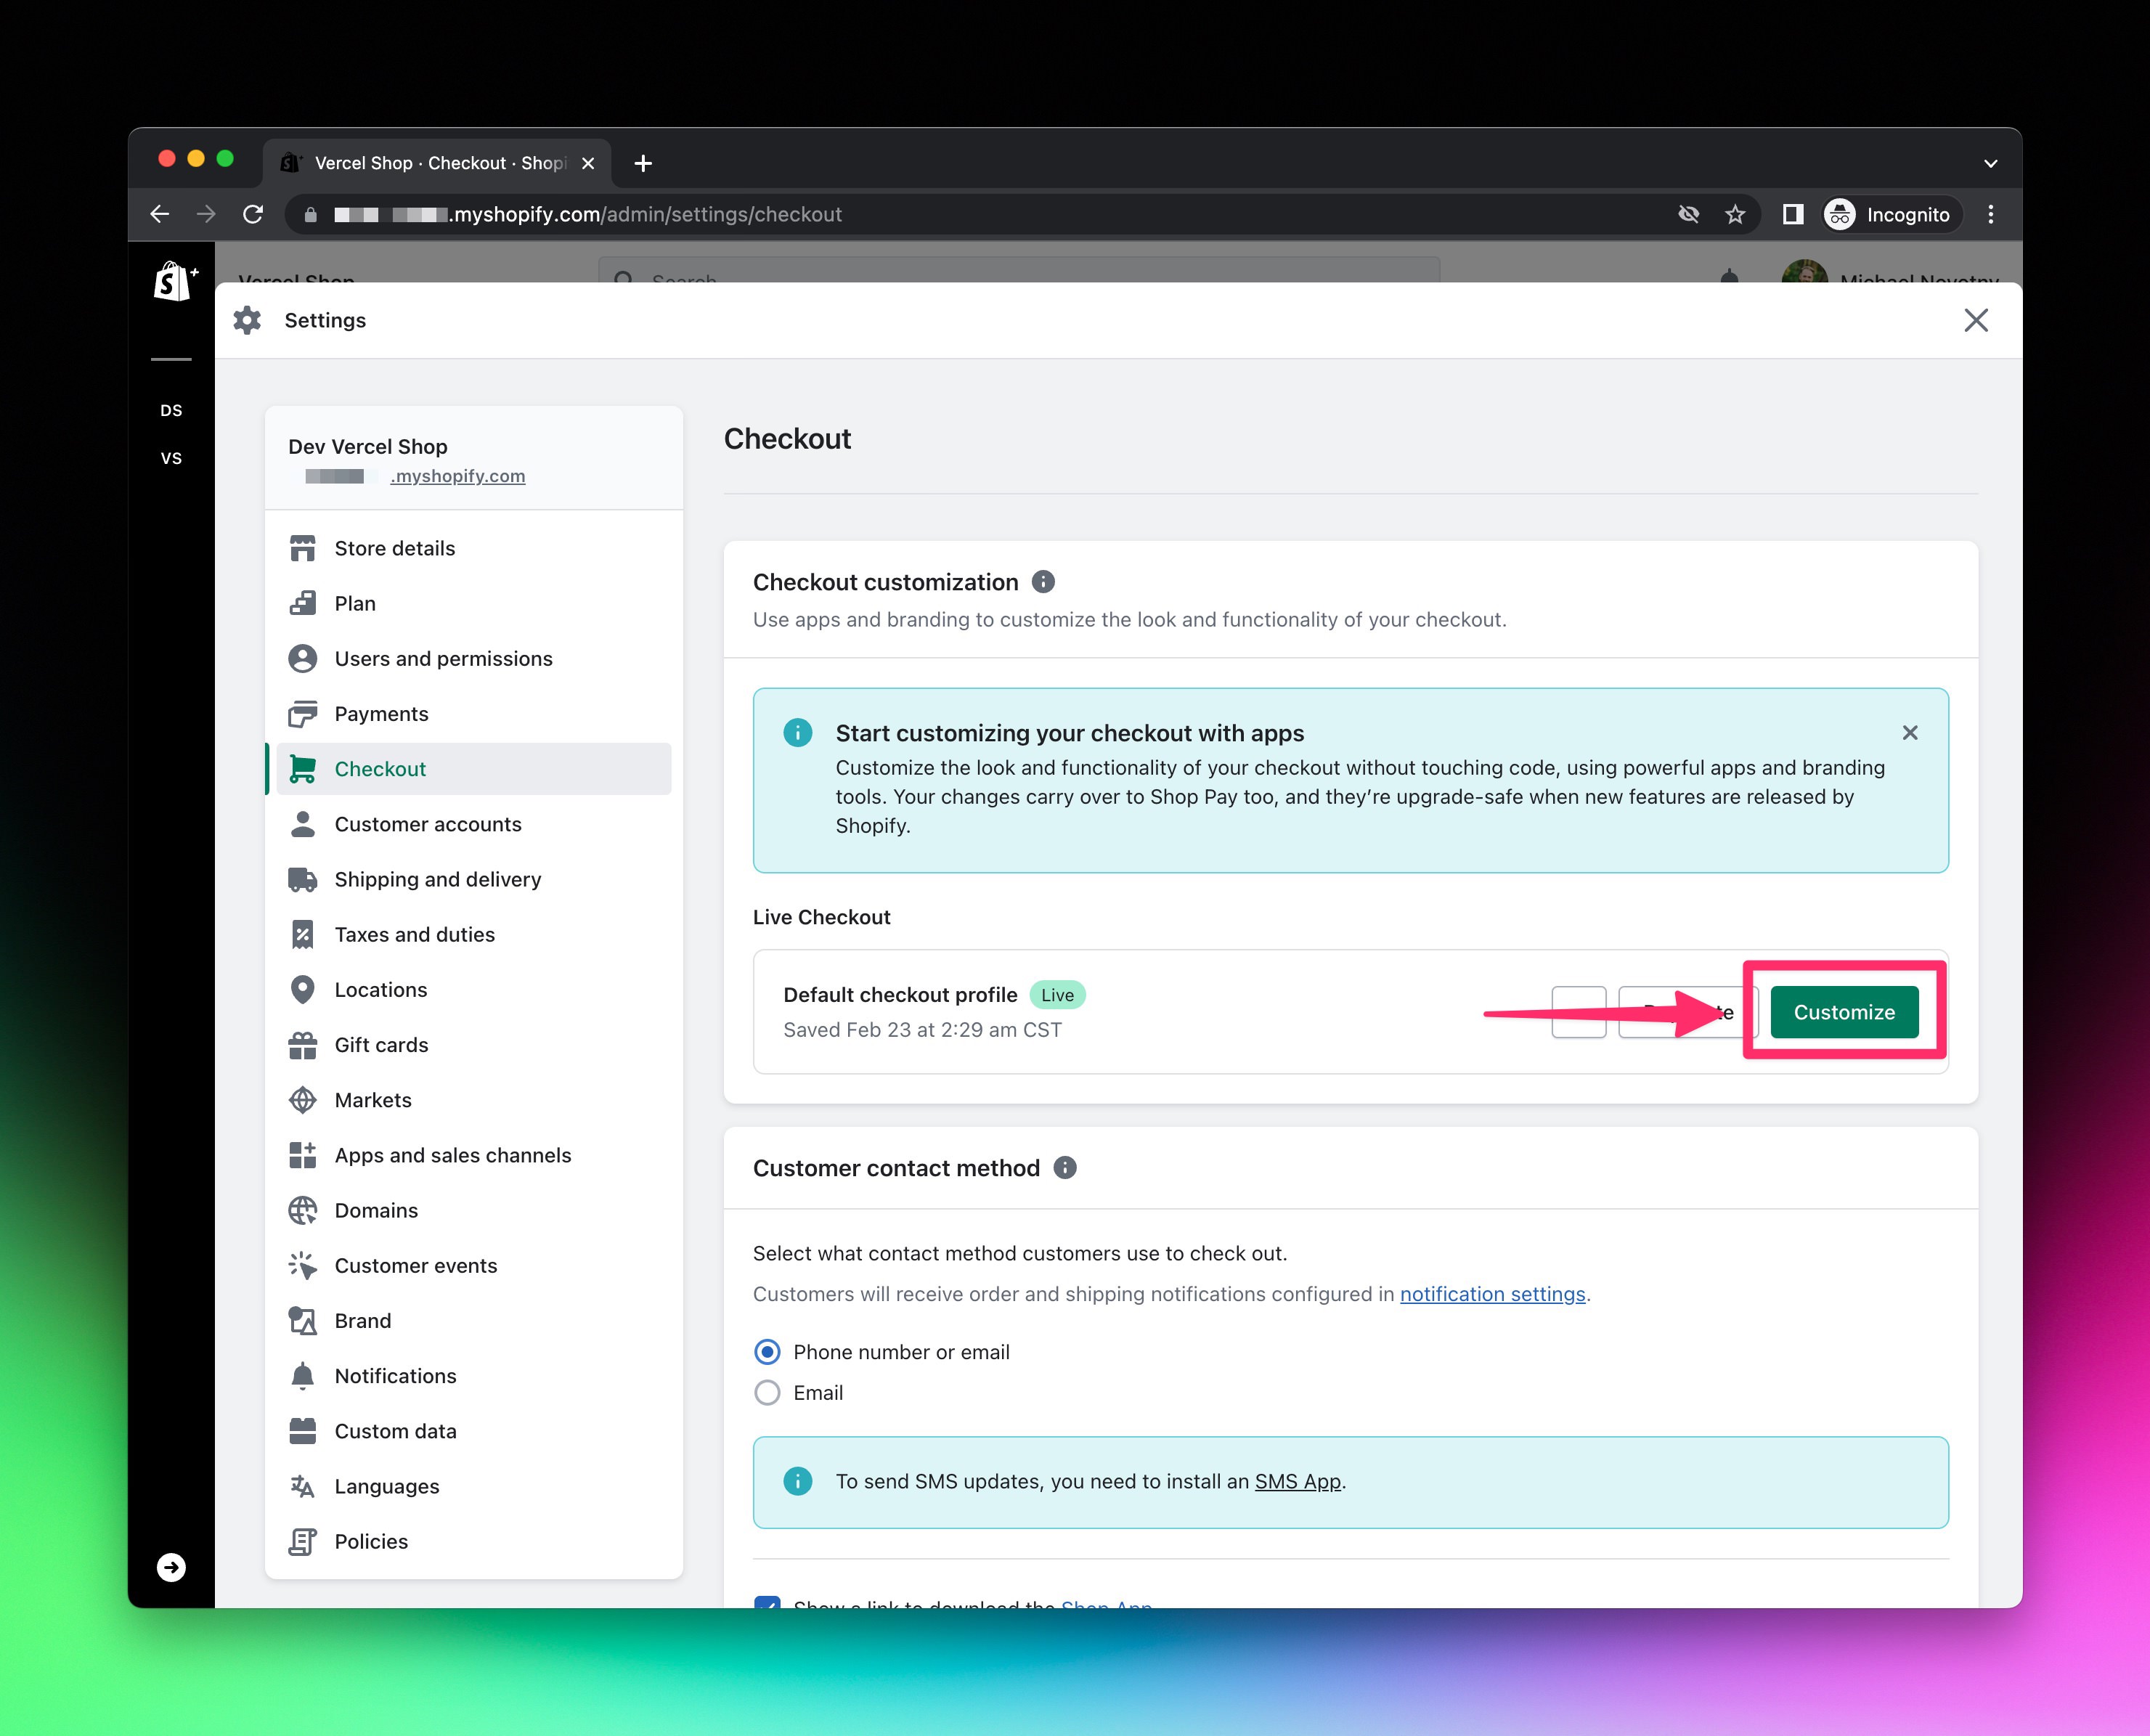
- Click
Branding(ie. the paintbrush icon) and customize your brand. Please note, there are three steps / pages to the checkout flow. Use the dropdown to change pages and adjust branding as needed on each page. ClickSavewhen you are done.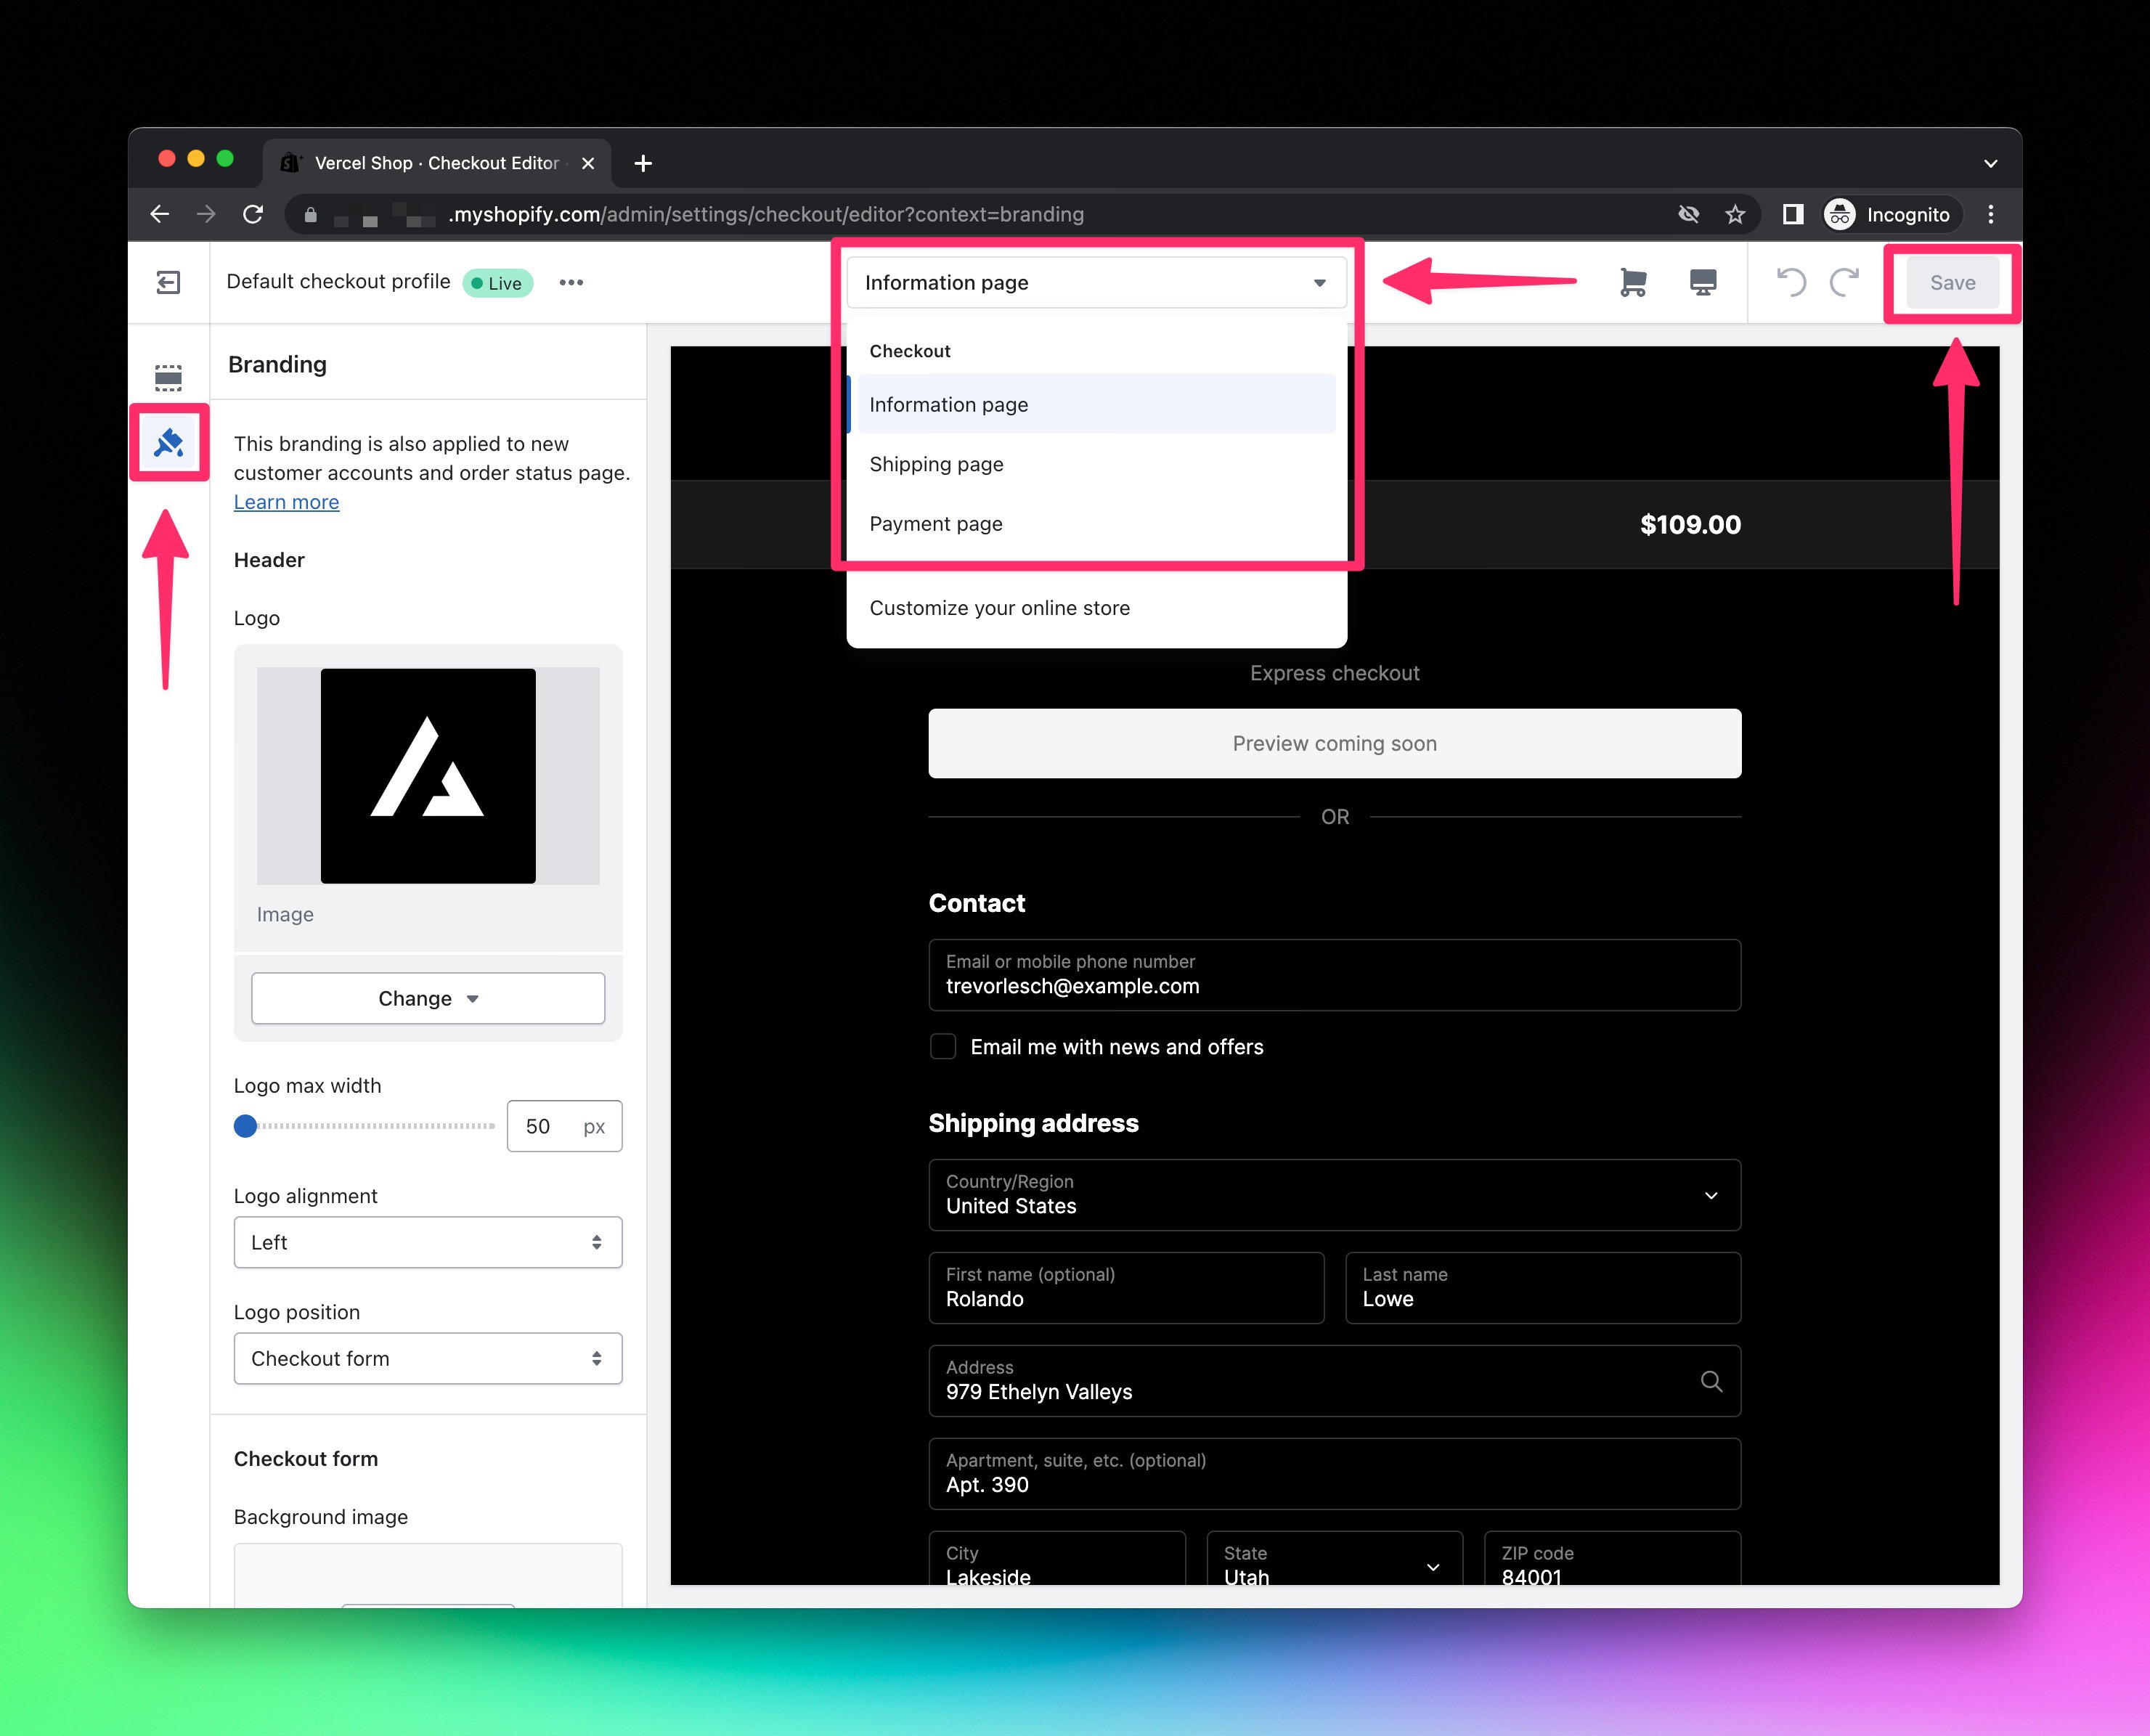
- Navigate to
https://[your-shopify-store-subdomain].myshopify.com/admin/settings/branding. - Customize settings to match your brand.

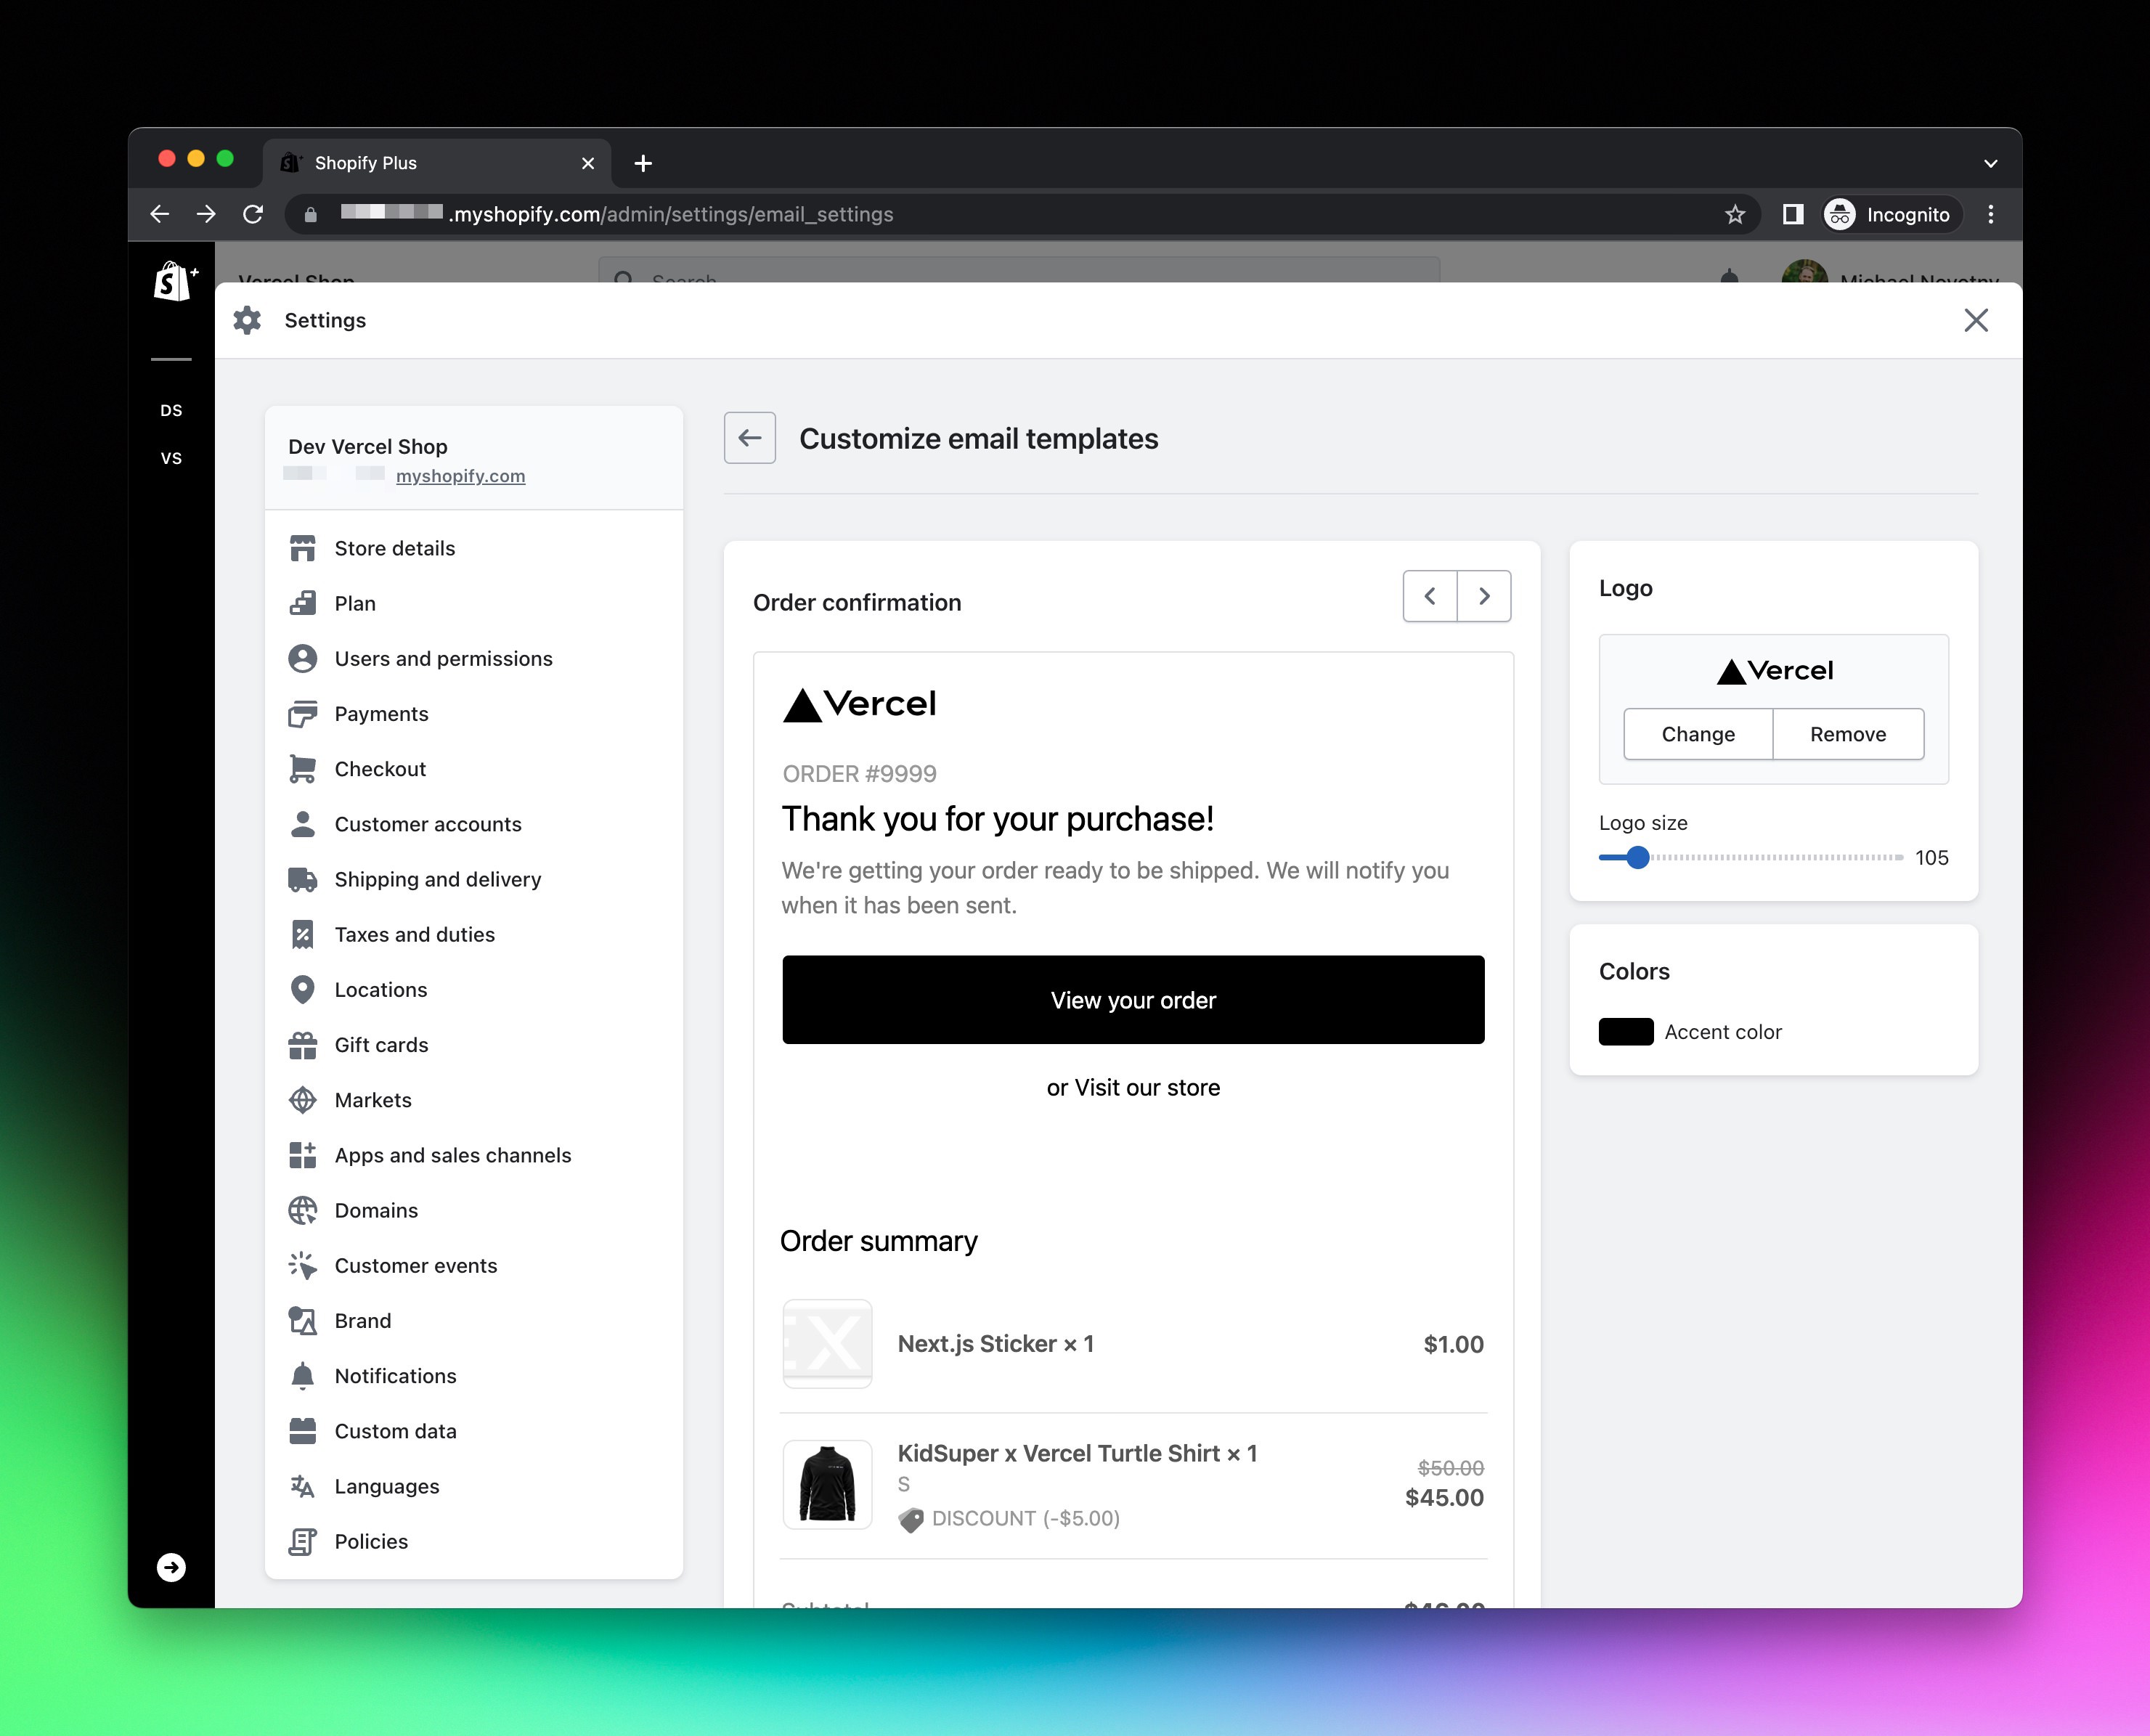
Emails
- Navigate to
https://[your-shopify-store-subdomain].myshopify.com/admin/settings/email_settings. - Customize settings to match your brand.
Favicon
- Navigate to
https://[your-shopify-store-subdomain].myshopify.com/admin/themes. - Click the green
Customizebutton.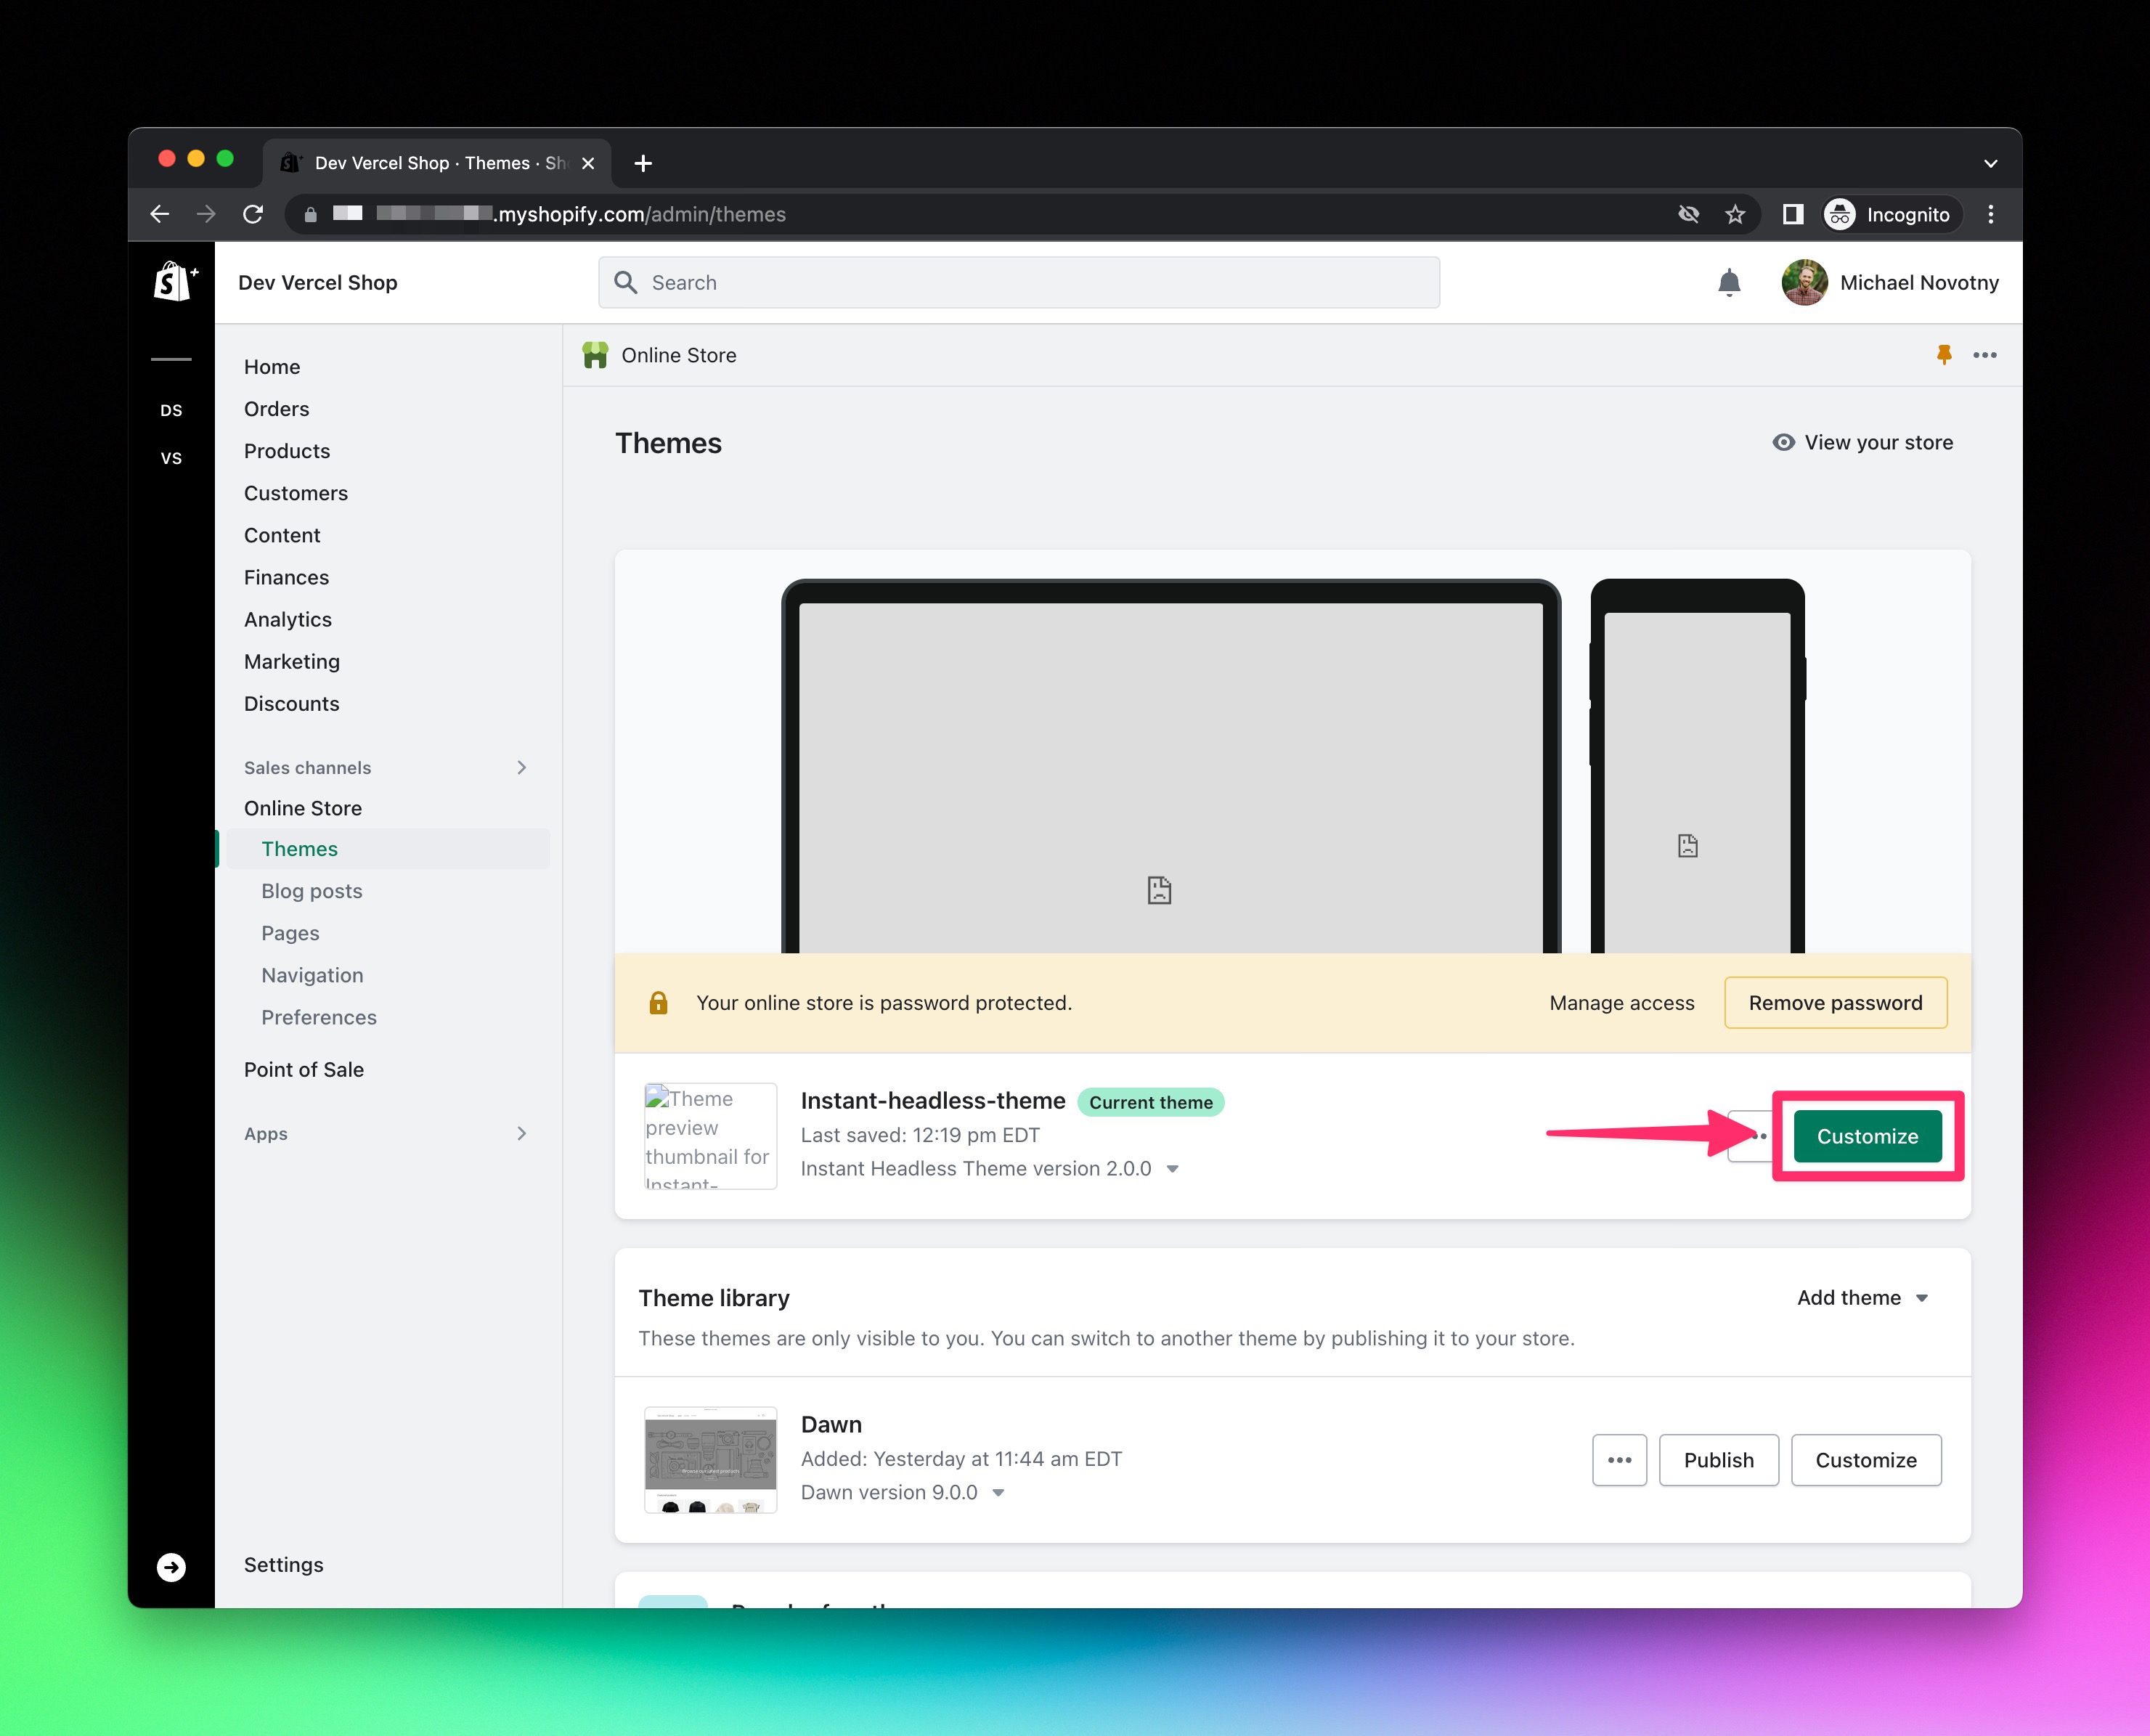
- Click
Theme settings(ie. the paintbrush icon), expand theFAVICONsection, upload favicon, then click theSavebutton.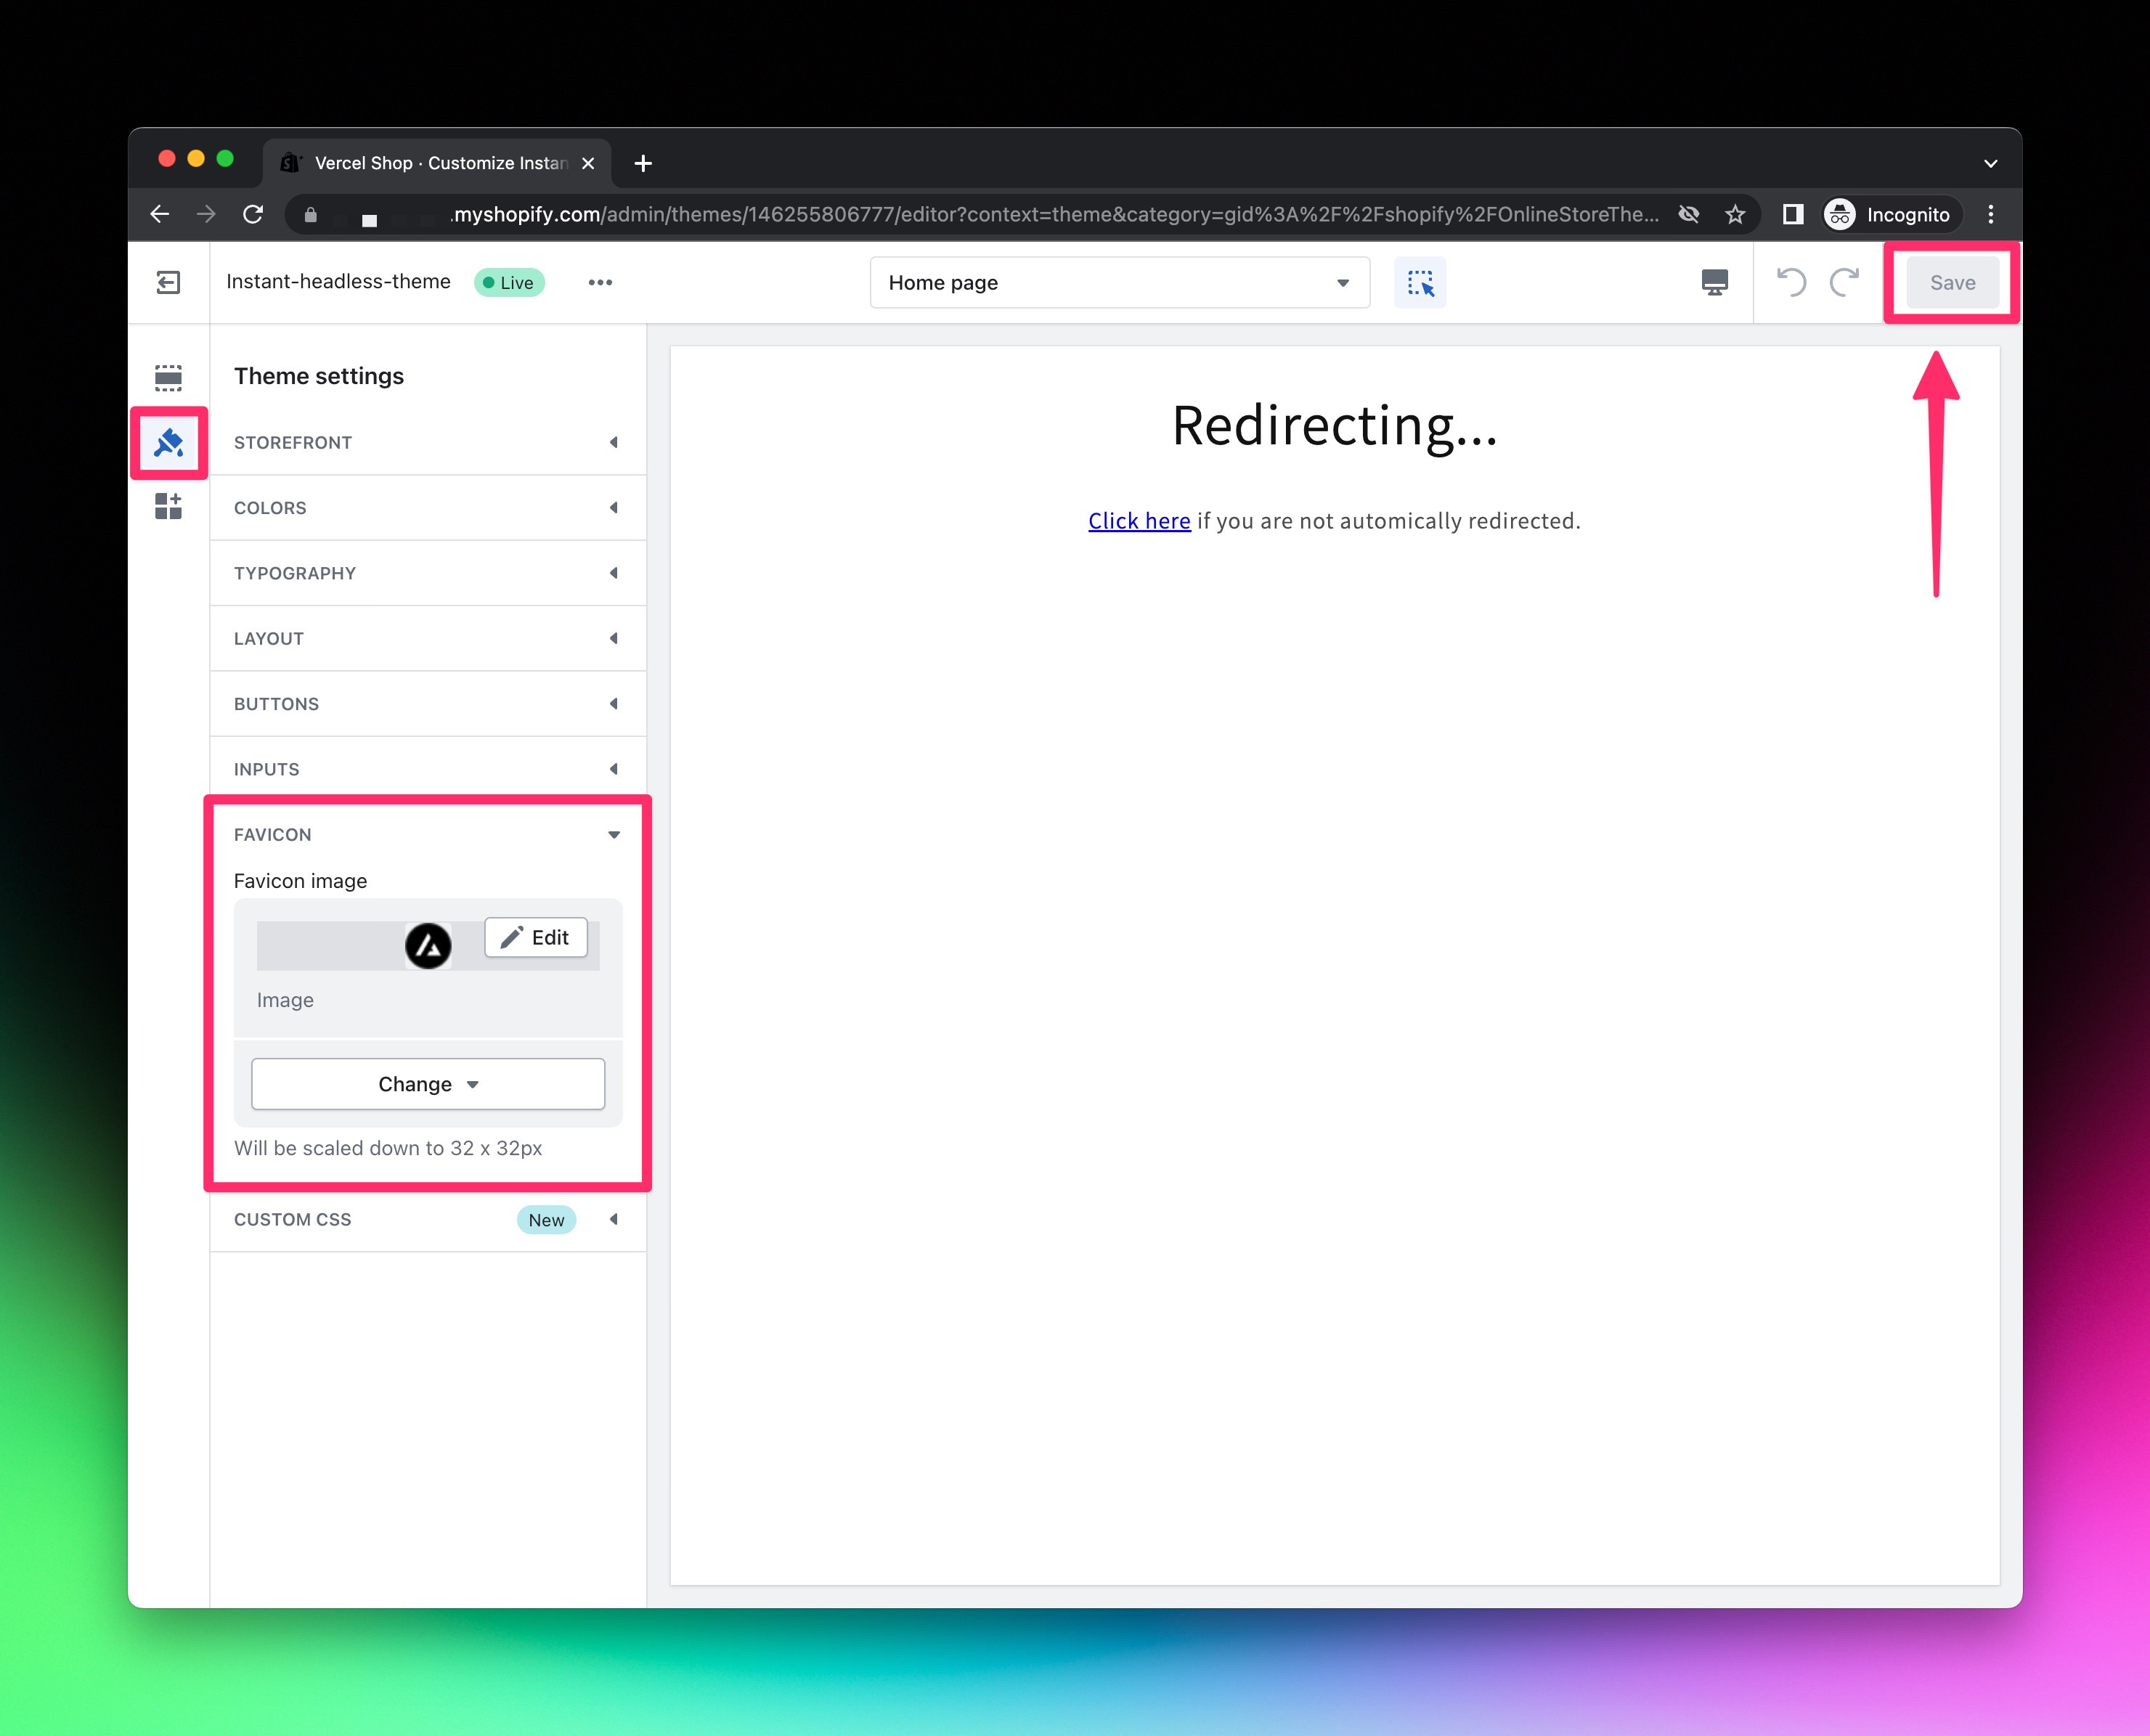
Configure webhooks for on-demand incremental static regeneration (ISR)
Utilizing Shopify's webhooks, and listening for select Shopify webhook event topics, we can use Next'js on-demand revalidation to keep data fetches indefinitely cached until certain events in the Shopify store occur.
Next.js is pre-configured to listen for the following Shopify webhook events and automatically revalidate fetches.
collections/createcollections/deletecollections/updateproducts/createproducts/deleteproducts/update(this also includes when variants are added, updated, and removed as well as when products are purchased so inventory and out of stocks can be updated)
Expand to view detailed walkthrough
Setup secret for secure revalidation
- Create your own secret or generate a random UUID.
- Create a Vercel Environment Variable named
SHOPIFY_REVALIDATION_SECRETand use the value from above.
Configure Shopify webhooks
- Navigate to
https://[your-shopify-store-subdomain].myshopify.com/admin/settings/notifications. - Add webhooks for all six event topics listed above. You can add more sets for other preview urls, environments, or local development. Append
?secret=[SECRET]to each url, where[SECRET]is the secret you created above.
Testing webhooks during local development
The easiest way to test webhooks while developing locally is to use ngrok.
- Install and configure ngrok (you will need to create an account).
- Run your app locally,
npm run dev. - In a separate terminal session, run
ngrok http 3000. - Use the url generated by ngrok and add or update your webhook urls in Shopify.
- You can now make changes to your store and your local app should receive updates. You can also use the
Send test notificationbutton to trigger a generic webhook test.
Using Shopify as a CMS
Next.js Commerce is fully powered by Shopify in a truly headless and data driven way.
Products
https://[your-shopify-store-subdomain].myshopify.com/admin/products
Only Active products are shown. Draft products will not be shown until they are marked as Active.
Active products can still be hidden and not seen by navigating the site, by adding a nextjs-frontend-hidden tag on the product. This tag will also tell search engines to not index or crawl the product. The product is still directly accessible via url. This feature is great for "secret" products you only want to people you share the url with.
Product options and option combinations are driven from Shopify options and variants. When selecting options on the product detail page, other option and variant combinations will be visually validated and verified for availability, like Amazon does.
Products that are active and "out of stock" are still shown on the site, but the ability to add the product to the cart is disabled.
Collections
https://[your-shopify-store-subdomain].myshopify.com/admin/collections
Create whatever collections you want and configure them however you want. All available collections will show on the search page as filters on the left, with one exception...
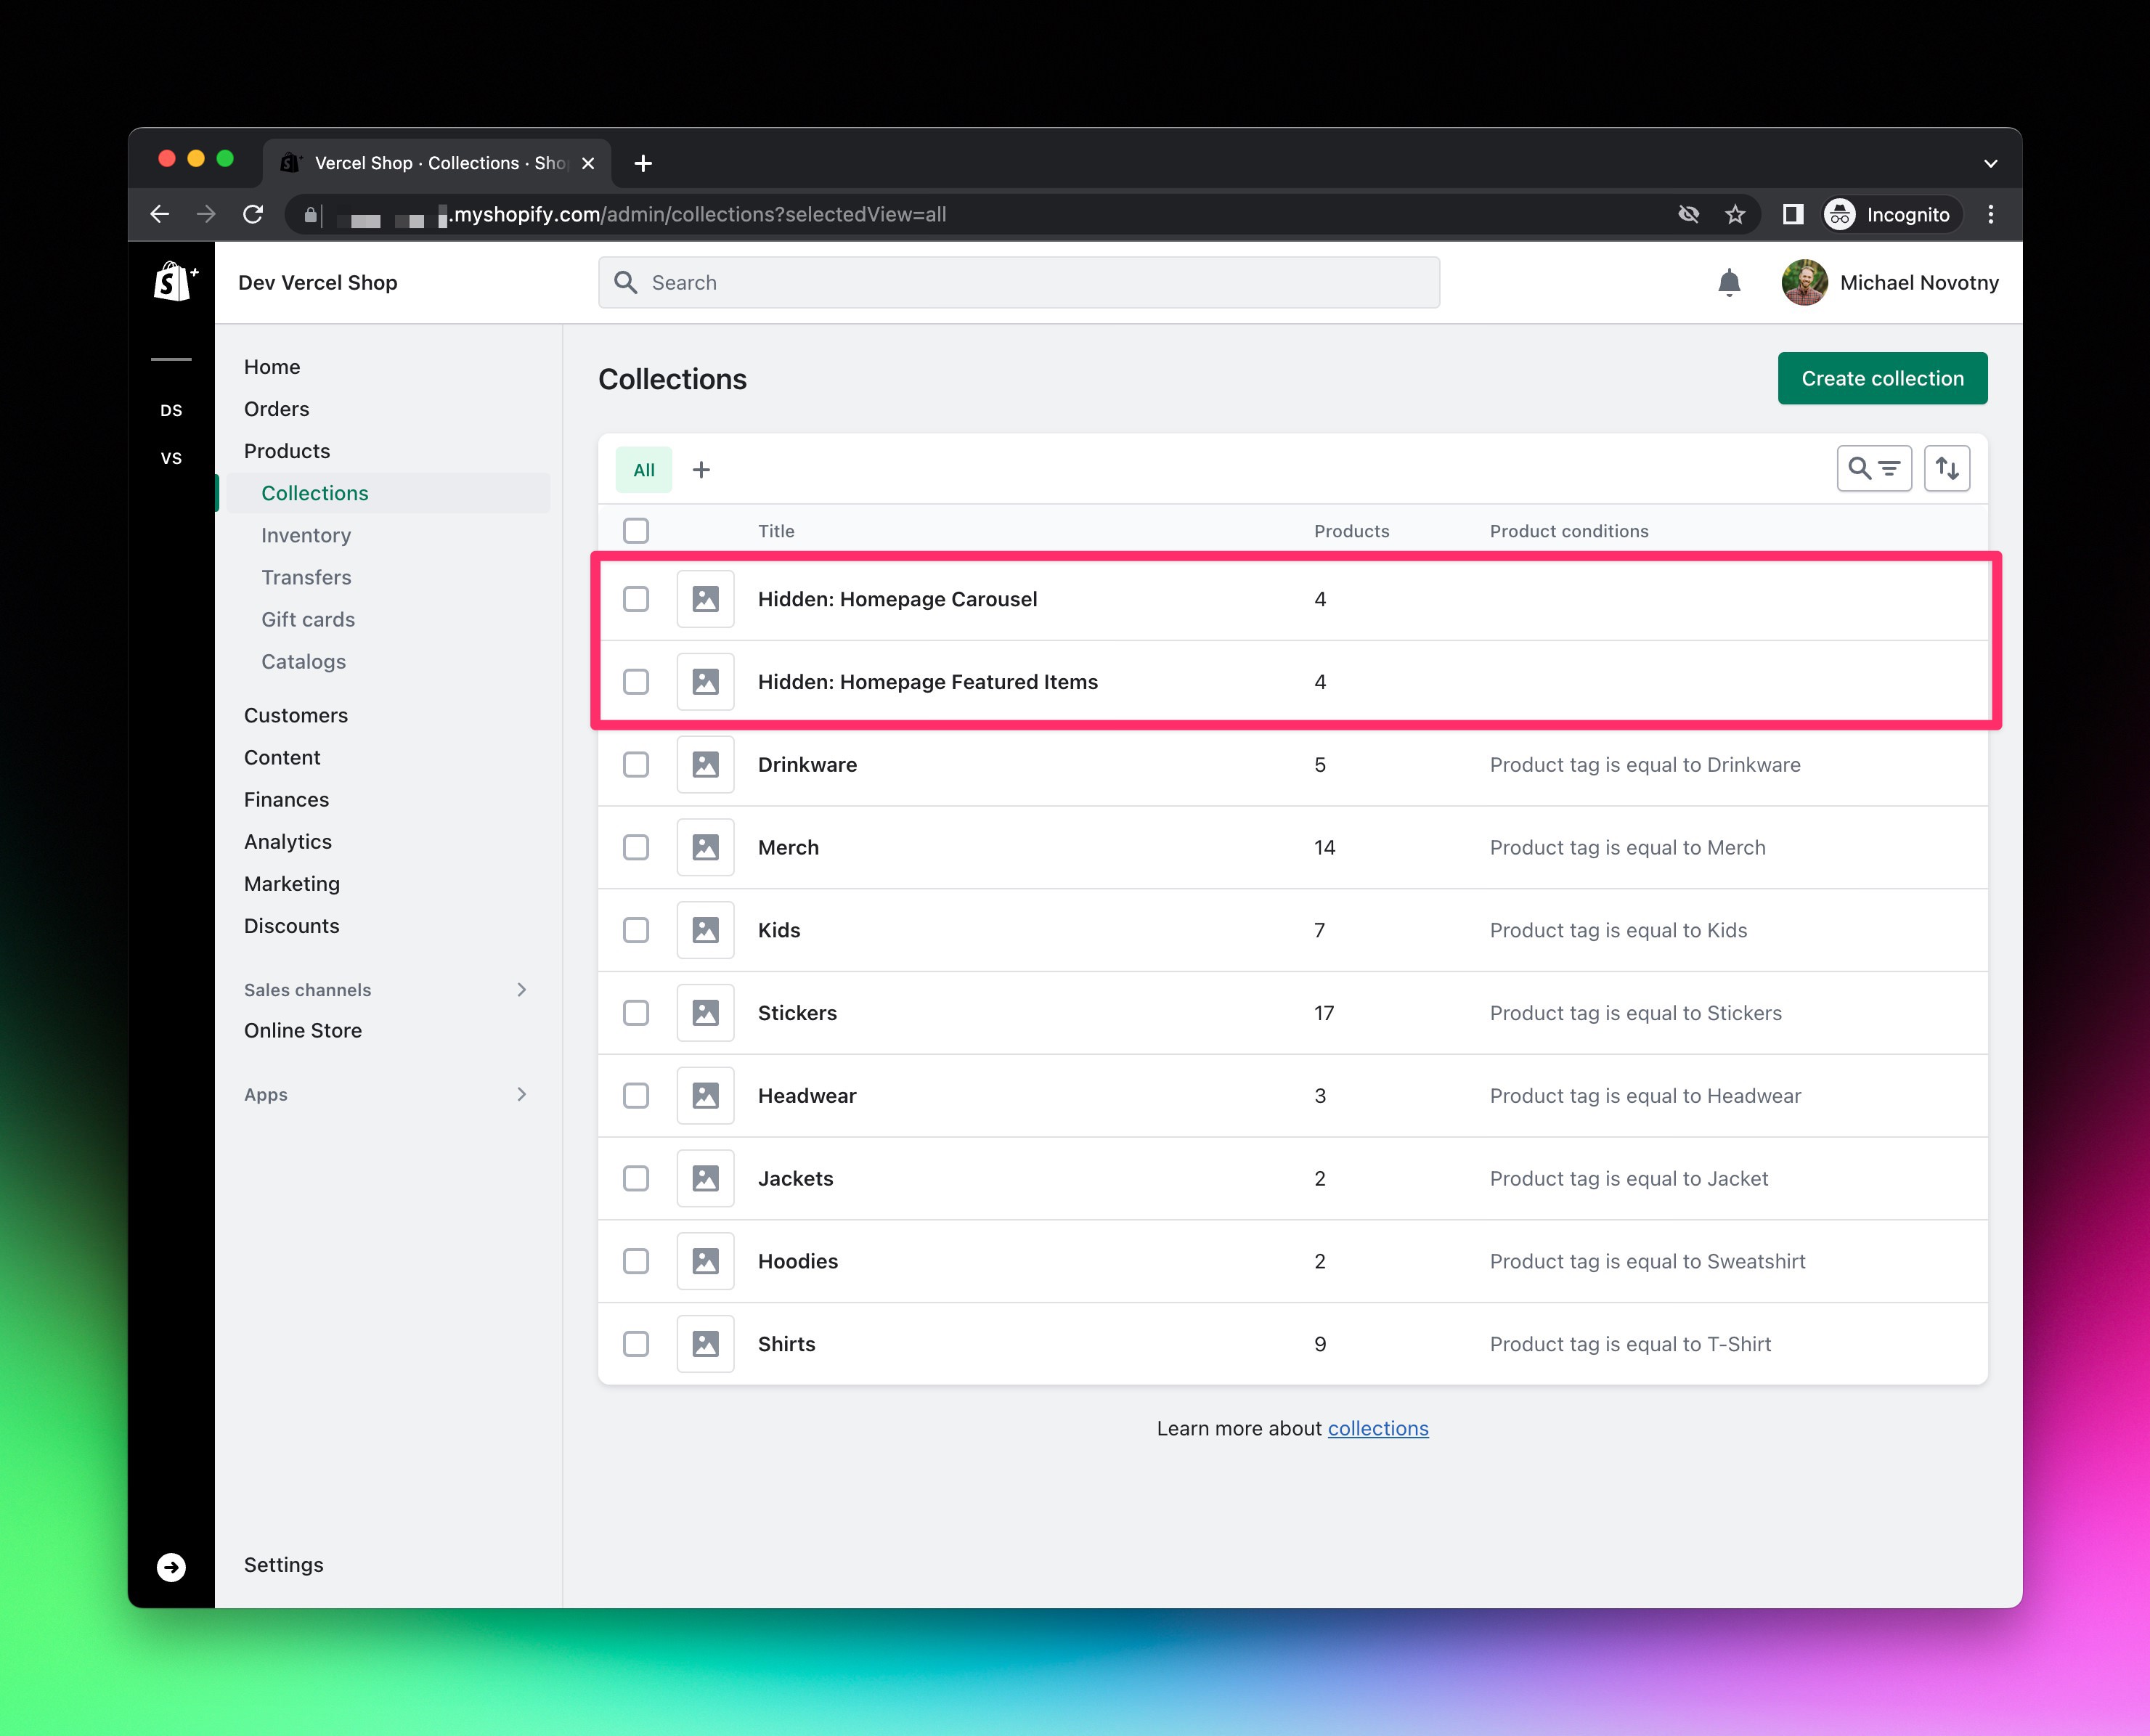
Any collection names that start with the word "hidden" will not show up on the headless front end. The Next.js Commerce theme comes pre-configured to look for two hidden collections. Collections were chosen for this over tags so that order of products could be controlled (collections allow for manual ordering).
Create the following collections:
Hidden: Homepage Featured Items-- Products in this collection are displayed in the three featured blocks on the homepage.Hidden: Homepage Carousel-- Products in this collection are displayed in the auto-scrolling carousel section on the homepage.

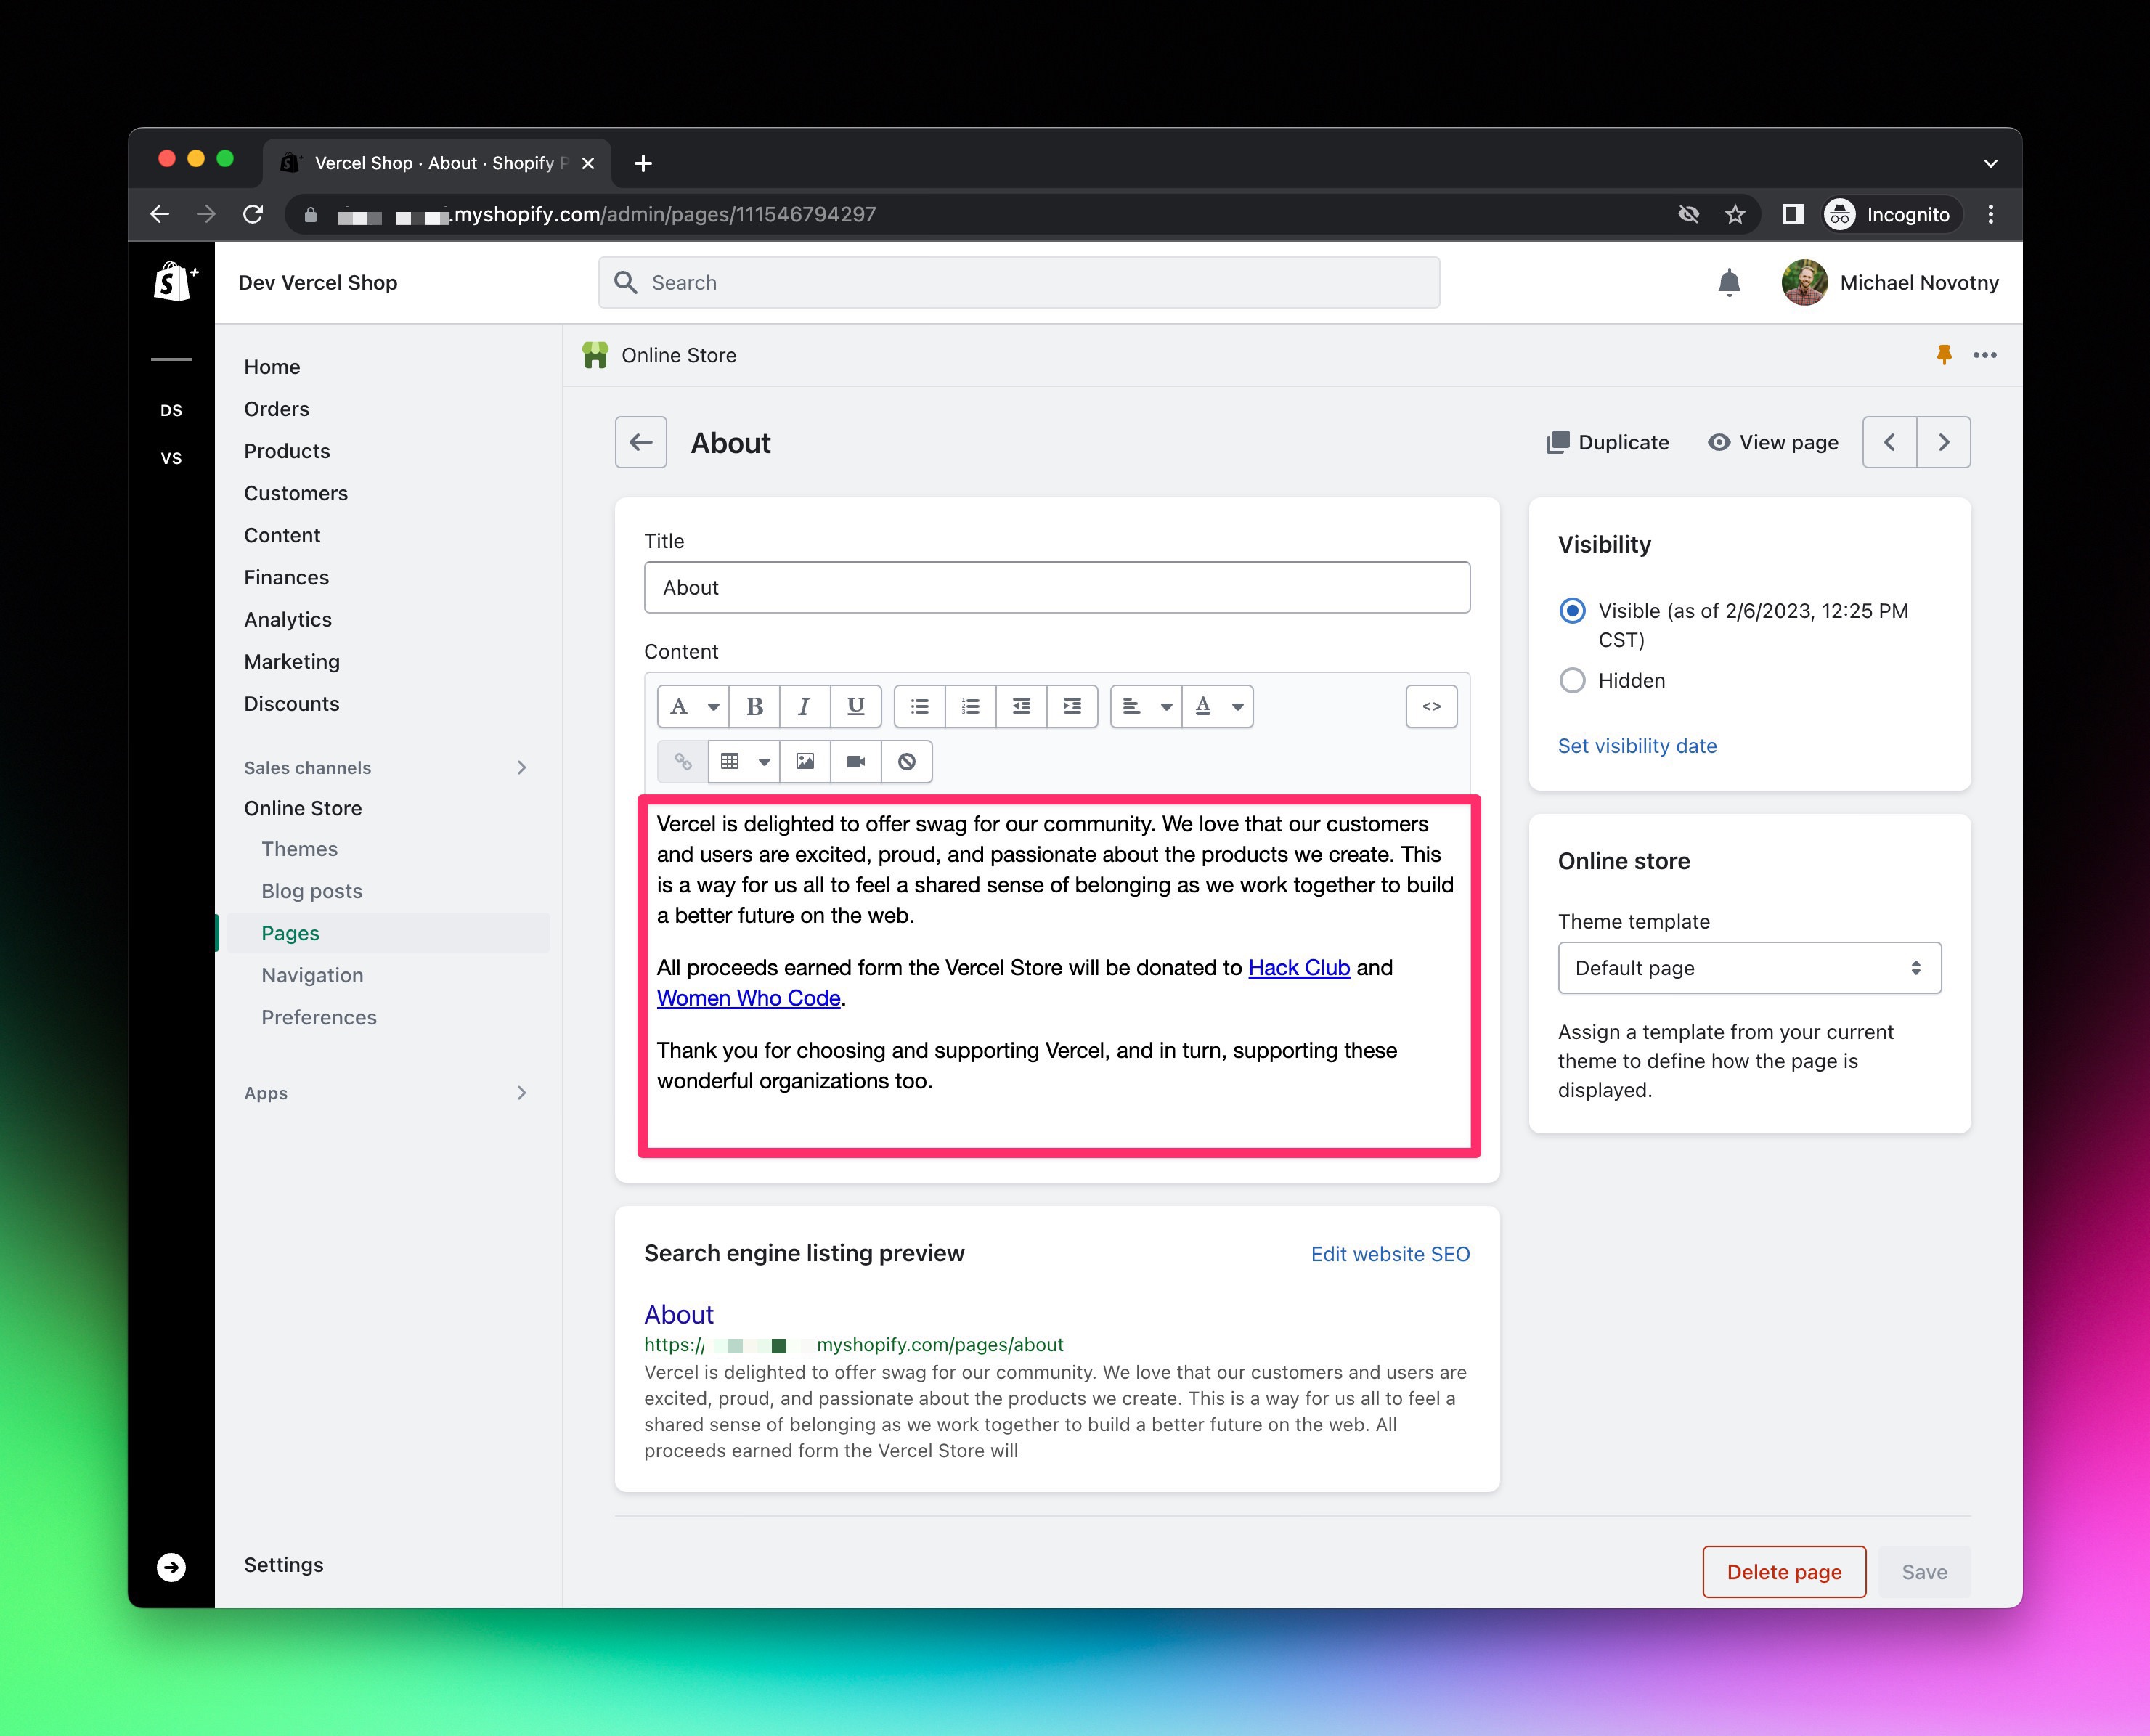
Pages
https://[your-shopify-store-subdomain].myshopify.com/admin/pages
Next.js Commerce contains a dynamic [page] route. It will use the value to look for a corresponding page in Shopify. If a page is found, it will display its rich content using Tailwind's prose. If a page is not found, a 404 page is displayed.

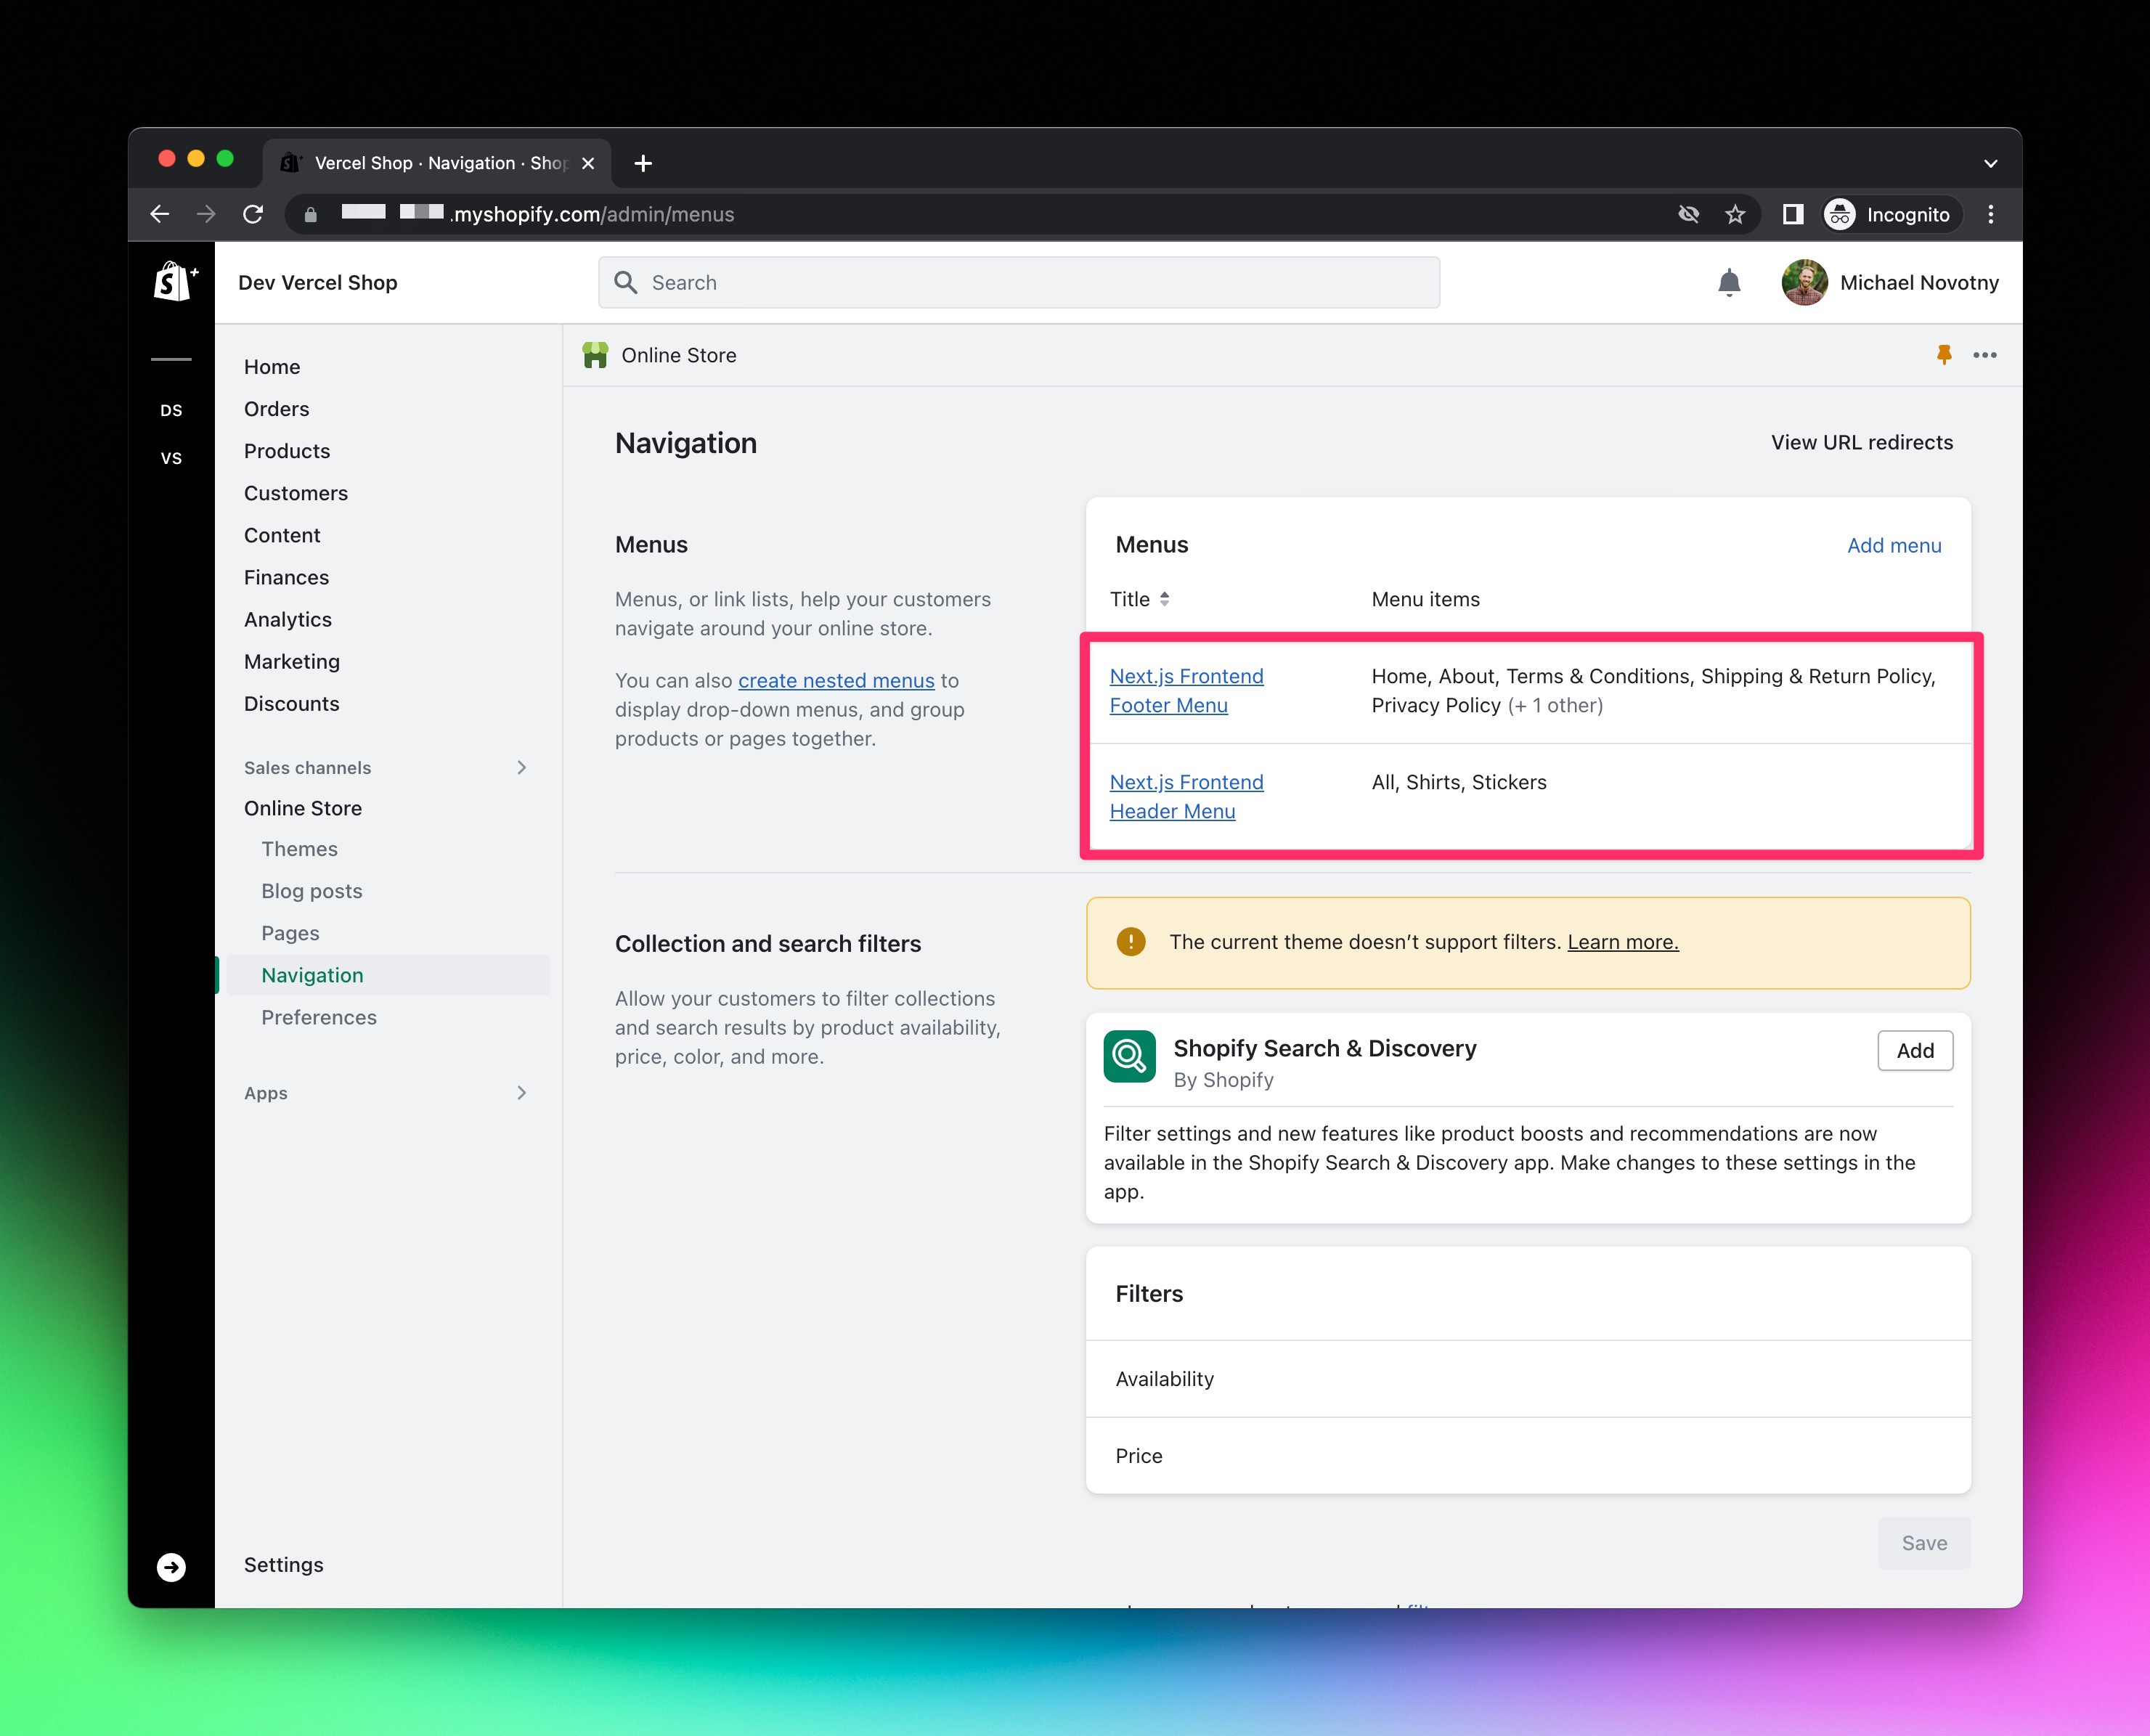
Navigation menus
https://[your-shopify-store-subdomain].myshopify.com/admin/menus
Next.js Commerce's header and footer navigation is pre-configured to be controlled by Shopify navigation menus. This means you have full control over what links go here. They can be to collections, pages, external links, and more.
Create the following navigation menus:
Next.js Frontend Header Menu-- Menu items to be shown in the headless frontend header.Next.js Frontend Footer Menu-- Menu items to be shown in the headless frontend footer.

SEO
Shopify's products, collections, pages, etc. allow you to create custom SEO titles and descriptions. Next.js Commerce is pre-configured to display these custom values, but also comes with sensible default fallbacks if they are not provided.
