4
0
forked from crowetic/commerce
commerce/README.md

276 lines
17 KiB
Markdown
Raw Normal View History

[![Deploy with Vercel](https://vercel.com/button)](https://vercel.com/new/clone?repository-url=https%3A%2F%2Fgithub.com%2Fvercel%2Fcommerce&project-name=commerce&repo-name=commerce&demo-title=Next.js%20Commerce&demo-url=https%3A%2F%2Fdemo.vercel.store&demo-image=https%3A%2F%2Fbigcommerce-demo-asset-ksvtgfvnd.vercel.app%2Fbigcommerce.png&env=SHOPIFY_REVALIDATION_SECRET,SHOPIFY_STOREFRONT_ACCESS_TOKEN,SHOPIFY_STORE_DOMAIN,SITE_NAME,TWITTER_CREATOR,TWITTER_SITE)
2020-10-27 08:39:43 -03:00
2020-10-24 19:18:13 -03:00
# Next.js Commerce
2020-10-27 08:39:43 -03:00
A Next.js 13 and App Router-ready ecommerce template featuring:
2020-10-27 08:39:43 -03:00
Next.js Commerce refresh. (#966) We're making some updates to Next.js Commerce. Everything prior to this commit marks what we're calling [`v1`](https://github.com/vercel/commerce/releases/tag/v1) as a point in time to be able to reference and still use going into the future. The current architecture of Commerce is a multi-vendor, interoperable solution, including: - [Shopify](https://shopify.vercel.store/) - [Swell](https://swell.vercel.store/) - [BigCommerce](https://bigcommerce.vercel.store/) - [Vendure](https://vendure.vercel.store/) - [Saleor](https://saleor.vercel.store/) - [Ordercloud](https://ordercloud.vercel.store/) - [Spree](https://spree.vercel.store/) - [Kibo Commerce](https://kibocommerce.vercel.store/) - [Commerce.js](https://commercejs.vercel.store/) - [SalesForce Cloud Commerce](https://salesforce-cloud-commerce.vercel.store/) All features can be toggled on or off, and it's easy to change between commerce providers. To support this, we needed to create a ["commerce metaframework"](https://github.com/vercel/commerce/blob/d1d9e8c4343e70d72df6e00ec95f6ea4efbb7c54/packages/commerce/new-provider.md) where providers could confirm to an API spec to add support for Next.js Commerce. While this worked and was successful for `v1`, we have different design goals and ambitions for `v2`. **What You Need To Know** - `v1` will not be updated moving forward. If you need to reference `v1`, you will still be able to clone and deploy the version tagged at this release. - `v2` will be shifting to be a single provider vs. provider agnostic. Other providers are welcome to fork this repository and swap out the underlying `lib/` implementation that connects to the selected commerce provider (Shopify). This architecture was chosen to reduce the surface area of the codebase, remove the intermediate metaframework layer for provider-interoperability, and enable usage with the latest Next.js and React features. - We will be sharing more about `v2` in the future as we continue to iterate before the marked release.
2023-04-17 23:00:47 -04:00
- Next.js App Router
- Optimized for SEO using Next.js's Metadata
- React Server Components (RSCs) and Suspense
2023-06-17 11:20:58 -07:00
- Server Actions for mutations
- Edge Runtime
- New fetching and caching paradigms
- Dynamic OG images
Next.js Commerce refresh. (#966) We're making some updates to Next.js Commerce. Everything prior to this commit marks what we're calling [`v1`](https://github.com/vercel/commerce/releases/tag/v1) as a point in time to be able to reference and still use going into the future. The current architecture of Commerce is a multi-vendor, interoperable solution, including: - [Shopify](https://shopify.vercel.store/) - [Swell](https://swell.vercel.store/) - [BigCommerce](https://bigcommerce.vercel.store/) - [Vendure](https://vendure.vercel.store/) - [Saleor](https://saleor.vercel.store/) - [Ordercloud](https://ordercloud.vercel.store/) - [Spree](https://spree.vercel.store/) - [Kibo Commerce](https://kibocommerce.vercel.store/) - [Commerce.js](https://commercejs.vercel.store/) - [SalesForce Cloud Commerce](https://salesforce-cloud-commerce.vercel.store/) All features can be toggled on or off, and it's easy to change between commerce providers. To support this, we needed to create a ["commerce metaframework"](https://github.com/vercel/commerce/blob/d1d9e8c4343e70d72df6e00ec95f6ea4efbb7c54/packages/commerce/new-provider.md) where providers could confirm to an API spec to add support for Next.js Commerce. While this worked and was successful for `v1`, we have different design goals and ambitions for `v2`. **What You Need To Know** - `v1` will not be updated moving forward. If you need to reference `v1`, you will still be able to clone and deploy the version tagged at this release. - `v2` will be shifting to be a single provider vs. provider agnostic. Other providers are welcome to fork this repository and swap out the underlying `lib/` implementation that connects to the selected commerce provider (Shopify). This architecture was chosen to reduce the surface area of the codebase, remove the intermediate metaframework layer for provider-interoperability, and enable usage with the latest Next.js and React features. - We will be sharing more about `v2` in the future as we continue to iterate before the marked release.
2023-04-17 23:00:47 -04:00
- Styling with Tailwind CSS
- Checkout and payments with Shopify
- Automatic light/dark mode based on system settings
> Note: Looking for Next.js Commerce v1? View the [code](https://github.com/vercel/commerce/tree/v1), [demo](https://commerce-v1.vercel.store), and [release notes](https://github.com/vercel/commerce/releases/tag/v1)
## Providers
2023-05-09 07:21:15 -07:00
Vercel will only be actively maintaining a Shopify version [as outlined in our vision and strategy for Next.js Commerce](https://github.com/vercel/commerce/pull/966).
Vercel is more than happy to partner and work with any commerce provider to help them get a similar template up and running and listed below. Alternative providers should be able to fork this repository and swap out the `lib/shopify` file with their own implementation while leaving the rest of the template mostly unchanged.
- Shopify (this repository)
- [BigCommerce](https://github.com/bigcommerce/nextjs-commerce) ([Demo](https://next-commerce-v2.vercel.app/))
- [Medusa](https://github.com/medusajs/vercel-commerce) ([Demo](https://medusa-nextjs-commerce.vercel.app/))
- [Saleor](https://github.com/saleor/nextjs-commerce) ([Demo](https://saleor-commerce.vercel.app/))
2023-07-18 00:14:17 +02:00
- [Swell](https://github.com/swellstores/verswell-commerce) ([Demo](https://verswell-commerce.vercel.app/))
2023-05-09 07:21:15 -07:00
## Running locally
You will need to use the environment variables [defined in `.env.example`](.env.example) to run Next.js Commerce. It's recommended you use [Vercel Environment Variables](https://vercel.com/docs/concepts/projects/environment-variables) for this, but a `.env` file is all that is necessary.
New Release (#371) * Custom Checkout Progress * Updates to Checkout * Custom Checkout Progress * Adding tabs * Adding Collapse * Adding Collapse * Improving Sidebar Scroll * Modif footer * Changes * More design updates * sidebar cart * More design updates * More design updates * More design updates * More design updates * Types * Types * Design Updates * More changes * More changes * More changes * Changes * Changes * Changes * New tailwind required changes * Sidebar Styling issues with Mobile * Latest changes - Normalizing cart * Styling Fixes * New changes * Changes * latest * Refactor and Renaming some UI Props * Adding Quantity Component * Adding Rating Component * Rating Component * More updates * User Select disabled, plus hidding horizontal scroll bars * Changes * Adding ProductOptions Component and more helpers * Styling updates * Styling updates * Fix for slim tags * Missmatch with RightArrow * Footer updates and some styles * Latest Updates * Latest Updates * Latest Updates * Removing Portal, since it's not needed. We might add it later I'd rather not to. * Removing Portal, since it's not needed. We might add it later I'd rather not to. * Sam backdrop filter * General UI Improvements * General UI Improvements * Search now with Geist Colors * Now with Geist Colors * Changes * Scroll for Mobile on IOs devises * LoadingDots Working (: * Changes * More Changes * Perf changes * More perf changes * Fade to the Nametags in the ProductCard * changes * Search issue ui * Search issue ui * Make sure to only refresh navbar and modals when required * Index revalidate * Fixed image issue * hide album scroll on windows * Fix scrollbar * Changing * Adding 404 with Layout * Removing Toast * Adding Assets * Adding Assets * Progress with LocalProvider * New productTag * Only images for the drop * changes * Empty SWRhooks * Adding Local Provider * Working local * Working view of a LocalProvider * More updates * Changes * Removed react-ticker * default to local if no env available * default to local if no env available * add missing `@` to css import * rewrite search rewrites to multiple pages * allow requests in getStaticProps to execute in parallel * make type import explicit * add a tsconfig.js file * use local provider in tsconfig.js * avoid a circular dependency * Saleor was not in the providers list * avoid circular dependency in bigcommerce * Adding more to the Local Provider (#366) * Adding more data * Adding more data * optimize assets (#370) * Optimize assets (#372) * optimize assets * remove assets * remove assets * cart enabled * Adding saleor * Changes with Webpack * Changes Co-authored-by: Luis Alvarez <luis@vercel.com> Co-authored-by: Tobias Koppers <tobias.koppers@googlemail.com> Co-authored-by: Shu Ding <g@shud.in>
2021-06-15 20:23:17 -03:00
> Note: You should not commit your `.env` file or it will expose secrets that will allow others to control your Shopify store.
1. Install Vercel CLI: `npm i -g vercel`
2. Link local instance with Vercel and GitHub accounts (creates `.vercel` directory): `vercel link`
3. Download your environment variables: `vercel env pull`
```bash
Next.js Commerce refresh. (#966) We're making some updates to Next.js Commerce. Everything prior to this commit marks what we're calling [`v1`](https://github.com/vercel/commerce/releases/tag/v1) as a point in time to be able to reference and still use going into the future. The current architecture of Commerce is a multi-vendor, interoperable solution, including: - [Shopify](https://shopify.vercel.store/) - [Swell](https://swell.vercel.store/) - [BigCommerce](https://bigcommerce.vercel.store/) - [Vendure](https://vendure.vercel.store/) - [Saleor](https://saleor.vercel.store/) - [Ordercloud](https://ordercloud.vercel.store/) - [Spree](https://spree.vercel.store/) - [Kibo Commerce](https://kibocommerce.vercel.store/) - [Commerce.js](https://commercejs.vercel.store/) - [SalesForce Cloud Commerce](https://salesforce-cloud-commerce.vercel.store/) All features can be toggled on or off, and it's easy to change between commerce providers. To support this, we needed to create a ["commerce metaframework"](https://github.com/vercel/commerce/blob/d1d9e8c4343e70d72df6e00ec95f6ea4efbb7c54/packages/commerce/new-provider.md) where providers could confirm to an API spec to add support for Next.js Commerce. While this worked and was successful for `v1`, we have different design goals and ambitions for `v2`. **What You Need To Know** - `v1` will not be updated moving forward. If you need to reference `v1`, you will still be able to clone and deploy the version tagged at this release. - `v2` will be shifting to be a single provider vs. provider agnostic. Other providers are welcome to fork this repository and swap out the underlying `lib/` implementation that connects to the selected commerce provider (Shopify). This architecture was chosen to reduce the surface area of the codebase, remove the intermediate metaframework layer for provider-interoperability, and enable usage with the latest Next.js and React features. - We will be sharing more about `v2` in the future as we continue to iterate before the marked release.
2023-04-17 23:00:47 -04:00
pnpm install
pnpm dev
```
2022-03-08 23:24:23 -05:00
Next.js Commerce refresh. (#966) We're making some updates to Next.js Commerce. Everything prior to this commit marks what we're calling [`v1`](https://github.com/vercel/commerce/releases/tag/v1) as a point in time to be able to reference and still use going into the future. The current architecture of Commerce is a multi-vendor, interoperable solution, including: - [Shopify](https://shopify.vercel.store/) - [Swell](https://swell.vercel.store/) - [BigCommerce](https://bigcommerce.vercel.store/) - [Vendure](https://vendure.vercel.store/) - [Saleor](https://saleor.vercel.store/) - [Ordercloud](https://ordercloud.vercel.store/) - [Spree](https://spree.vercel.store/) - [Kibo Commerce](https://kibocommerce.vercel.store/) - [Commerce.js](https://commercejs.vercel.store/) - [SalesForce Cloud Commerce](https://salesforce-cloud-commerce.vercel.store/) All features can be toggled on or off, and it's easy to change between commerce providers. To support this, we needed to create a ["commerce metaframework"](https://github.com/vercel/commerce/blob/d1d9e8c4343e70d72df6e00ec95f6ea4efbb7c54/packages/commerce/new-provider.md) where providers could confirm to an API spec to add support for Next.js Commerce. While this worked and was successful for `v1`, we have different design goals and ambitions for `v2`. **What You Need To Know** - `v1` will not be updated moving forward. If you need to reference `v1`, you will still be able to clone and deploy the version tagged at this release. - `v2` will be shifting to be a single provider vs. provider agnostic. Other providers are welcome to fork this repository and swap out the underlying `lib/` implementation that connects to the selected commerce provider (Shopify). This architecture was chosen to reduce the surface area of the codebase, remove the intermediate metaframework layer for provider-interoperability, and enable usage with the latest Next.js and React features. - We will be sharing more about `v2` in the future as we continue to iterate before the marked release.
2023-04-17 23:00:47 -04:00
Your app should now be running on [localhost:3000](http://localhost:3000/).
<details>
<summary>Expand if you work at Vercel and want to run locally and / or contribute</summary>
1. Run `vc link`.
1. Select the `Vercel Solutions` scope.
1. Connect to the existing `commerce-shopify` project.
1. Run `vc env pull` to get environment variables.
1. Run `pmpm dev` to ensure everything is working correctly.
</details>
## How to configure your Shopify store for Next.js Commerce
Next.js Commerce requires a [paid Shopify plan](https://www.shopify.com/pricing).
> Note: Next.js Commerce will not work with a Shopify Starter plan as it does not allow installation of custom themes, which is required to run as a headless storefront.
### Add Shopify domain to an environment variable
Create a `SHOPIFY_STORE_DOMAIN` environment variable and use your Shopify domain as the the value (ie. `SHOPIFY_STORE_SUBDOMAIN.myshopify.com`).
> Note: Do not include the `https://`.
### Accessing the Shopify Storefront API
Next.js Commerce utilizes [Shopify's Storefront API](https://shopify.dev/docs/api/storefront) to create unique customer experiences. The API offers a full range of commerce options making it possible for customers to control products, collections, menus, pages, cart, checkout, and more.
In order to use the Shopify's Storefront API, you need to install the [Headless app](https://apps.shopify.com/headless) in your Shopify store.
Once installed, you'll need to create a `SHOPIFY_STOREFRONT_ACCESS_TOKEN` environment variable and use the public access token as the value
> Note: Shopify does offer a Node.js Storefront API SDK. We use the Storefront API via GraphQL directly instead of the Node.js SDK so we have more control over fetching and caching.
<details>
<summary>Expand to view detailed walkthrough</summary>
1. Navigate to `https://SHOPIFY_STORE_SUBDOMAIN.myshopify.com/admin/settings/apps`.
1. Click the green `Shopify App Store` button.
![Shopify App Store](https://user-images.githubusercontent.com/446260/233220545-cb4c1461-ebc5-424e-a421-bf0d32044027.jpg)
1. Search for `Headless` and click on the `Headless` app.
![Headless](https://user-images.githubusercontent.com/446260/233220547-6d93b5ef-16c7-45db-99e7-13ae7e18eb39.jpg)
1. Click the black `Add app` button.
![Add app](https://user-images.githubusercontent.com/446260/233220550-a34c8bda-75a8-437a-9673-125f3794ff35.jpg)
1. Click the green `Add sales channel` button.
![Add sales channel](https://user-images.githubusercontent.com/446260/233220553-42d94a74-421d-4f8a-99ab-a95936b707a3.jpg)
1. Click the green `Create storefront` button.
![Create storefront](https://user-images.githubusercontent.com/446260/233220556-1eee15c4-a45d-446e-9f73-2e7c9f56b29c.jpg)
1. Copy and paste the public access token and assign it to a `SHOPIFY_STOREFRONT_ACCESS_TOKEN` environment variable.
![Pubic access token](https://user-images.githubusercontent.com/446260/233220558-5db04ff9-b894-40fe-bfba-0e92f26b8e1f.jpg)
1. If you ever need to reference the public access token again, you can navigate to `https://SHOPIFY_STORE_SUBDOMAIN.myshopify.com/admin/headless_storefronts`.
</details>
### Install a headless theme
When using a headless Shopify setup, you normally don't want customers to access any of the theme pages except for checkout. However, you can't totally disable the theme and a lot of links will still point to the theme (e.g. links in emails, order details, plugins, checkout, etc.).
To enable a seamless flow between your headless site and Shopify, you can install the [Shopify Headless Theme](https://github.com/instantcommerce/shopify-headless-theme).
Follow the installation instructions and configure the theme with your headless site's values.
<details>
<summary>Expand to view detailed walkthrough</summary>
1. Download [Shopify Headless Theme](https://github.com/instantcommerce/shopify-headless-theme).
![Download Shoify Headless Theme](https://user-images.githubusercontent.com/446260/233220560-9f3f5ab0-ffb4-4305-b4ee-2c9d33eea90f.jpg)
1. Navigate to `https://SHOPIFY_STORE_SUBDOMAIN.myshopify.com/admin/themes`.
1. Click `Add theme`, then `Upload zip file`.
![Upload zip file](https://user-images.githubusercontent.com/446260/233220561-7a53809e-0d95-45eb-b52f-3a52e3663a9c.jpg)
1. Select the downloaded zip file from above, and click the green `Upload file` button.
![Select and upload file](https://user-images.githubusercontent.com/446260/233220563-135fb9f7-2921-4189-8f17-3b1cc15c0ea6.jpg)
1. Click `Customize`.
![Customize theme](https://user-images.githubusercontent.com/446260/233220565-24b9c954-c18a-46f1-9db5-3d2a00040e48.jpg)
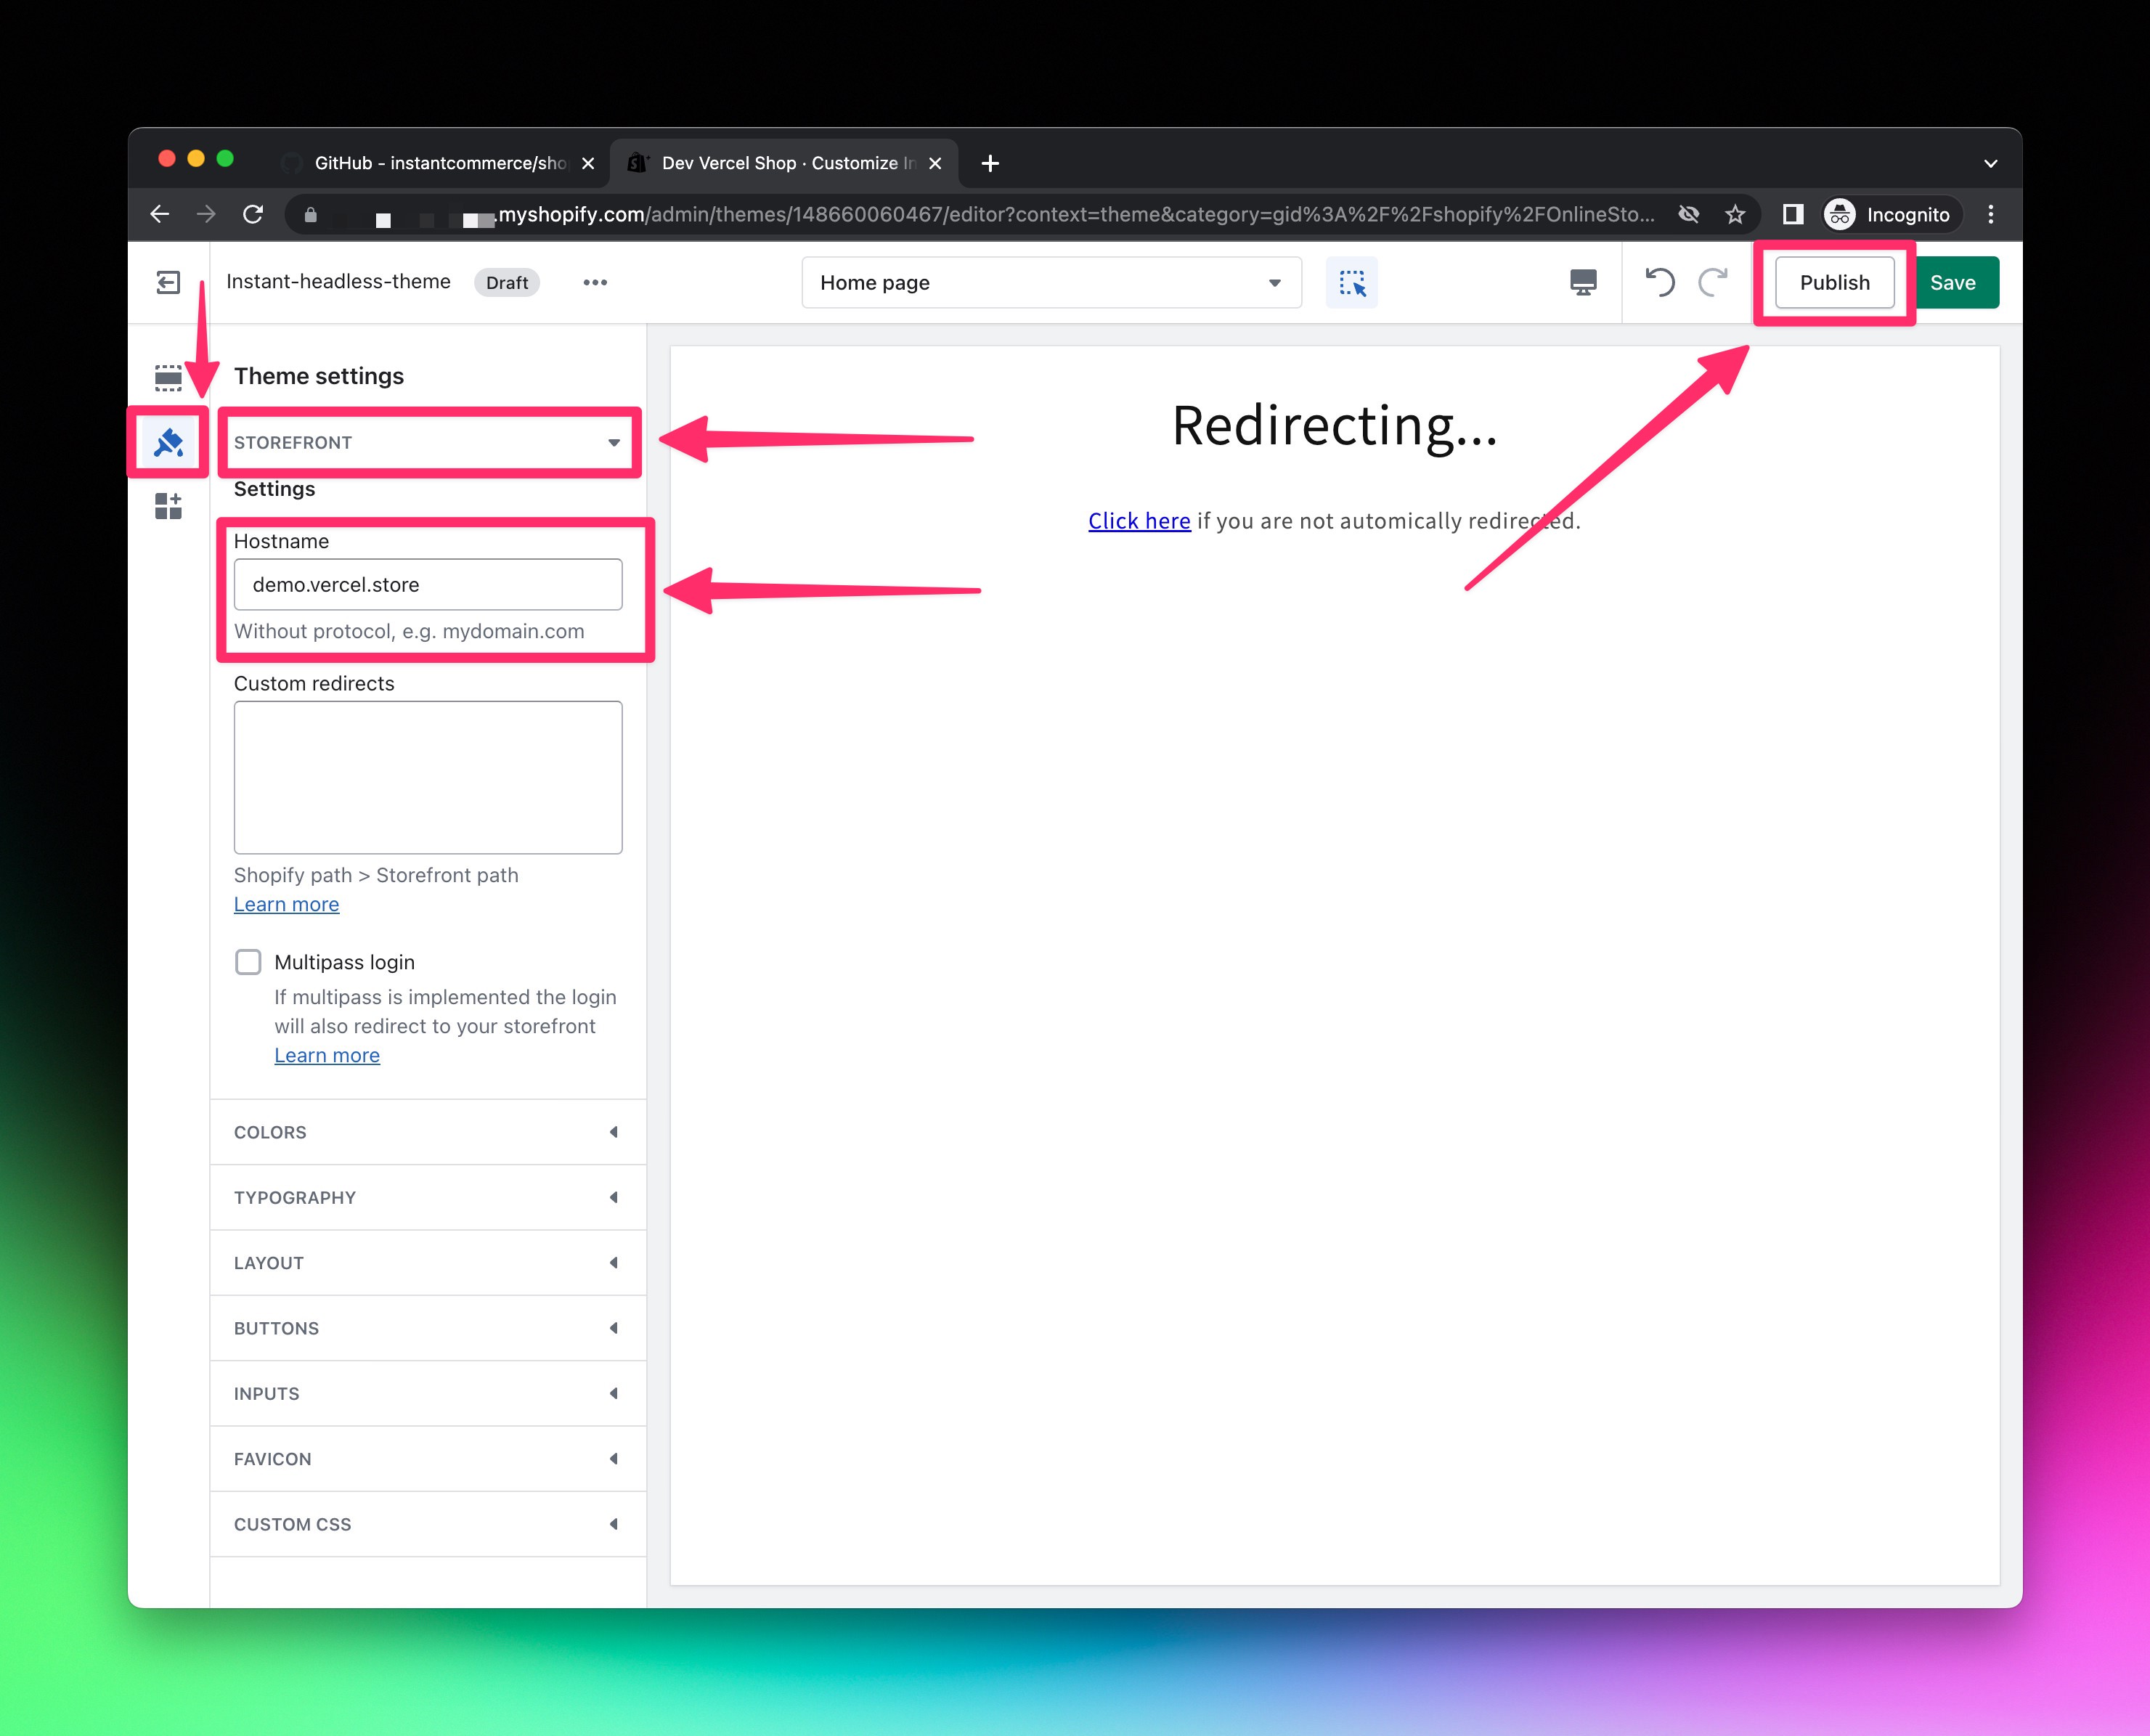
1. Click `Theme settings` (ie. the paintbrush icon), expand the `STOREFRONT` section, enter your headless store domain, click the gray `Publish` button.
![Set headless domain in theme settings](https://user-images.githubusercontent.com/446260/233220566-acaee14d-03f8-400d-a2a2-28e85eb5ecdc.jpg)
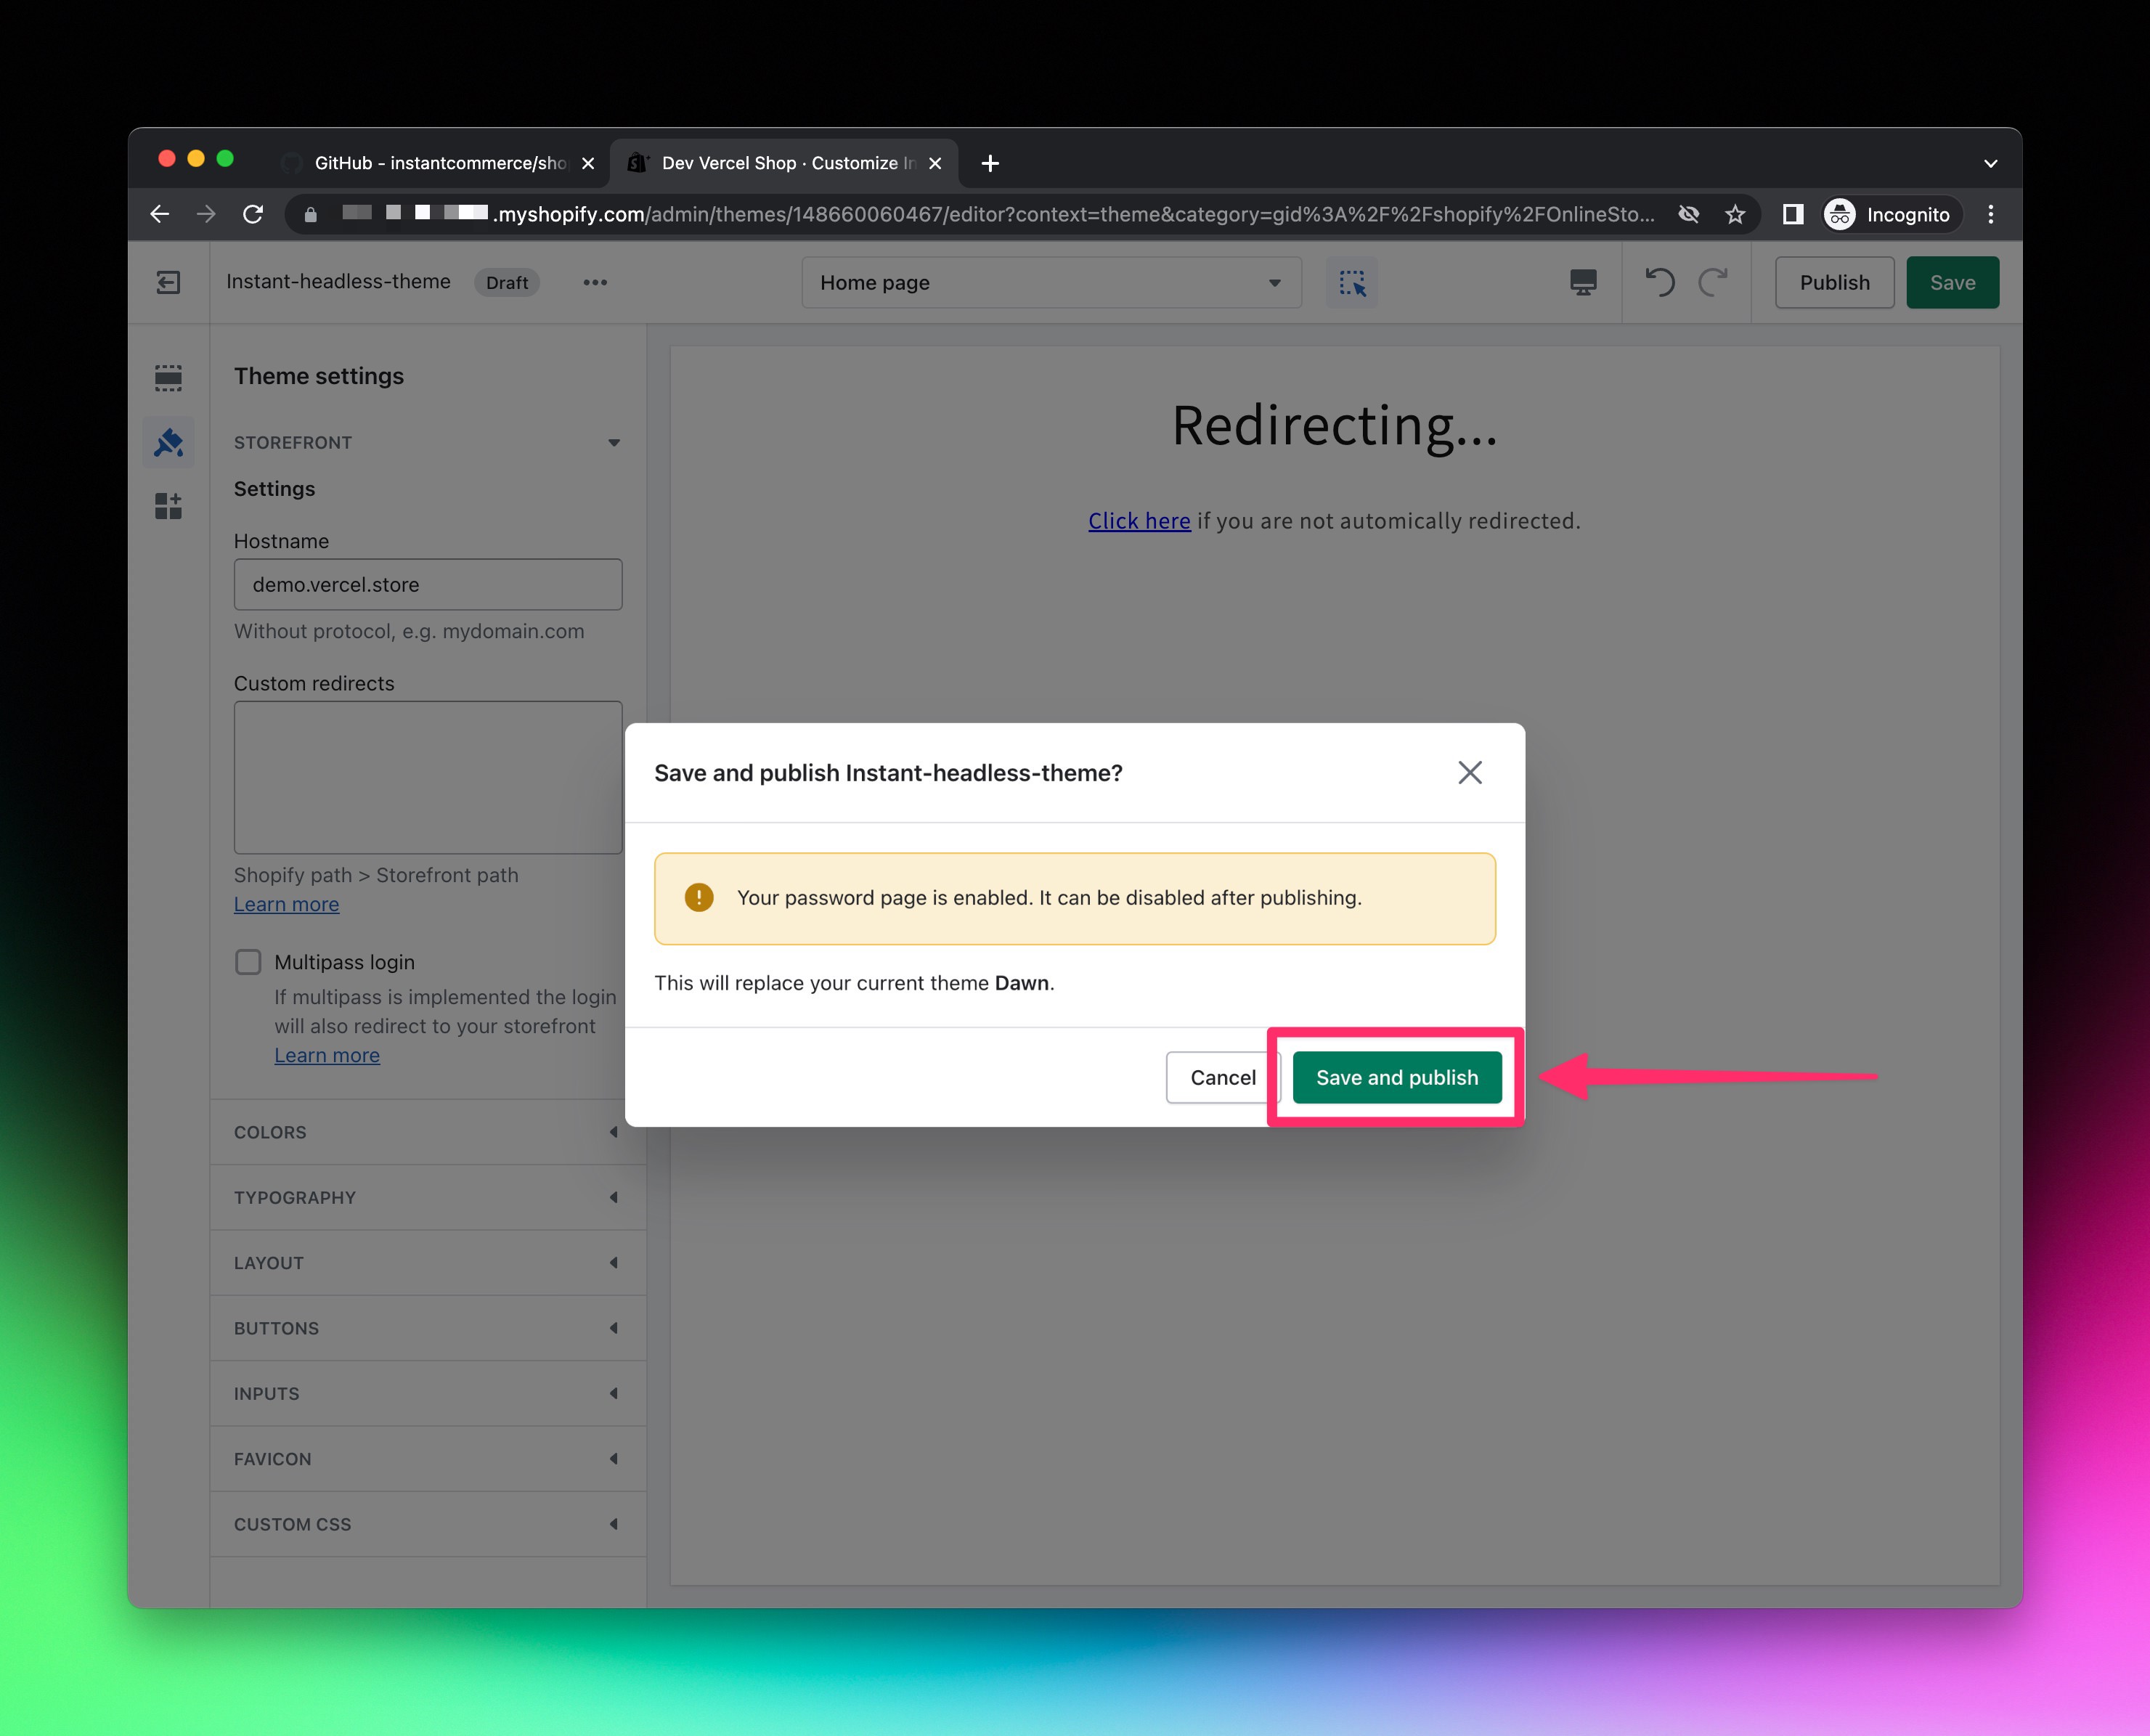
1. Confirm the theme change by clicking the green `Save and publish` button.
![Confirm save and publish](https://user-images.githubusercontent.com/446260/233220567-504d5bde-cfb9-426d-a264-f9a12d02af13.jpg)
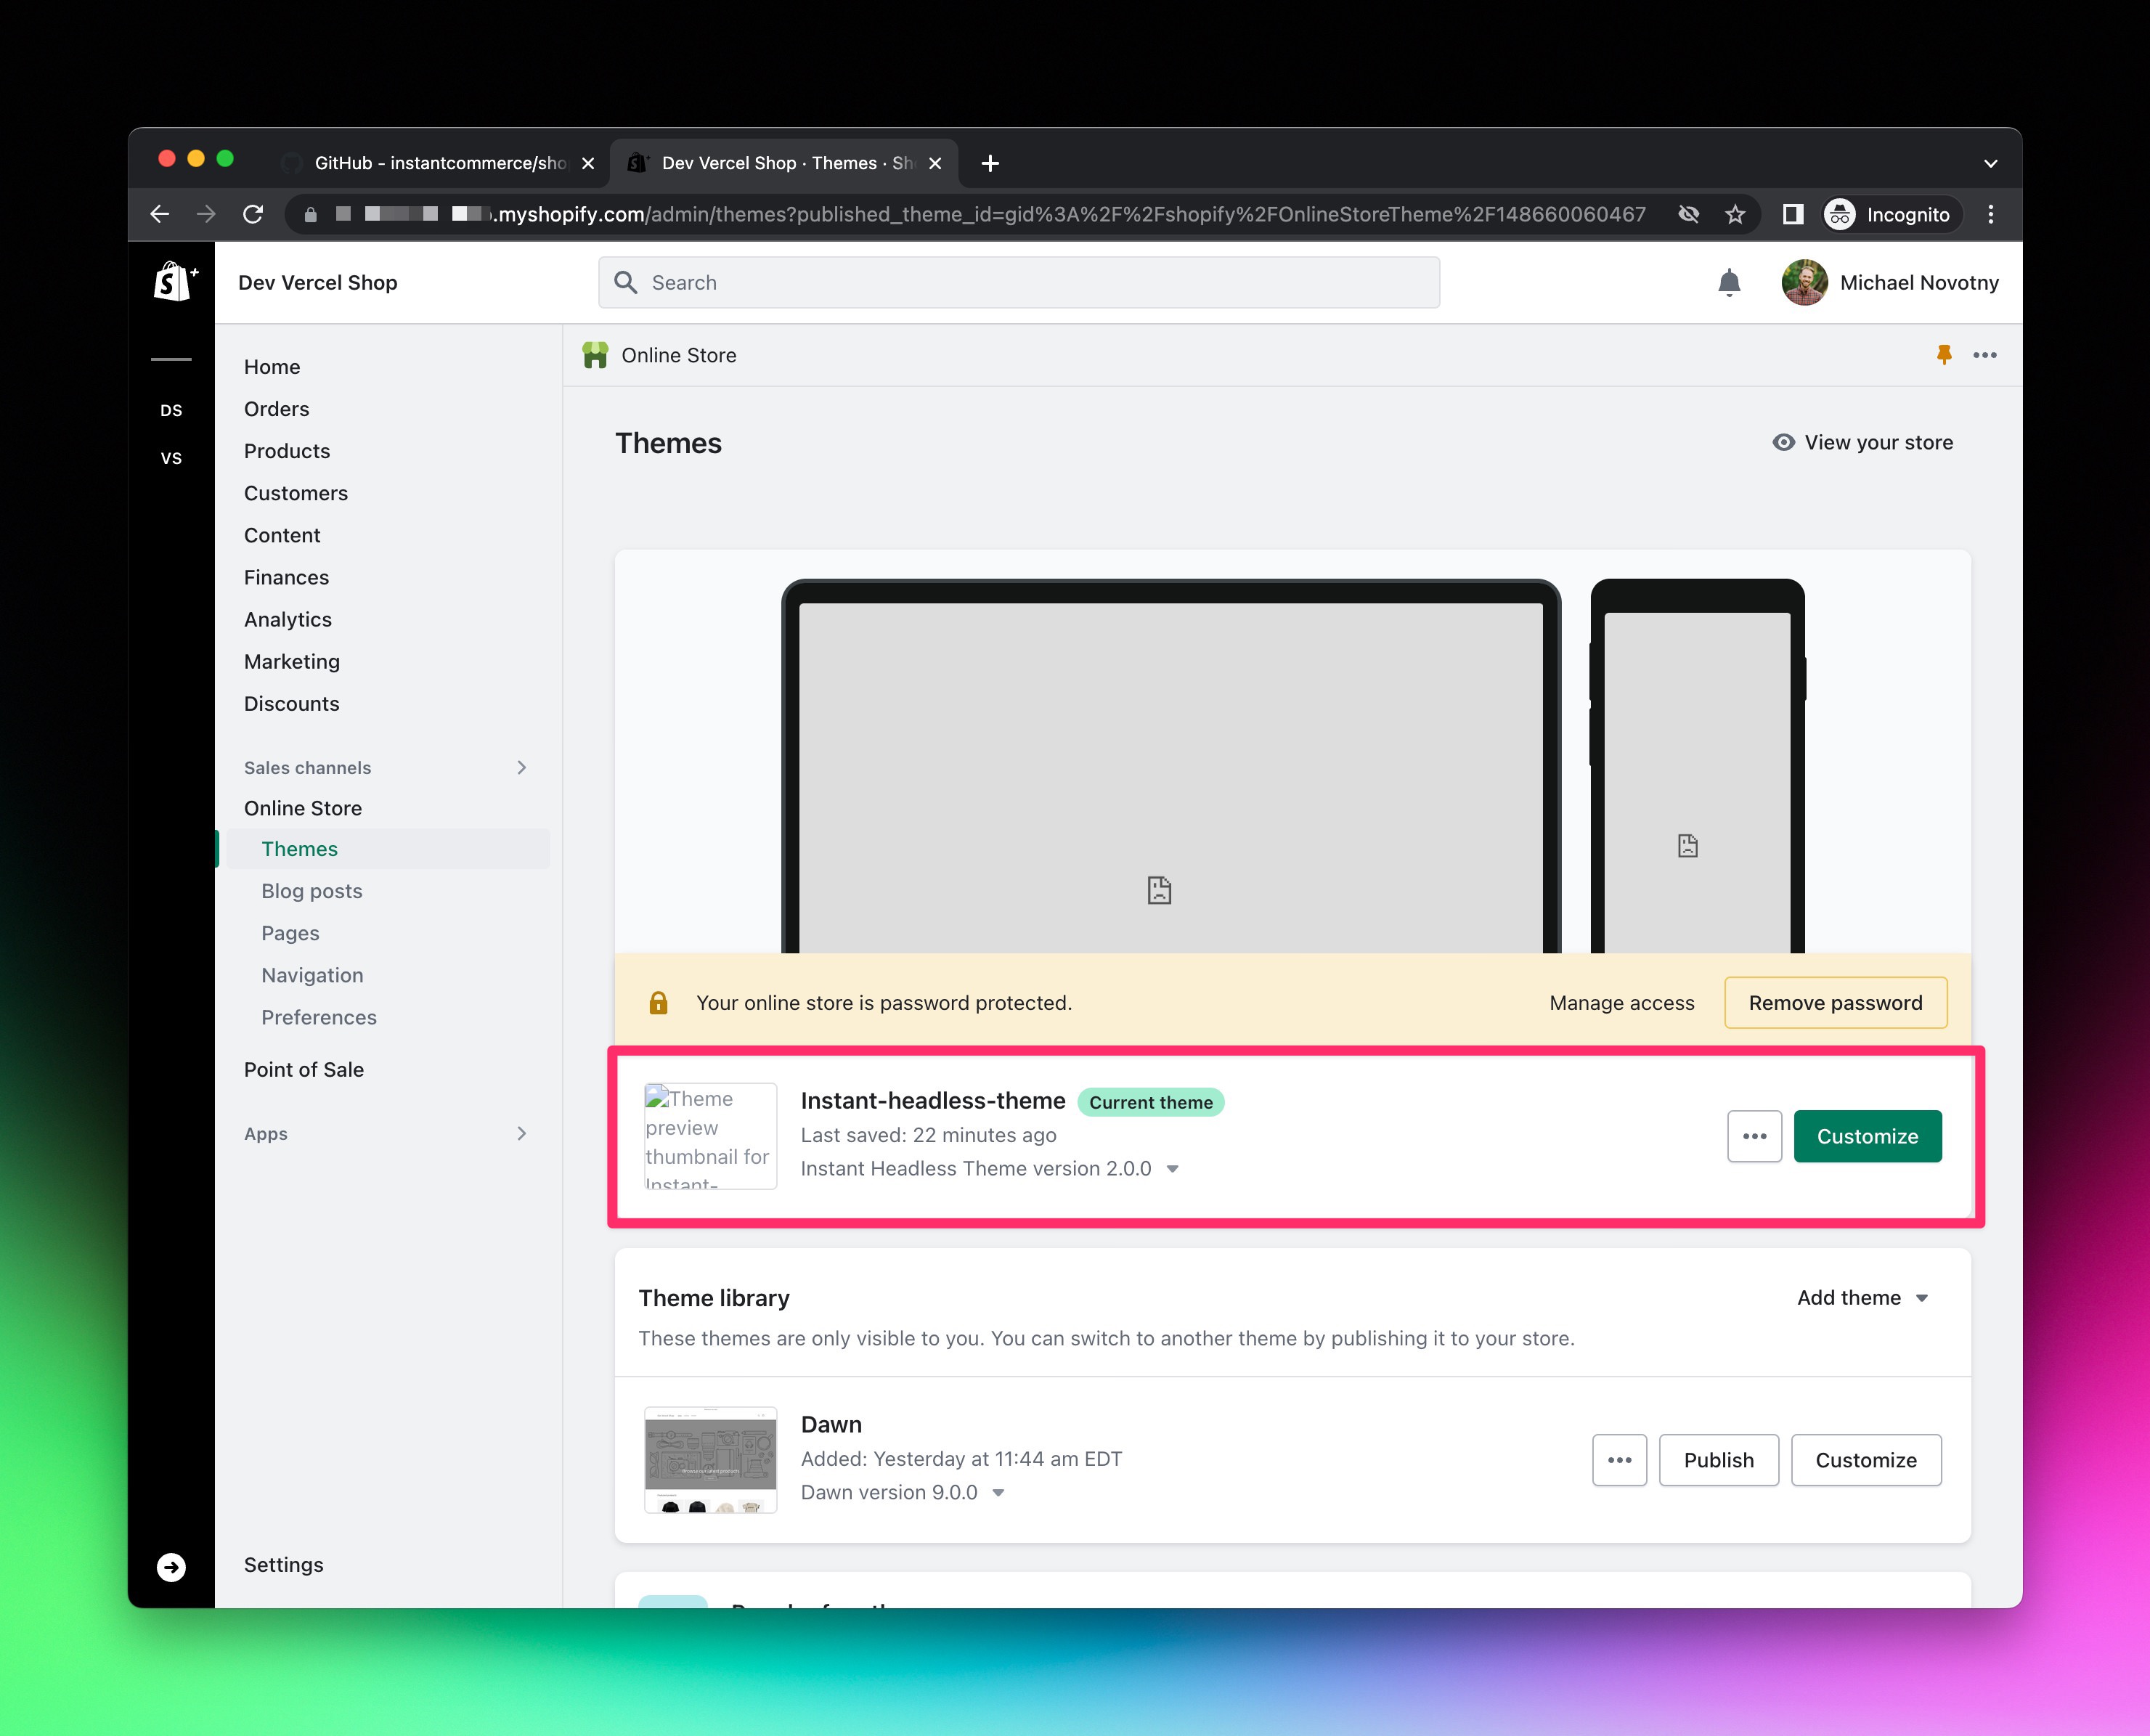
1. The headless theme should now be your current active theme.
![Headless theme is current and active](https://user-images.githubusercontent.com/446260/233220569-63cab2b4-241b-4bf1-9b5b-451daaeceb91.jpg)
</details>
### Branding & Design
Since you're creating a headless Shopify store, you'll be in full control of your brand and design. However, there are still a few aspects we're leaving within Shopify's control.
- Checkout
- Emails
- Order status
- Order history
- Favicon (for any Shopify controlled pages)
You can use Shopify's admin to customize these pages to match your brand and design.
<details>
<summary>Expand to view detailed walkthrough</summary>
#### Checkout, order status, and order history
1. Navigate to `https://SHOPIFY_STORE_SUBDOMAIN.myshopify.com/admin/settings/checkout`.
1. Click the green `Customize` button.
![Customize](https://user-images.githubusercontent.com/446260/233220530-9beda4b4-5008-440a-b923-9d196b722539.jpg)
1. Click `Branding` (ie. the paintbrush icon) and customize your brand. Please note, there are three steps / pages to the checkout flow. Use the dropdown to change pages and adjust branding as needed on each page. Click `Save` when you are done.
![Branding](https://user-images.githubusercontent.com/446260/233220534-e884d9fd-1a39-4f4d-9d09-163dde47c2e8.jpg)
1. Navigate to `https://SHOPIFY_STORE_SUBDOMAIN.myshopify.com/admin/settings/branding`.
1. Customize settings to match your brand.
![Branding](https://user-images.githubusercontent.com/446260/233220536-452b8802-9a1e-40f0-9a12-52b3dace84a5.jpg)
#### Emails
1. Navigate to `https://SHOPIFY_STORE_SUBDOMAIN.myshopify.com/admin/settings/email_settings`.
1. Customize settings to match your brand.
![Branding](https://user-images.githubusercontent.com/446260/233220538-13c83a9e-55f8-41e6-9b34-a39ee0848a8a.jpg)
#### Favicon
1. Navigate to `https://SHOPIFY_STORE_SUBDOMAIN.myshopify.com/admin/themes`.
1. Click the green `Customize` button.
![Customize theme](https://user-images.githubusercontent.com/446260/233220539-4869a6cd-f59f-4de6-8091-95ed81d2302d.jpg)
1. Click `Theme settings` (ie. the paintbrush icon), expand the `FAVICON` section, upload favicon, then click the `Save` button.
![Favicon](https://user-images.githubusercontent.com/446260/233220542-ac81b674-d86e-4172-ab38-c79d1ad1ff36.jpg)
</details>
### Configure webhooks for on-demand incremental static regeneration (ISR)
Utilizing [Shopify's webhooks](https://shopify.dev/docs/apps/webhooks), and listening for select [Shopify webhook event topics](https://shopify.dev/docs/api/admin-rest/2022-04/resources/webhook#event-topics), we can use [Next'js on-demand revalidation](https://nextjs.org/docs/app/building-your-application/data-fetching/revalidating#using-on-demand-revalidation) to keep data fetches indefinitely cached until certain events in the Shopify store occur.
Next.js is pre-configured to listen for the following Shopify webhook events and automatically revalidate fetches.
- `collections/create`
- `collections/delete`
- `collections/update`
- `products/create`
- `products/delete`
- `products/update` (this also includes when variants are added, updated, and removed as well as when products are purchased so inventory and out of stocks can be updated)
<details>
<summary>Expand to view detailed walkthrough</summary>
#### Setup secret for secure revalidation
1. Create your own secret or [generate a random UUID](https://www.uuidgenerator.net/guid).
1. Create a [Vercel Environment Variable](https://vercel.com/docs/concepts/projects/environment-variables) named `SHOPIFY_REVALIDATION_SECRET` and use the value from above.
#### Configure Shopify webhooks
1. Navigate to `https://SHOPIFY_STORE_SUBDOMAIN.myshopify.com/admin/settings/notifications`.
1. Add webhooks for all six event topics listed above. You can add more sets for other preview urls, environments, or local development. Append `?secret=[SECRET]` to each url, where `[SECRET]` is the secret you created above.
![Shopify store webhooks](https://github.com/vercel/commerce/assets/446260/3d713fd7-b642-46e2-b2ce-f2b695ff6d2b)
![Shopify store add webhook](https://github.com/vercel/commerce/assets/446260/f0240a22-be07-42bc-bf6c-b97873868677)
#### Testing webhooks during local development
The easiest way to test webhooks while developing locally is to use [ngrok](https://ngrok.com).
1. [Install and configure ngrok](https://ngrok.com/download) (you will need to create an account).
1. Run your app locally, `npm run dev`.
1. In a separate terminal session, run `ngrok http 3000`.
1. Use the url generated by ngrok and add or update your webhook urls in Shopify.
![ngrok](https://github.com/vercel/commerce/assets/446260/5dc09c5d-0e48-479c-ab64-de8dc9a2c4b1)
![Shopify store edit webhook](https://github.com/vercel/commerce/assets/446260/13fd397d-4666-4e8d-b25f-4adc674345c0)
1. You can now make changes to your store and your local app should receive updates. You can also use the `Send test notification` button to trigger a generic webhook test.
![Shopify store webhook send test notification](https://github.com/vercel/commerce/assets/446260/e872e233-1663-446d-961f-8c9455358530)
</details>
### Using Shopify as a CMS
Next.js Commerce is fully powered by Shopify in a truly headless and data driven way.
#### Products
`https://SHOPIFY_STORE_SUBDOMAIN.myshopify.com/admin/products`
Only `Active` products are shown. `Draft` products will not be shown until they are marked as `Active`.
`Active` products can still be hidden and not seen by navigating the site, by adding a `nextjs-frontend-hidden` tag on the product. This tag will also tell search engines to not index or crawl the product. The product is still directly accessible via url. This feature is great for "secret" products you only want to people you share the url with.
Product options and option combinations are driven from Shopify options and variants. When selecting options on the product detail page, other option and variant combinations will be visually validated and verified for availability, like Amazon does.
Products that are active and "out of stock" are still shown on the site, but the ability to add the product to the cart is disabled.
#### Collections
`https://SHOPIFY_STORE_SUBDOMAIN.myshopify.com/admin/collections`
Create whatever collections you want and configure them however you want. All available collections will show on the search page as filters on the left, with one exception...
Any collection names that start with the word "hidden" will not show up on the headless front end. The Next.js Commerce theme comes pre-configured to look for two hidden collections. Collections were chosen for this over tags so that order of products could be controlled (collections allow for manual ordering).
Create the following collections:
- `Hidden: Homepage Featured Items` -- Products in this collection are displayed in the three featured blocks on the homepage.
- `Hidden: Homepage Carousel` -- Products in this collection are displayed in the auto-scrolling carousel section on the homepage.
![Shopify collections](https://user-images.githubusercontent.com/446260/233220543-81896a2b-7085-4abc-a4f1-ce321e08b953.jpg)
![Shopify collection detail](https://user-images.githubusercontent.com/446260/233220544-ecd4c069-49fc-4a0b-8378-aa5e1b4b5257.jpg)
#### Pages
`https://SHOPIFY_STORE_SUBDOMAIN.myshopify.com/admin/pages`
Next.js Commerce contains a dynamic `[page]` route. It will use the value to look for a corresponding page in Shopify. If a page is found, it will display its rich content using Tailwind's prose. If a page is not found, a 404 page is displayed.
![Shopify pages](https://user-images.githubusercontent.com/446260/233221142-4dc3fa56-5256-4d84-b0a3-331ffb7d79b2.jpg)
![Shopify page detail](https://user-images.githubusercontent.com/446260/233247700-cbeaf917-fb67-49e9-b9b9-5ee8cb188639.jpg)
#### Navigation menus
`https://SHOPIFY_STORE_SUBDOMAIN.myshopify.com/admin/menus`
Next.js Commerce's header and footer navigation is pre-configured to be controlled by Shopify navigation menus. This means you have full control over what links go here. They can be to collections, pages, external links, and more.
Create the following navigation menus:
- `Next.js Frontend Header Menu` -- Menu items to be shown in the headless frontend header.
- `Next.js Frontend Footer Menu` -- Menu items to be shown in the headless frontend footer.
![Shopify navigation menus](https://user-images.githubusercontent.com/446260/233220571-33f9d5a8-1206-4ab4-ad79-83b4ca954331.jpg)
![Shopify navigation menu detail](https://user-images.githubusercontent.com/446260/233220573-5f03a51f-4100-461f-a696-f085856e391b.jpg)
#### SEO
Shopify's products, collections, pages, etc. allow you to create custom SEO titles and descriptions. Next.js Commerce is pre-configured to display these custom values, but also comes with sensible default fallbacks if they are not provided.
![Shopify SEO](https://user-images.githubusercontent.com/446260/233247701-0ff2a560-7949-4e6c-b3a8-8168ed6341f8.jpg)